The Original Pre-Viz Tool – A DIY Lens Angle Calculator


Some of my collection of traditional studio lens angle templates. The ones on the left are for long lenses while the ones on the right are wide-angle lens. The third from the left is a zoom lens template.

Some of my collection of traditional studio lens angle templates. The ones on the left are for long lenses while the ones on the right are wide-angle lens. The third from the left is a zoom lens template.


Pre-vis Before Previs

Before the term “Pre-visualization” ever existed, there was the lens angle template. These were a staple of any Hollywood studio Art Department and were used when laying out a set to determine camera angles, backing sizes needed, rear projection screens and planning back-projected set illustrations for the producer and director to approve sets long before there were 3D computer programs.

There was a time when a basic knowledge of optics and lenses was considered mandatory and was necessary not only because the Art Director would design the sets to be shot in a specific way but this information was needed when designing effects shots such as forced perspective sets, glass shots and the like.

Todd AO template

A template for a 100mm to 300mm zoom lens in the Todd AO format. Todd AO was an early 70mm film format with an aspect ratio of 2.20.

The templates were for a single lens, usually a prime lens, and were made using 1/8″ or 1/4″ thick plexiglas. The projection lines were scratched or engraved into the acrylic, sometimes by a Set Designer but other times they were made by the studio sign shop. Some of my examples are obviously done with a hand held engraving tool while others have been done with a lettering template and have inked letters.

Todd AO lens template

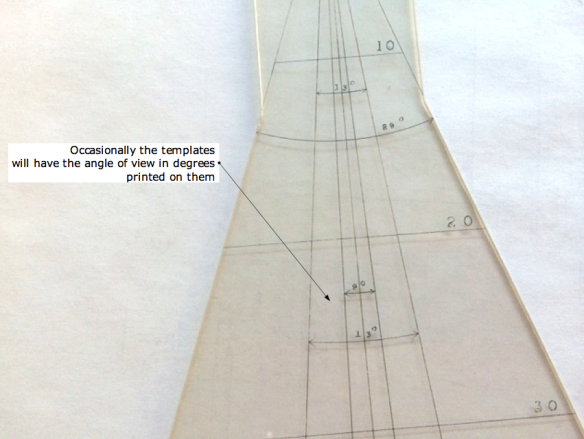
Each template had two sets of projection lines, one set for the horizontal plane (for use with a plan view) and another for the vertical plane, for use with scale room elevations. Most are made for use with 1/4″ scale drawings but they are accurate for any orthographic drawing because the angle is unaffected by the scale. Most will have markings to note the distances from the lens entrance pupil in 1/4″ scale.

angle of view

The “Quick View”

By the 1990’s, there were so many different formats and lens combinations most of us in the Art Department in Hollywood carried thick manila envelopes of acetates of the various focal lengths, but I always seemed to be missing one that I needed and I found some were inaccurate from being cloned so many times. In 1998 I designed a device that had all the available formats and prime lenses  so you could just dial up the one you needed. I redesigned it in 2008 to include the digital formats but sold out of them a year ago.

I stopped having them made since they were expensive but hated to see them become obsolete since they are still so useful. For a director, they are the perfect way to see if a shot is possible at a location or see the limitations of a particular lens on a set when you can’t rely on wild walls.

Making A Quick View

Yours won’t be on Lexan like the originals were but will be sturdy enough plus cheap enough to replace if it’s damaged or lost. Download the files below and take them to your nearest copy center and have both the dial and the nomen printed on clear acetate. They don’t have to be printed at exactly 100% but they should be at the same scale to each other. Then you just line up the center marks and use a compass point or push pin to pierce the centers, creating a pivot point in place of the brass rivet as in the photo above.

The diagrams from the original instruction manual will explain how to use them. You’ll note that I’ve added a feature that wasn’t on the originals, a protractor which will tell you the angle of a selected lens.

Quick View II User Manual_2

Quick View II User Manual_3

QuickViewII_nomen

QuickViewII_dial

P.S. – Your Rendering Software Is Obsolete

An article at PC Magazine.com last November talked about how real-time rendering is changing the movies, mainly in terms of how it affects the workflow and the time involved in creating animated films. Because of the advances in processor speeds and the continuing evolution of software programming, animators are beginning to be able to animate in real time. The giant rendering farms of the Far East may soon be a thing of the past.

Creating renders, at least for me, is a tedious affair that ends up eating hours of time while processing images, and renders ( pun intended ) my computer a slave to the rendering engine, useless for working on anything else.

The new wave in rendering software is for real-time execution with full motion and lighting effects as well as physical atmospheric effects like water, fog, etc.

While not cheap, there are a number of real-time, full motion options that cut the normal still-image render time from hours to seconds.

LumenRT

The least expensive option I’m aware of is LumenRT. This is a real-time rendering engine designed for use with Sketchup, but is currently being developed for use with other modeling software. Unlike the other programs I’ll discuss, there is a calculation process involved that does take more time but the advantage of this is that you can output what is called a LiveCube, which is an executable file you can send to anyone that they can navigate in and explore the model without the need for any software. Pretty neat. The downside is that once this is done, if you make any changes you need to recompute everything.

The program boast very accurate lighting and reflection effects and this affects the render speed. The company’s site advises that you may experience slower processing speeds if your model exceeds 40,000 square feet or 500,000 polys.

Normally price at $295, the program is currently on sale for $195 at their site. You can watch a promo film below, and read a review of it here.


Lumion

The next option is a program called Lumion, which was designed based on the object-oriented analysis approach of Quest 3D, a virtual reality program designed for 3D fly-throughs and simulations.

Lumion’s interface

Lumion is a true real-time rendering engine that can import nearly any 3D model. Instead of using ray-tracing technology like most other renderers, it uses a system more like those found in gaming systems to simulate light effects. This would seem to suggest that the specular effects and reflections are not accurate but a viewing of several sample videos of the product seems to suggest otherwise. Because of the way the program operates, objects in the background are rendered at lesser resolutions meaning it can handle models with millions of polys without bogging down.

The program is touted as having a short learning curve and is able to generate full motion renders in a fraction of the time it once took to do them in programs like Maya.

Lumion isn’t cheap by any means. The price of the basic program is about $1,900 with the pro version running about $3,700. There is a free version, which is limited and there is a trial version as well. It also runs only on the Windows operating system. Check out the amazing promo videos below and read the reviews here and here.

Lumion quick overview from Lumion on Vimeo.

Waterfall Lumion techpreview from Lumion on Vimeo.

Lumion demonstration from Lumion on Vimeo.

Twinmotion 2

Twinmotion 2 bills itself as “the render killer”. It was developed by an architectural film as an in-house application but was made available to the public. Like Lumion it is capable of handling huge models because of its Level Of Detail technology that renders distant objects with less detail and increases the poly count as you move closer to them.

Twinmotion 2 interface

Twinmotion seems to have more accurate geo-locating controls as well as sun controls, but Lumion is constantly changing so that may no longer be the case. Twinmotion does create excellent renders as seen below in this side-by-side comparison of a render to actual film of the location.

At $2900, Twinmotion 2 is in the same range as Lumion. Plus, there is a $850 annual subscription fee, similar to Revit. It’s hardly a purchase one could take lightly.

So what does this mean for the Art Department? Do we need full-motion renders? Considering that renders are becoming more and more common at each step of the design process, creating full-motion renders that can be done in a fraction of the time of traditional renders might become the norm.

Maybe that’s not such a bad thing. Maybe they could provide a good transistion step into the pre-viz process. Or maybe they’ll bring some of the pre-viz work back into the Art Department.

What do you think?