When recreating a period set from the 1800’s in particular, it’s difficult to really replicate the designs of the period because current wood moulding and millwork don’t allow for what was a common practice by designers and architects; true proportional design.
A moulding catalogue of today looks very different from the original moulding catalogues of the 1800’s. Not only because they contained a larger variety of profiles, but there was a large selection of different sizes for almost every profile that they offered.
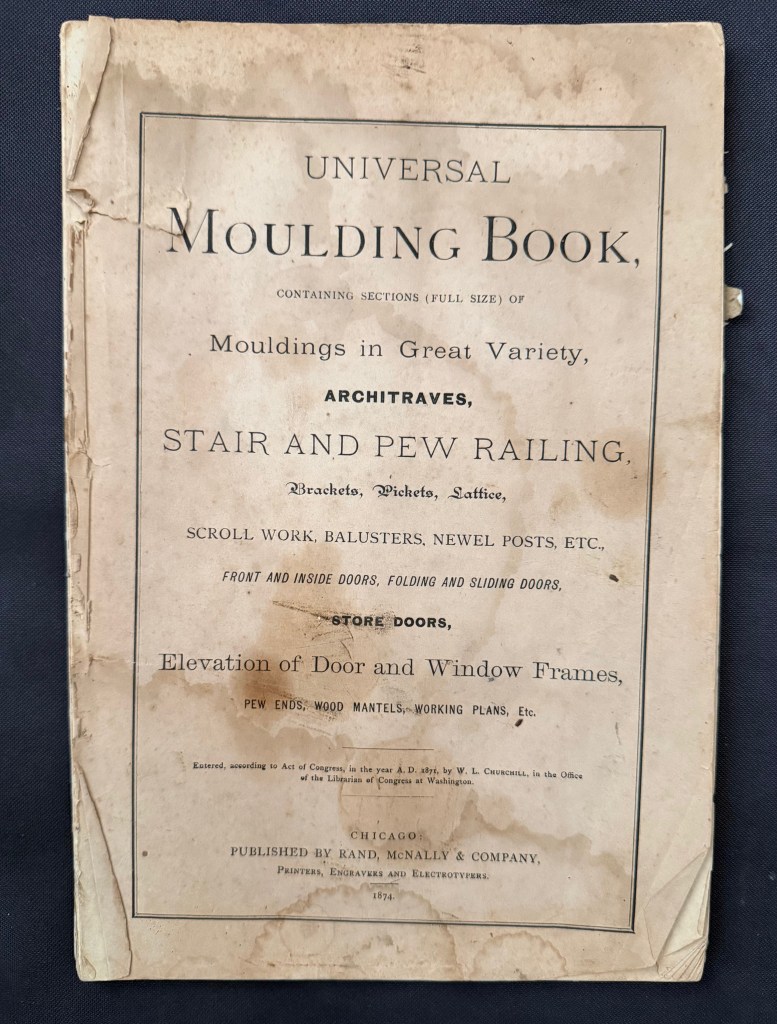
The cover of the 1874 Universal Moulding Book. One of the first millwork catalogues for wood moulding.
The oldest moulding catalogue that I own is the Universal Moulding Book from 1874. This catalogue shows over 650 moulding profiles in full size. It isn’t the first version. I know this because the catalogue states that 46 profiles have been phased out from a previous catalogue.
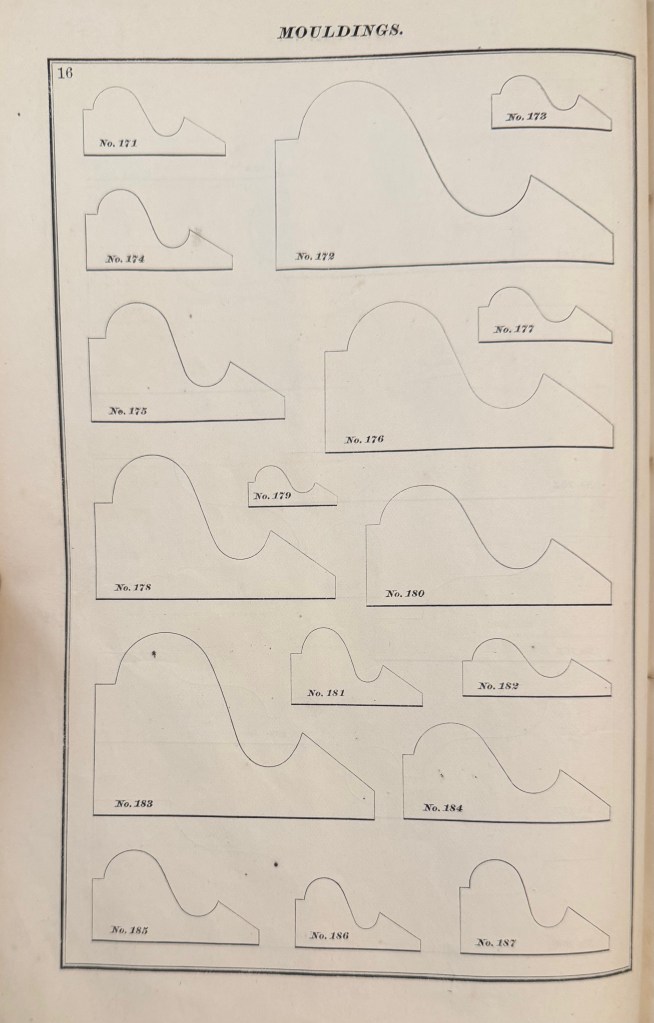
Here is a page of a profile known as a Quirked Greek Ogee and Bevel, a popular profile in the mid 19th century. Notice that there are 17 different sizes.
Why so many sizes?
Originally moulding or architectural enrichment wasn’t an afterthought. The mouldings were designed to be used in proportion to the openings that they surrounded.
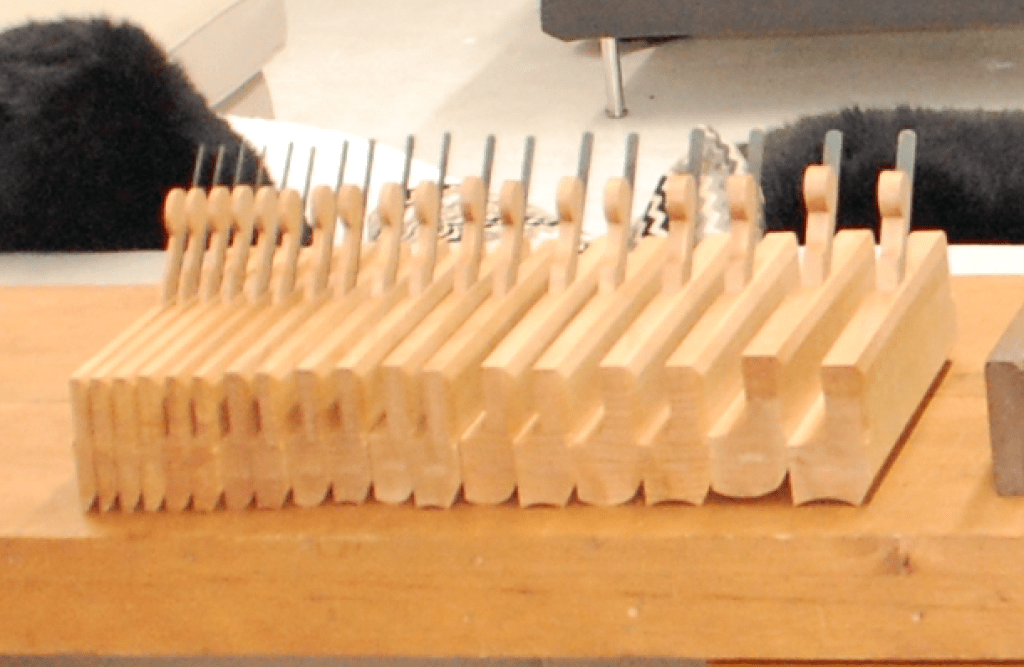
In America, and England, before the Industrial Revolution, wood mouldings were made by hand. (plaster ornament was as well). With a set of planes called Hollows and Rounds, an infinite variety of moulding profiles could be created. A set of planes were designed to created 1/6th diameter arcs in increments of 1/16th inch.
My working set of hollows and rounds
Various pattern books of the period laid out the formulas for creating the mouldings according to the width of the openings. In his 1827 version of Builder’s Companion, Asher Benjamin wrote that for a door or window, the proper proportion would be found by dividing the opening into eight parts and giving one to the width of the moulding, He noted that this formula would provide a different width for different widths of doors and windows, but said that it wasn’t good to have different widths of architraves in the same room.
Obviously he wasn’t around to comment on this house interior……….
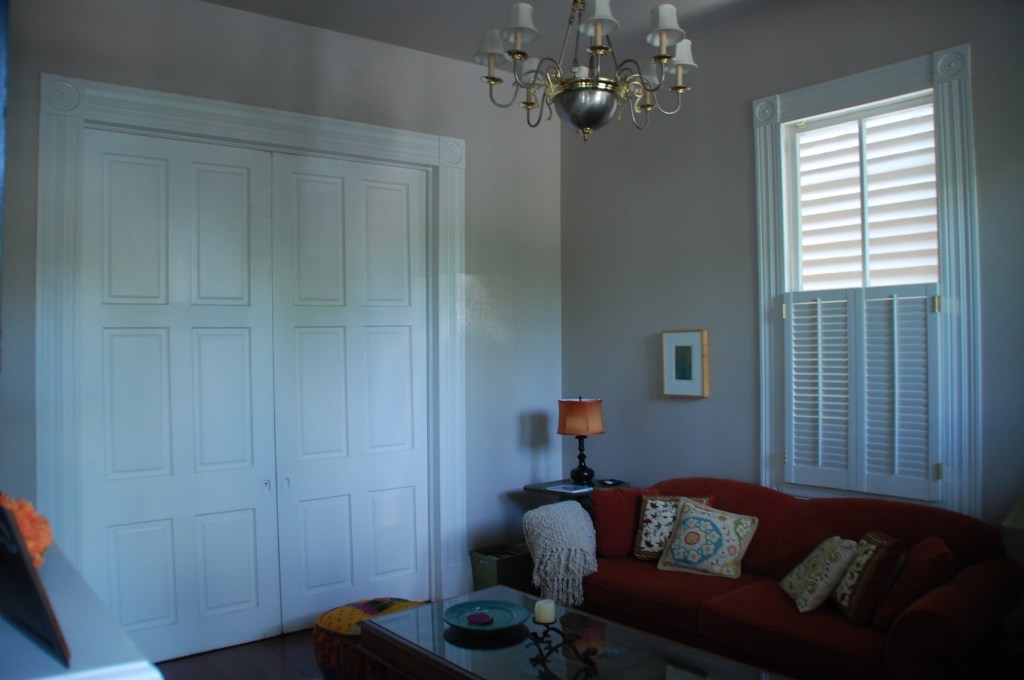
1839 New Orleans 4-bay townhouse
The pocket door opening in the photo is 6′ wide while the window width is about 3′ wide. You probably don’t notice that the architraves and the corner blocks are different sizes. The casing aound the doos is about 6″ in width while the window casing is less than 5″. The casing that frames the doors would look too large around the windows while the window casing width would be too diminished by the pocket door opening width.
Because the casing widths conform to the opening sizes, they look similar enough in size for their differences to be hard to recognize. The fact that they have proportional details within the overal common profile helps as well.
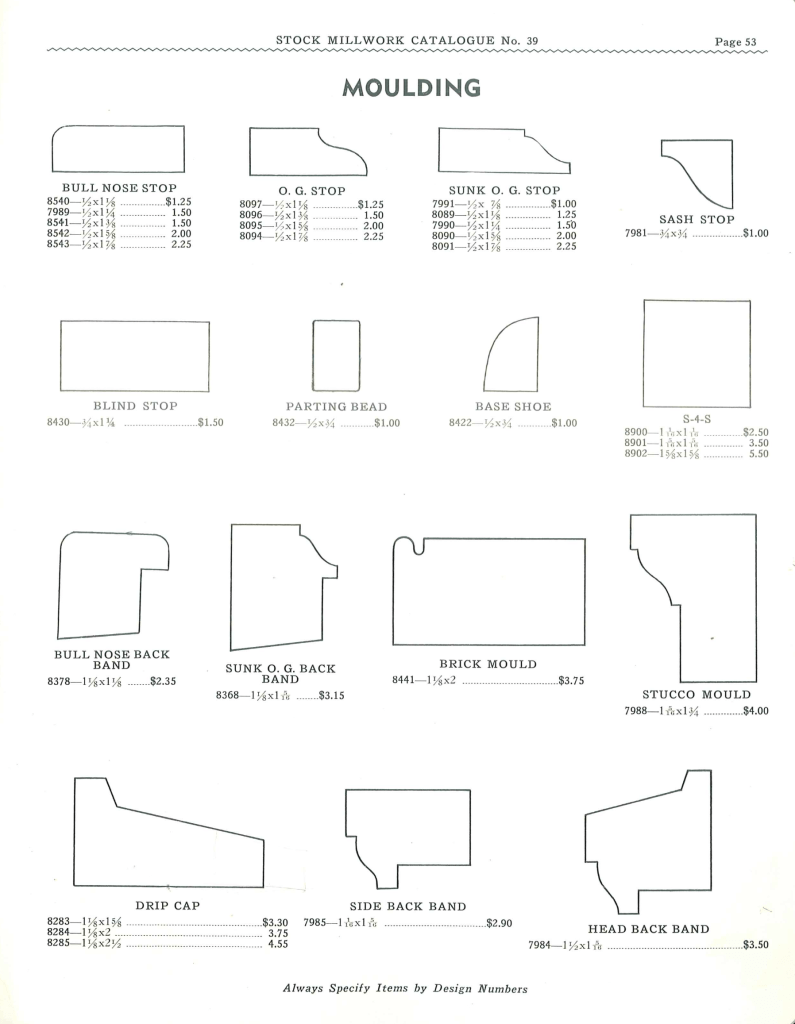
When the factory-made millworker begain to replace the on-site handmade moulding, they settled on a series of profile sizes that would fit most situations based on common door and window opening sizes.
This variety of sizes began to diminish into the 20th century until around 1940, when most catalogues began to offer only a few or even just one size of each profile.
A page from the 1939 Stock Millwork Catalogue
When you have a design that requires moulding profiles that aren’t available, (which is a common problem with 19th century Victorian designs), and you aren’t able to create a built-up moulding from available profiles, you may have to have a set of custom knifes made.
If you order enough linear feet of the mould, some shops will waive the knife fee as it adds to their selection of profiles. Be sure you look into custom knifes before you discount it as being too expensive. The job is also done by CNC now rather than hand-grinding. so the actual operation is not a bid deal.
Visualization skills are something anyone can learn. You just need to understand the basics of scale. Once you familiarize yourself with the basic scales that are used in design you can start to train your brain to correctly imagine anything and visualize it in an actual space.
I created the diagram above for a blog article I wrote about model scale. The article was about choosing a proper scale for physical models rather than digital ones.
The article didn’t clearly explain what ‘scale’ is or how it’s used in technical drawings. It also didn’t explain the difference between a ‘scale unit equivalent’ and a ‘ratio’, or how to use scales to help you with visualize objects in your mind.
Drawing Scales
Drawing in scale is a way to clearly communicate the size of something, either physical or imagined, in a visual way to help the viewer understand the proportions and size of an object. Either on its own or in relation to other objects.
Some drawing scales are noted by using a measured unit and comparing it to a life-size unit, such as 1/4″ = 1′-0″, which is a popular scale for architectural drawings.
This means that 1/4″ as measured on the drawing is 1′-0″ in actual size.
On the diagram above you’ll see the use of scale ratios. Note the ratio of 1:48 has the 1/4″ scale in parenthesis. The ratio scales can be interpreted as dividing the full size unit into that number of divisions. If you divide 1 foot into 48 segments, each of those segments would be 1/4″ long. So, a drawing with a ratio of 1:96 would be the same as 1/8″=1′-0″. A scale of 1″=1′-0″ would be a ratio scale of 1:12, as there are 12 inches in a foot.
Look at your shoe. If you are an average size person, the length of your shoe is about 1 foot long (28 to 30cm if you use the metric system). If you wanted to draw the outline of the sole of your shoe in, let’s say 1/2″=1′-0″ scale, that would be an equivalent ratio of 1:24. 12 inches divided into 24 parts would each be 1/2″ long.
If you use the metric system you’re in luck. You don’t have to deal with a silly fractional system and you use a strictly ratio system for drawing scales.
Analog Is Best
A scale of 3/4″=1′-0″ is a very common scale for drawing architectural details, but not for designers who mainly work in the theater. Because of tradition, in the theatrical world, such as Broadway, the standard size of plans and elevations is 1/2″+1′-0″.
A detail of an elaborate doorway will obviously look much larger when drawn at the 3/4″ scale than at 1/2″ scale. If you are used to looking at details in one scale, the same details will look ‘wrong’ in the smaller or larger scale.
I worked with a designer who asked me to not draw details in 3/4″ scale because he was used to visualizing designs full-size while looking at them in 1/2″=1′-0″ scale. Seeing them in a larger scale was disconcerting for him while visualizing.
As far as visualizing in scale, seeing a drawing printed on paper is better than looking at it on a computer screen every time. In terms of viewing images on a computer screen, the screens will lie to you every second of every day, in all kinds of ways, particularly in regards to size comparisons.
Imagine you’re looking at a drawing of sofa that is drawn in 1/2″ scale, or 1:50 in metric, on a computer screen. On your desk is a drawing of a room plan in 1/4″ scale, or 1:25 in metric. If the sofa drawing was on paper you could easily convert the sofa in your mind to the smaller scale to imagine how it would fit in the room.
If the sofa drawing is on a screen, how can you be sure if the scale is correct? You can’t. Even if the software is telling you that the image is being presented in a scale that is true to the stated size, most people could not make the visual transformation unless they were very experienced in doing it.
The Packets
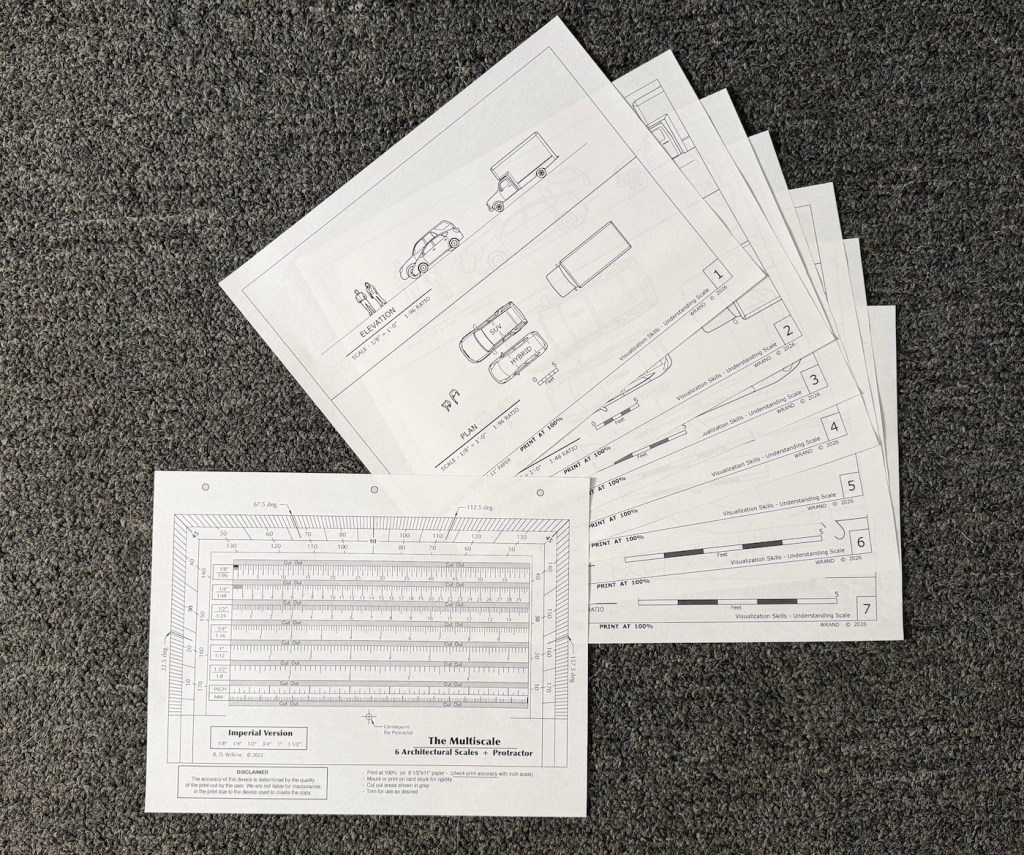
You can download the Visualization Chart packets from the links below. If you’re in the States, you want to download the packet marked “Imperial units”. If you’re anywhere else in the world that uses the non-fractional, uncomplicated, easy-to-use measuring system known as Metric, be sure to download that one.
The packet with Imperial /foot/inch scales contains 8 sheets with 5 scales: 1/8″, 1/4″, 1/2″, 3/4″, and 1″. There is also a copy of my Multiscale in the event that you don’t own an architects scale.
Print these all at 100% on letter size paper. Be sure that the print setting is at 100!
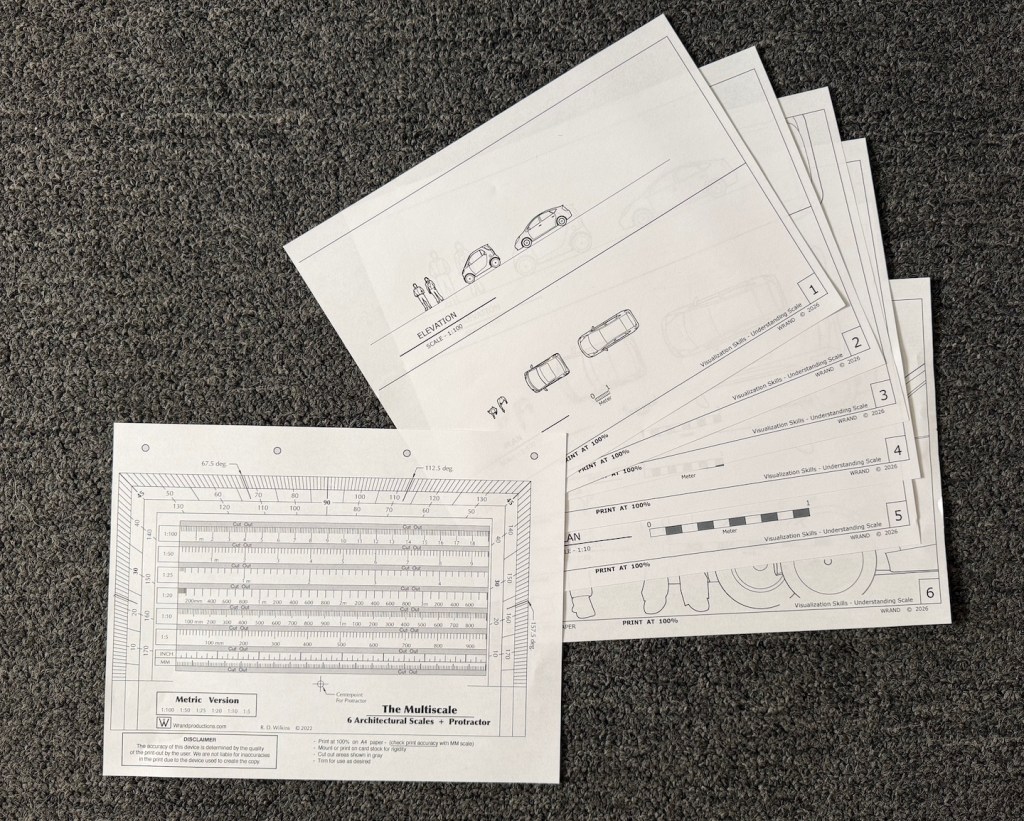
The metric packet contains 7 sheets in 4 scales: 1:100, 1:50,1:20, and 1:10. The seventh sheet is a Multiscale in metric. The Multiscale includes the 1:25 ratio which I didn’t include in the diagrams. That ratio doesn’t seem to be much used anymore. Let me know if that isn’t the case.
Print them all on A4 paper at 100%.
Using The Diagrams
Prepare The Multiscale
Print it out at 100% and check the lower scale markings against a known ruler or measuring tape to be sure it is printed correctly.
Cutout the gray areas for ease of measurement. You can also glue it to a piece of cardstock or a file folder to make it stiffer.
Exercise #1
Get familiar with the different scales. Examine the way objects look in the Plan view from above as opposed to the Elevation views from the sides. Does either view make the object, either the people or the vehicles seem different in scale?
How do they compare to each other? Place one scale sheet beside another and notice how the perceived distance caused by the smaller scales affects your perception of their proportions differently than the larger scales.
Exercise #2 – Thinking Vertically
Pick an object that’s relatively large in size such as a sofa, a piano, TV in your room. Now using the scale on the Multiscale, draw the object on the scale Elevation sheet next to the people or the vehicle.
Notice its proportion and size compared to the things on the sheet. Does it seem smaller or larger in comparison than what you visualized in your mind before to drew it?
Take a measuring tape and measure a wall of your bedroom or living room, and draw it in scale on a sheet or another piece of paper. Now look at a framed picture or mirror or wall hanging from another room or another location. Try to imagine it on your wall. measure the piece and draw it in scale on the scale wall drawing. How does it look? Does it take up the same space that you imagined it would when you visualized it on your wall?
Exercise #3 – Thinking Horizontally
Measure your bedroom or another space of your house. Now try to visualize one of the vehicles on the scale sheets appearing inside your house. Using the Plan view of the 1/4″ sheet or the 1:50, draw the floor plan of that room in the chosen scale using the Multiscale. Using pencil, you can draw the space right on the scale sheet. Does the vehicle fit in the space you measured? If it does, does the space around it seem to be the same as what you imagined, or is the space larger than what it feels like when you are standing in it?
Exercise #4 – The Teleporter In Your Head
Take the scale floor plan you’ve drawn of your room and go to a store where they have furnishings. Now look around at things like sofas, large TVs, or beds. Take a tape measure with you or use the measurements they provide at the store. Imagine them in the space.
Test your power of scale conversion by estimating the area of the floor the objects would take up. Draw them on the plan with a pencil. You will eventually be able to estimate foot or metric increments visually on a scale drawing. In 1:50, the width of the tip of a finger is about 1 meter in scale. In 1/4″ scale, the width of a finger is about 3 scale feet. The width of a thumb is 4 feet.
When you get home, test your guess. How close were you?
One of the reasons that I wrote the Wrand Film Glossary was to record many of the obscure film and entertainment industry terms that get passes down orally but are never recorded.
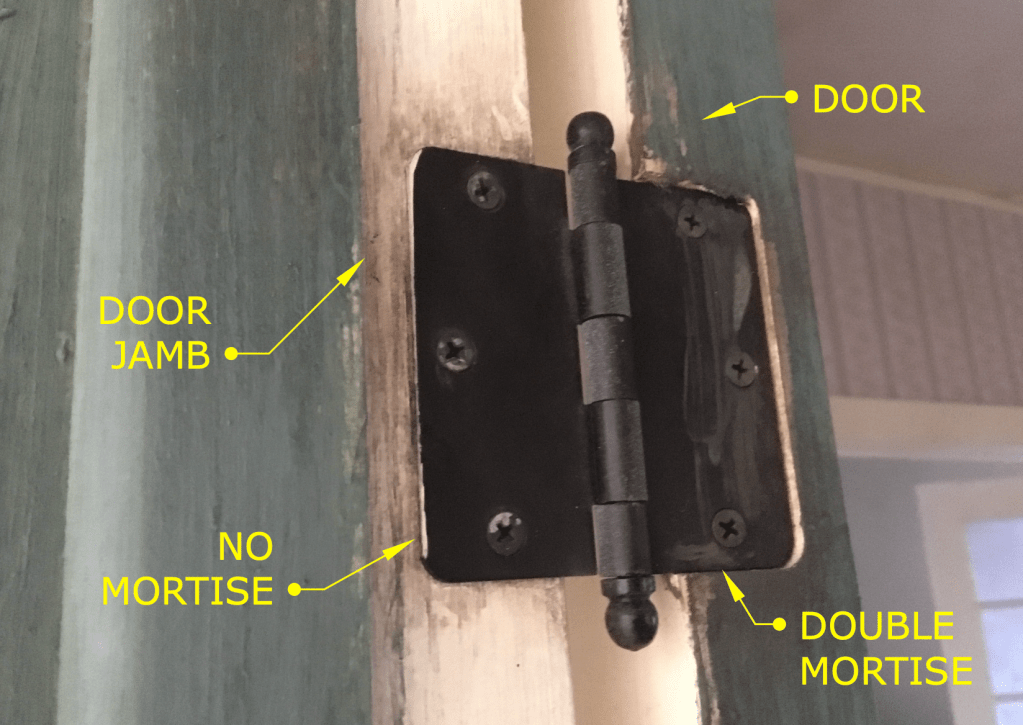
Art department and set construction lingo is usually not included in the typical film glossary, and “Double dap” is one of those odd terms that you will hear used by Prop Makers* but have probably never had it explained.
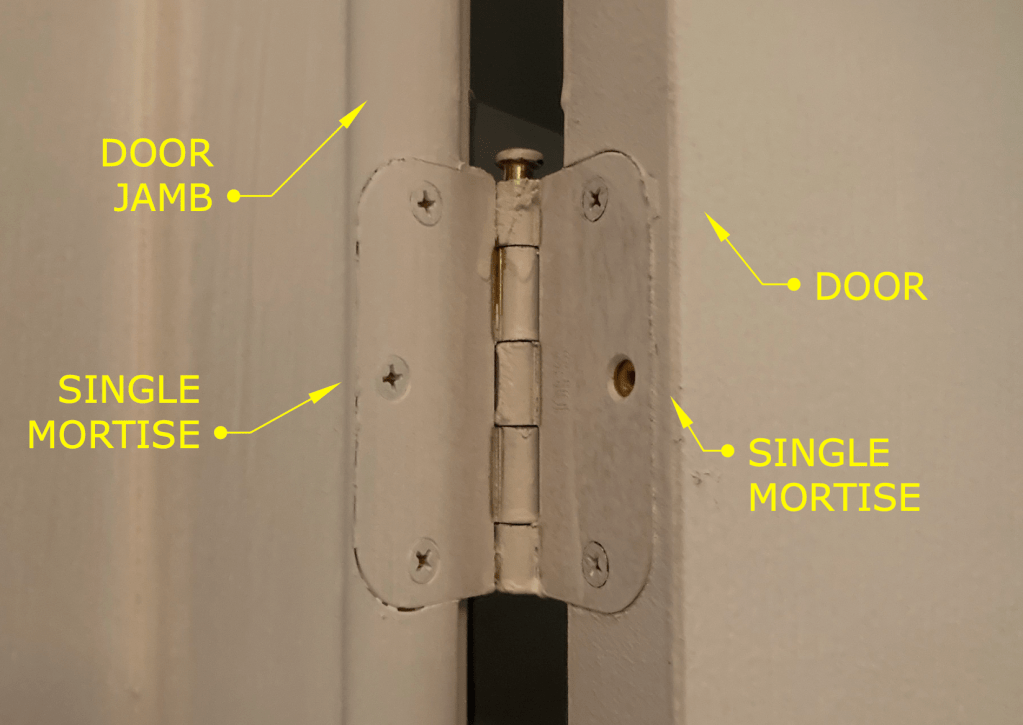
The term refers to how the hinges of a door on a stage set are to be installed. Normally the installation of hinges for a door involves creating mortises in the door stile and the jamb that match the thickness of the hinge leaves. That’s referred to as a “single dap” installation. (Note: this is specifically for doors in North America or the UK. Many Continental European doors are half-overlay and don’t use the type of leaf hinges that are standard here.)
Typical hinge installation – referred to as a Single Dap
A “double dap” installation involves creating a mortise in the door which is twice as deep as usual and not making a mortise in the jamb, as shown below.
Example of a Double Dapped hinge
The diagram below is a side-by-side plan view showing both types of installation.
So what’s the purpose of this? Well, this is something that is more typical on sets for a broadcast show than on sets for a feature film.
One advantage is speed. We tend to build sets at a pretty brisk pace, sometimes building an entire set over a weekend. For example, if you have a set with six doors, that means you need to install 18 hinges, which means routing 32 mortises. With a double dap installation you cut that number in half.
Another advantage is if you are redressing a set and need to change out the door of an opening for a different door. With a standard installation, you will need to patch and fill and re-rout three mortises. Instead you just need to fill some screw holes.
This is also the case if you need to change the swing direction of a door at the last moment. (Good luck prying off and repositioning that door stop.)
Double dapping has fallen out of favor lately. Production Designers don’t like the look of it for one thing. (Along with Phillips head screws on a period hinge!) They tend to stick out particularly when the hinges are a contrasting color from the jamb or if the wood is painted a light color and the hinges have a dark laquer/black finish. In some instances this condition can either visually hide the extra mortise depth or accentuate it.
Also, notice the round corners on the hinges in the photos. Round corner hinges are a 20th century invention to speed up production. Once machinery, i.e. routers, was being used for mortising, it became a lot faster to create hinges with leaves that didn’t require squaring off the mortise corners as was necessary for period, square hinges. Round corner hinges come in 1/4″ and 5/8″ radius corners, so be aware of what radius size they are if you’re choosing hinges for a door that has already been mortised.
Note: Prop Maker is a designation for a union stage carpenter in Los Angeles to differentiate them from a ‘civilian’ carpenter. They are trained it building theatrical scenery of all types and historical periods and specialize in creating scenery for film productions. They are more similar to cabinet makers than a typical carpenter and are skilled in construction techniques and methods that would baffle most people outside the entertainment industry.
You’ve probably never thought about how sound can affect your stage set. Beyond trying to not create an environment that would drive the sound recordist mad, you usually don’t think about odd acoustic anomalies that might pop up that you never intended to happen. Like echoes.
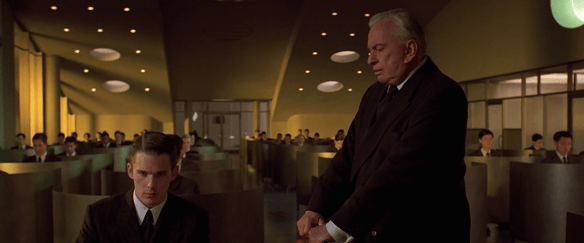
Computer Hall set – Gattaca – Columbia Pictures 1997
Yeah, echoes will bite you in the ass if you’re not careful.
On the main set for the 1997 film Gattaca, just such an anomaly occurred, and it was the cinematographer who ended up saving the day.
And what does the cinematographer have to do with sound problems? Keep reading.
The Computer Hall set was designed by Production Designer Jan Roelfs and was inspired by the real-life location that he and Director Andrew Niccol chose for the film. The actual building chosen for the exterior of the Gattaca Aerospace Corporation was the Marin County Civic Center in California, designed by Frank Lloyd Wright. The art department flew to Marin and surveyed the interior details so that they could be matched for the set on stage, which was in a warehouse in Playa Vista.
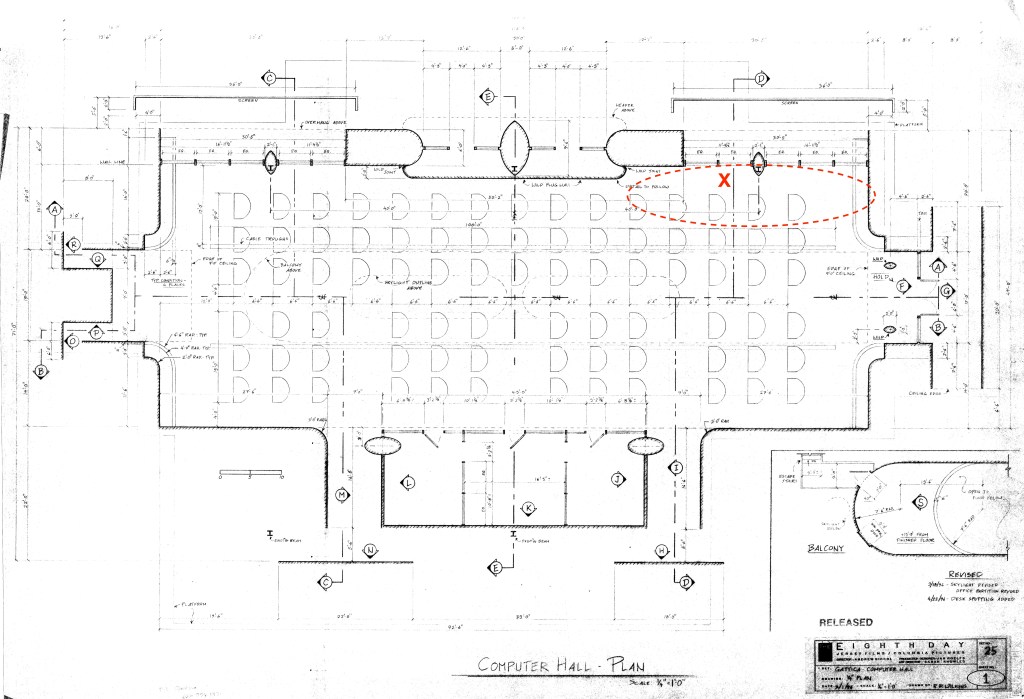
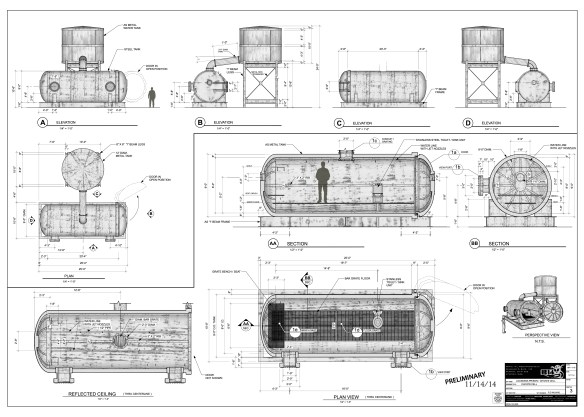
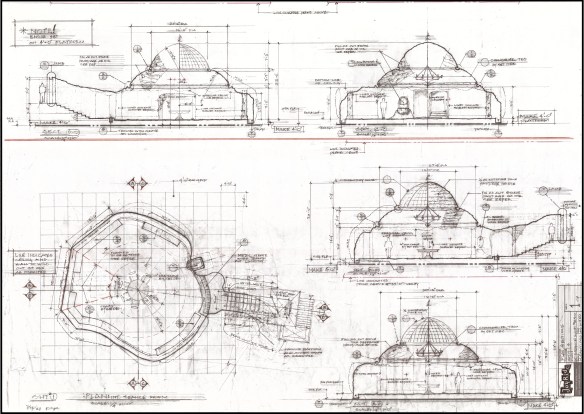
The building they had leased made for an odd sound stage, but its size made it large enough to build the sets for the film in. There were the normal problems you deal with in a structure that was never designed to be a sound stage: support posts at regular intervals, a ceiling that is not nearly as high as those in an actual sound stage. On the plan below, you can see where the oval columns were designed to hide two of the building’s I-beam columns.
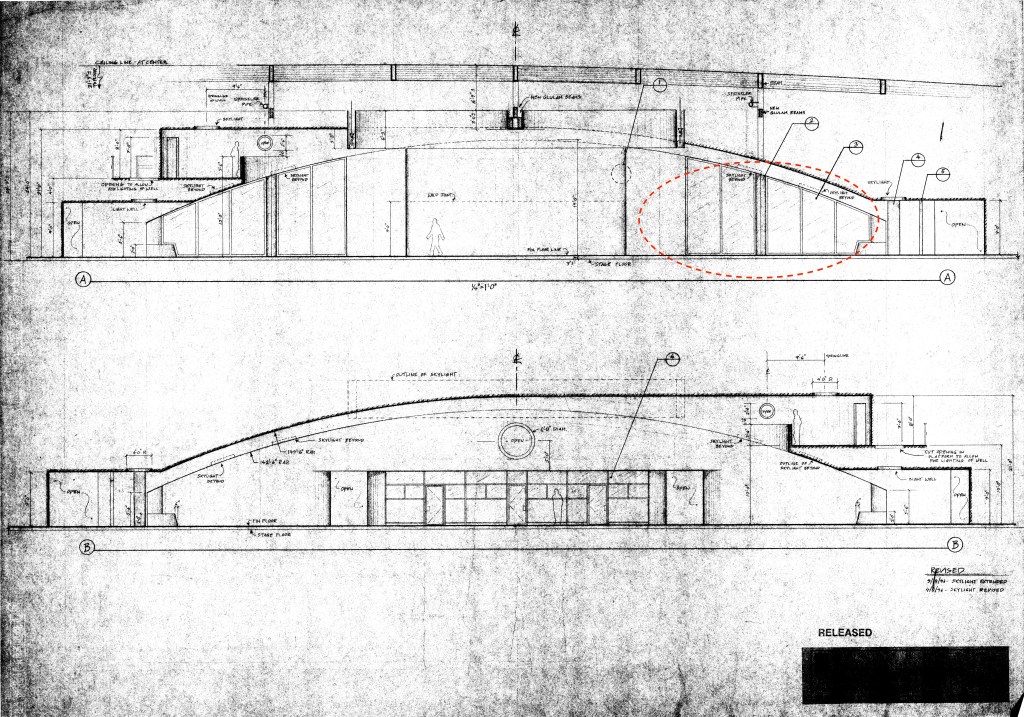
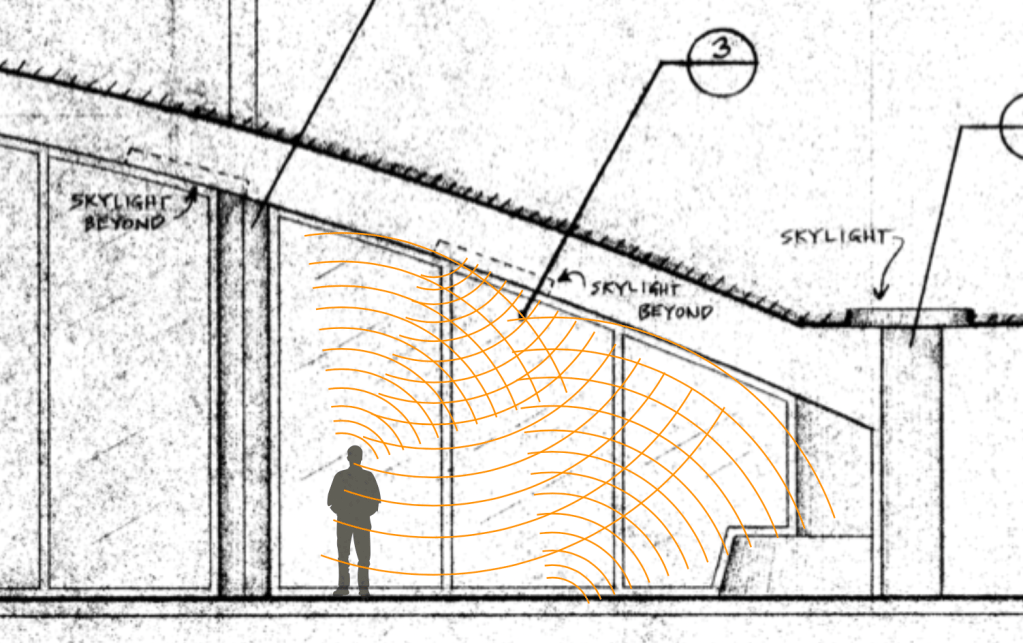
These are my drawings of the plan and elevations of the set with the areas of the sound problems circled.
(One note: on the title block, you’ll notice it reads “Eighth Day”. This was the original title of the film. In pre-production, the producers learned that there was a French movie of the same name that was going to be released, and a name change was required. The writer and director Andrew Niccol decided that he would create a new title using the four letters used to identify the nucleobases of DNA: GATC.)
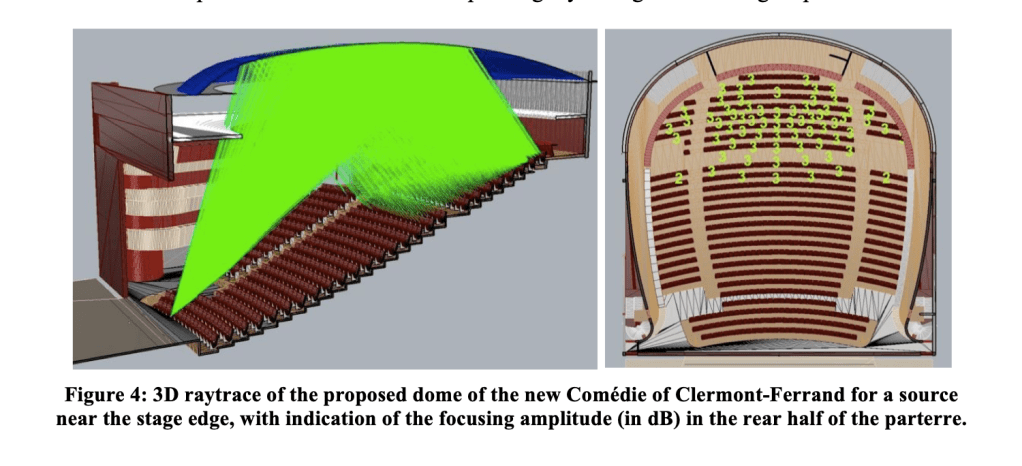
Turns out, theater designers had known about the sound reflective effects of elliptical and parabolic ceilings for years, as most of the western world designed theaters in the mode of the typical Italian horseshoe layout plan.
A presentation at the 2017 International Congress On Sound was focused on this phenomenon.
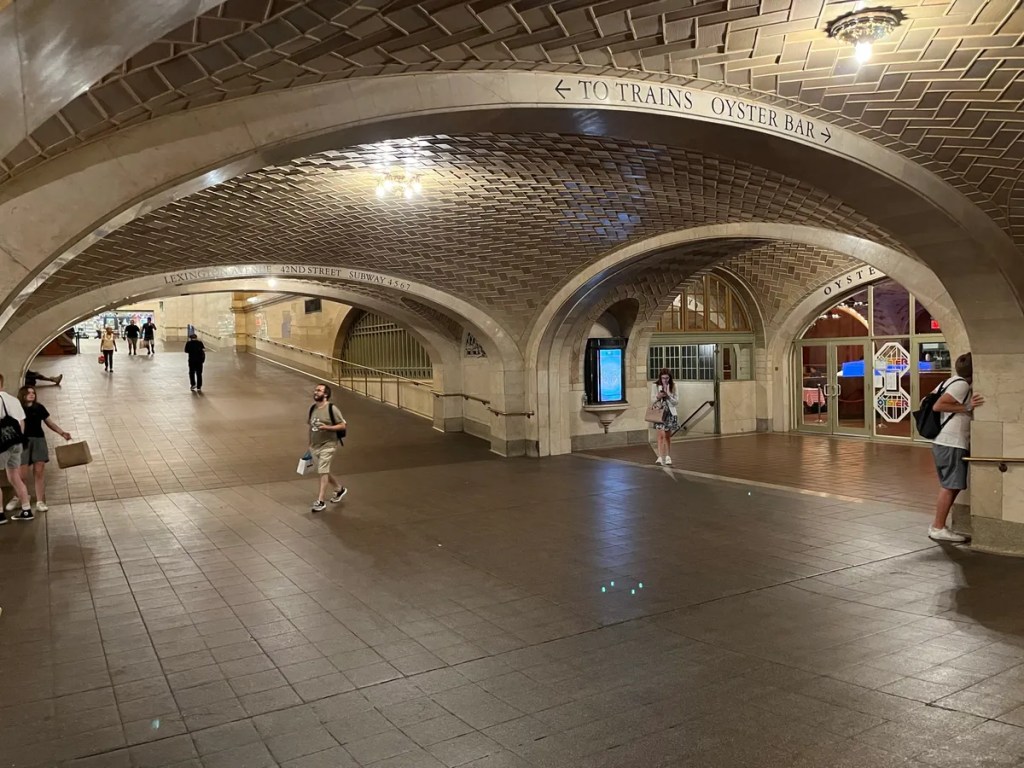
In New York City’s Grand Central Station, there is a ‘whispering gallery’ or acoustic vortex. This is an architectural phenomenon created by a number of configurations, in this case, a vaulted ceiling in the subway entrance under the terminal. A person standing in one corner of the hall intersection can whisper into the corner and the sound travels over the curved surface of the ceiling and can be heard by a person standing in the opposite corner.
New York Grand Central Station
I discovered the echo one day when I was walking the set and stopped at the point in question. I saw a gnat and clapped my hands together to kill it. That’s when I heard the strange echo. Horrified, I clapped again and there was the same echo. I clapped a third time, just as Jan was walking through the set. He stopped and frowned. “Don’t do that!’, he said.
I think what was happening was that the area beneath the lower section of the ceiling of the set created a flutter echo, which was enhanced by the smooth ceiling surface. The two large skylights didn’t seem to affect this echo.
There was no carpeting or fabric to dampen the sound which would have eliminated this effect.
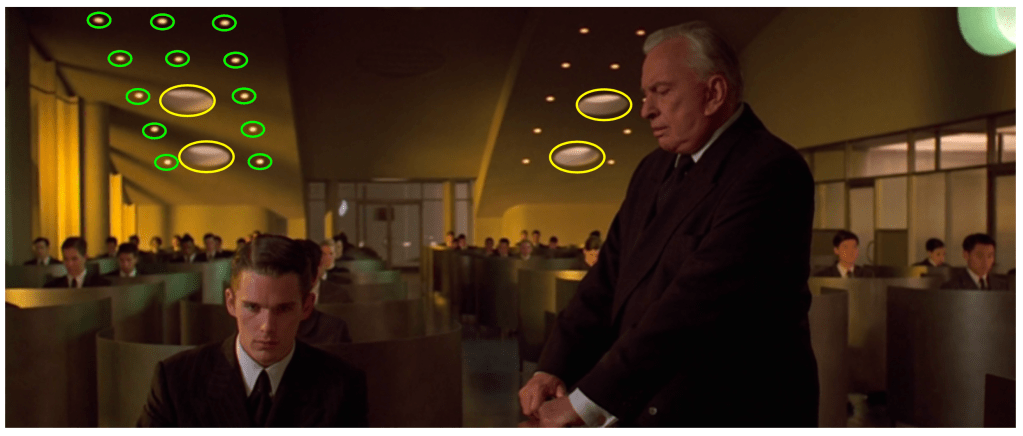
The solution came for the most part when the cinematographer, Slawomir Idziak, told us that he needed more practical lights in the set. This required creating dozens of new openings in the lower sections of the ceiling. These holes interrupted the acoustic waves and the echo disappeared. With the addition of the desks and the background actors, the sound reflection was minimal.
The photo below shows the original skylights in yellow, with the new lights circled in green.
The look of construction drawings for film and television has changed a lot over the years, particularly now that most drawings are done digitally with computers rather than by hand.
While many current drawing styles now incorporate photo-textures, shadows, and icons to add life to drawings beyond what is typical of architectural drawings, it’s hard for them to match the aesthetics of hand drawings.
CAD drawing from 3D model – photo textures applied
Having started as a pencil draftsman I guess I do have a bit of a personal bias, but the unique style of each person on a hand-drafted drawing was immediately recognizable to people who knew their work.
Before digital illustrations and renders of 3D models, hand-drafted drawings had to serve as a design sales tool as well as instructions for scenery construction.
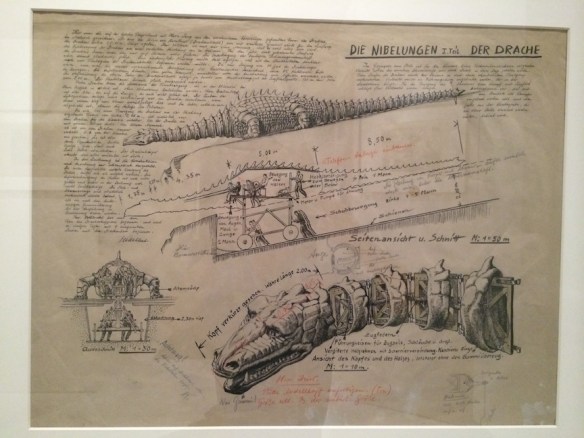
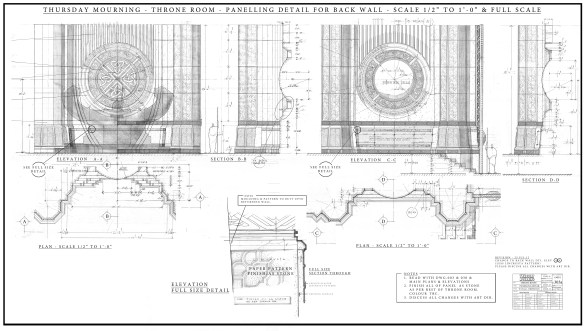
Here are some shots of a set design by Erich Kettlehut in 1923 for the UFA film, Die Nibelungen, for the scene where Siegfried kills the dragon.
The drawing was displayed as part of an exhibition of artwork from the UFA silent film period of the 1920s and 30s at the Los Angeles County Museum of Art in 2014. The drawing is from the collection of La Cinématiquè Française in Paris, France.
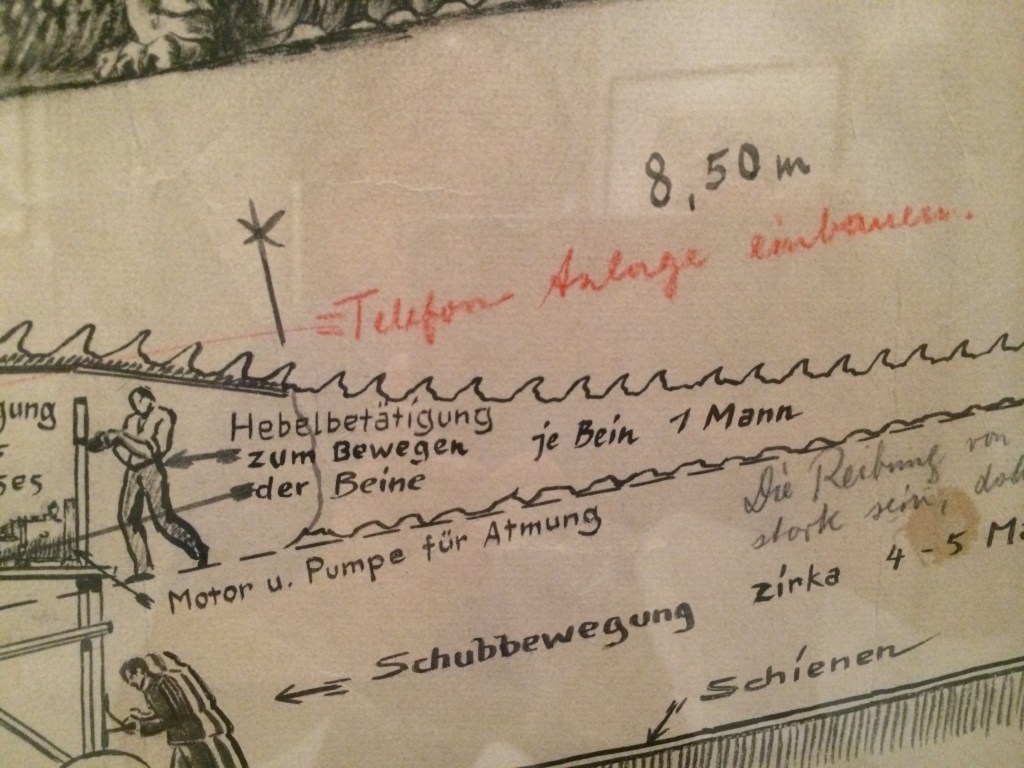
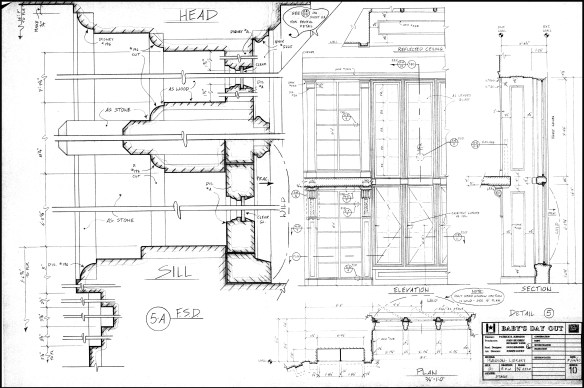
Note that the drawing not only provides a pictorial description of what the dragon should look like, but calls out dimensions, construction materials, how the action prop is to be operated, surrounding scenery requirements, and specific technical details of mechanical movements.
Technical drawing of the Dragon by Art Director Erich Kettelhut – ink and pencil on vellumKettelhut called out the length of the neck as well as the tension springs, framework, control cables and hoses required for the creatures fiery breath. He calls out “only rubber!” for the mouth area.The size and depth of the recessed path required for the props operators.drawing describing how each part of the dragon was to be operated by stagehands.Note in red indicates that a telephone/communication system needs to be added to the prop for the crew.
The scene where Siegfried slays the dragon in Die Niebelungen from 1923
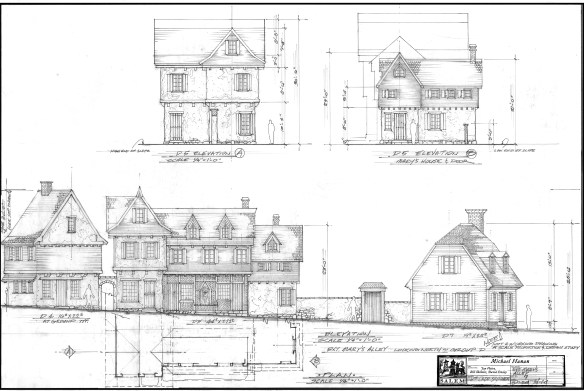
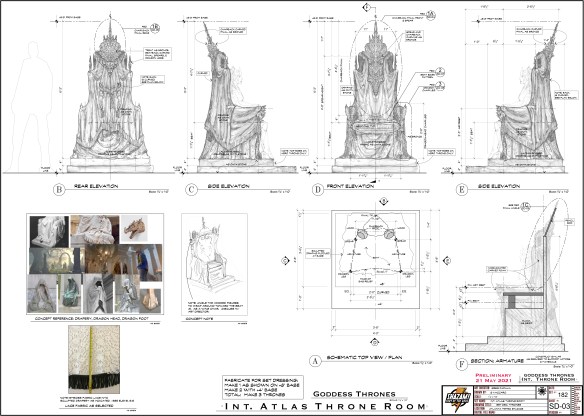
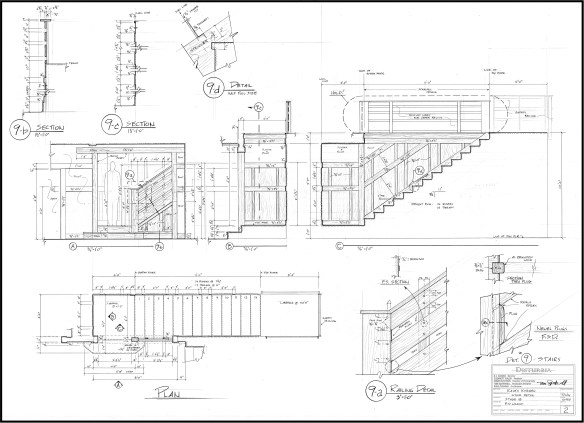
Here are a few more hand-drafted pencil drawings from more recent films:
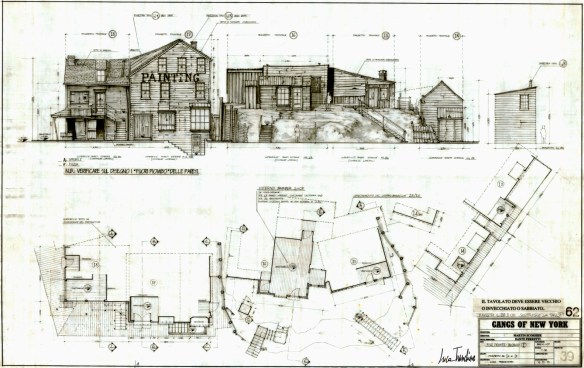
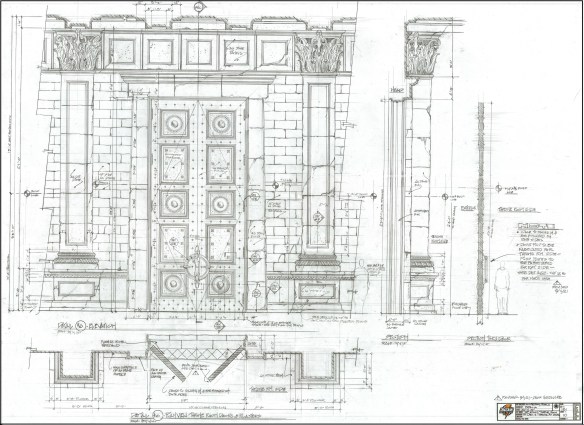
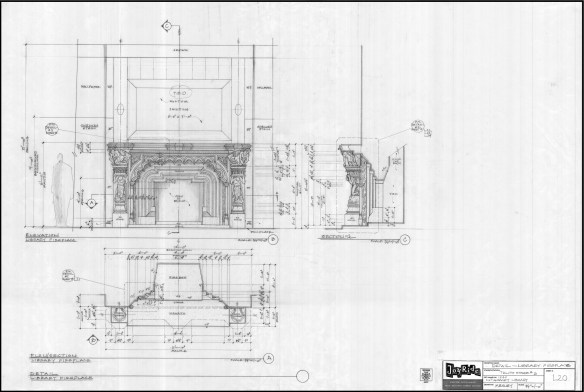
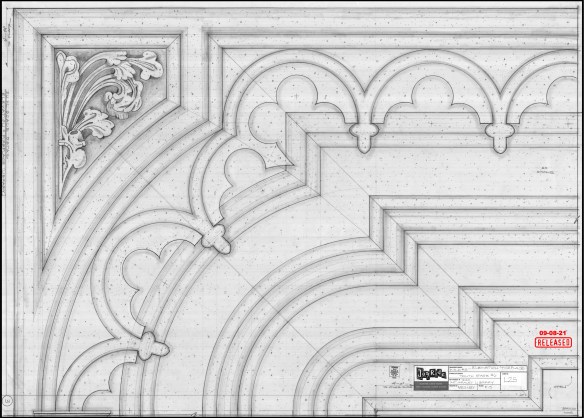
Salem – drawing by William Ladd SkinnerGangs Of New York – drawing by Luca TranchinoShazam – drawing by Greg PapaliaHaunted Mansion – drawing by Barbara MesneyHaunted Mansion – full size detail of fireplace for the plasterersThor – drawing by Oli GoodierShazam – drawing by Stella VaccaroDisturbia – drawing by RD WilkinsHaunted Mansion – drawing by Hugo SantiagoBaby’s Day Out – window detail
Jeesh, it’s been ten years since my last gift guide and I’m getting it out a little late this year, but some of the same items are still here on the list, mainly the classic tools and books that never become obsolete, (like a lot of software programs do).
I don’t receive any money from these recommendations. These are books and tools that I own and use often.
My Must-Have Tools For Film Designers
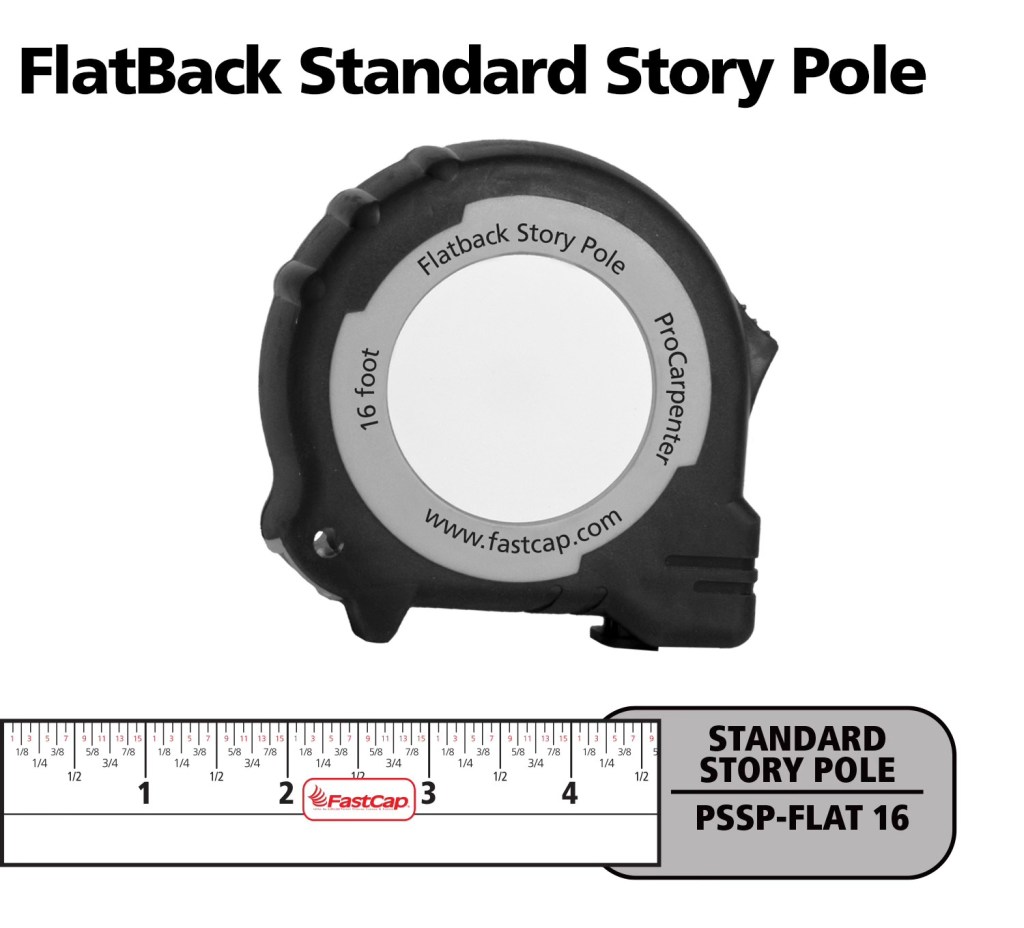
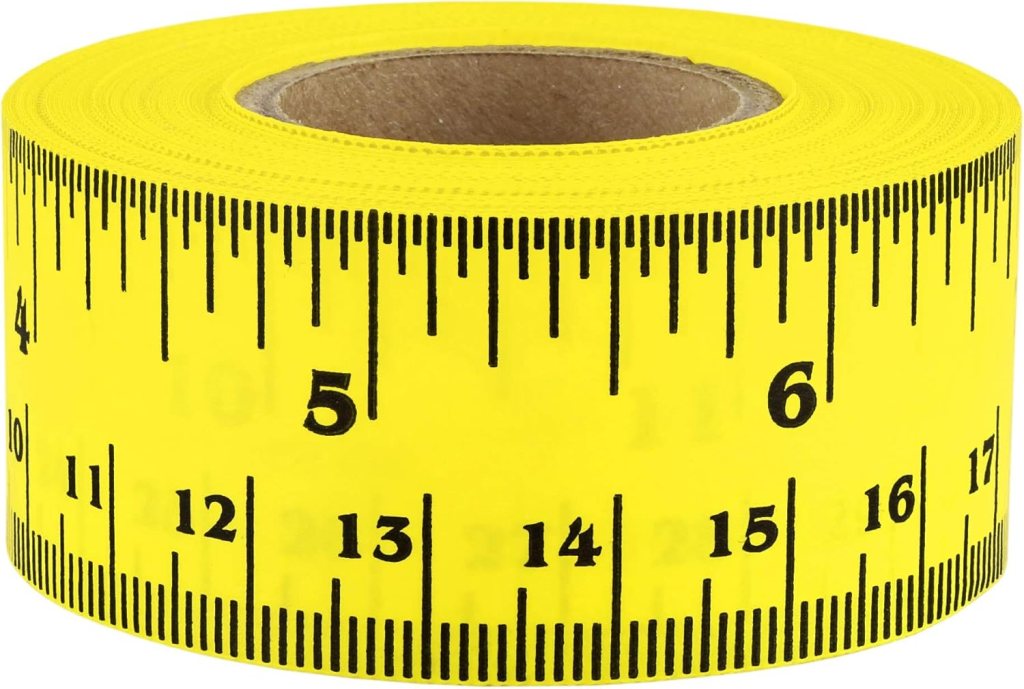
FastCap Flat Back Tape – You can not only measure round or curved surfaces but it has a blank area to write on for use as a story pole. – $10.00
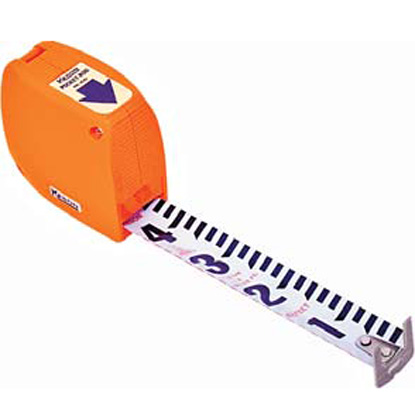
Keson Pocket Rod– These are so essential for site surveys that I have four of them. They come in Architect and Engineer models. – $20.00
6″ Digital Calipers – Like these, there are many manufactures. (Avoid any priced under $20.00.) – Must-have tool for doing photo scaling (see article) – about $24.00
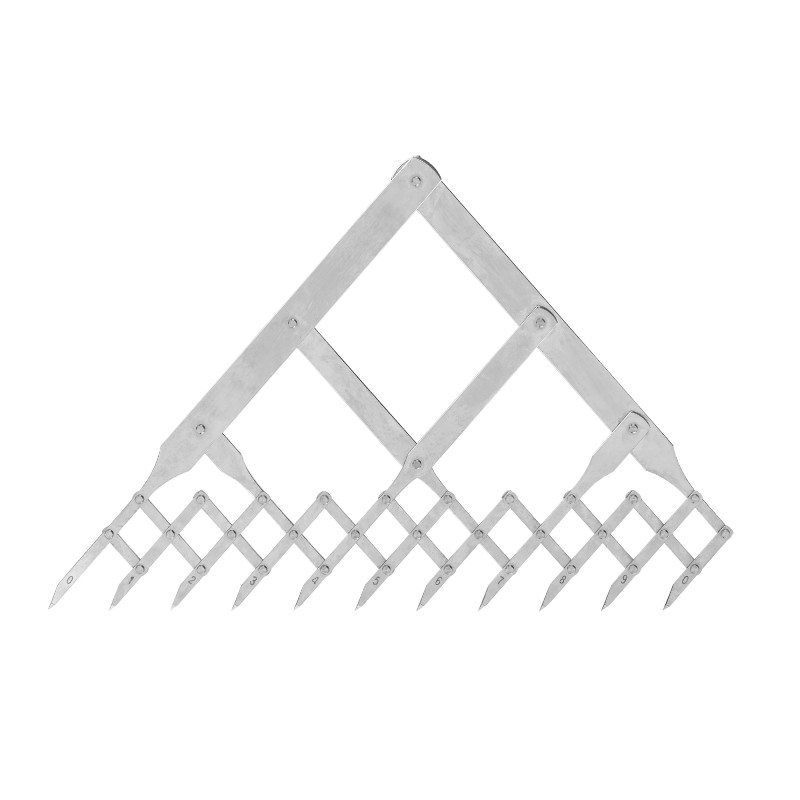
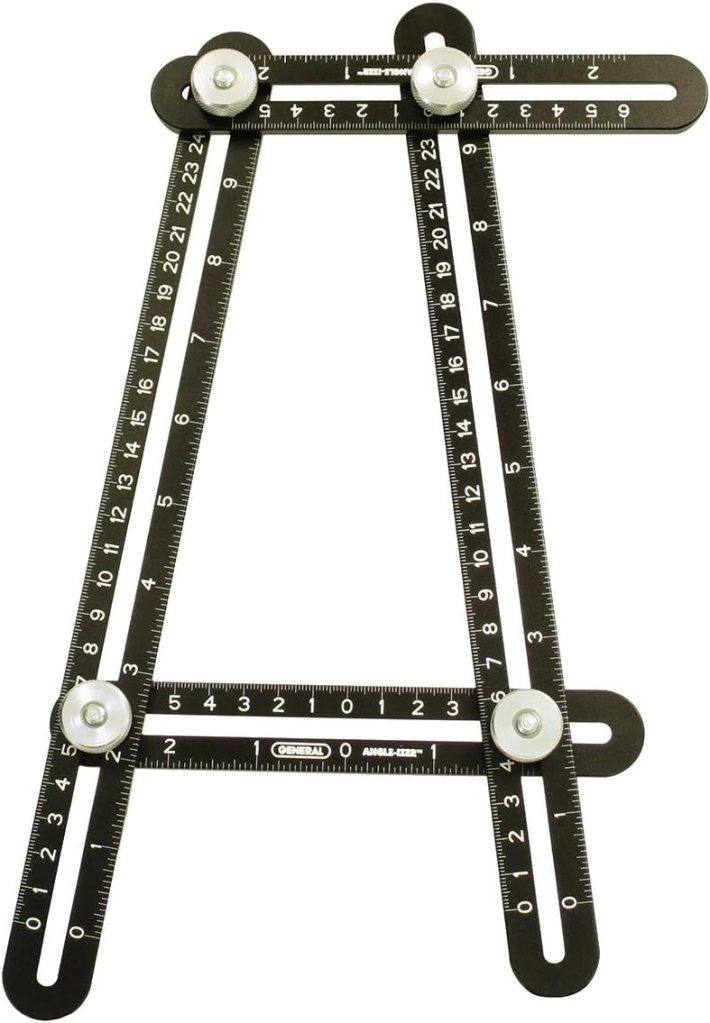
Equal Space Dividers – great for not only photo scaling but for designing in general. They run the gamut in price from these to these. $220 to $24.00
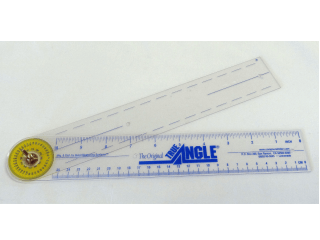
True Angle – Multi-use tool for measuring and transferring angles. lightweight. – 12″ -$16.00
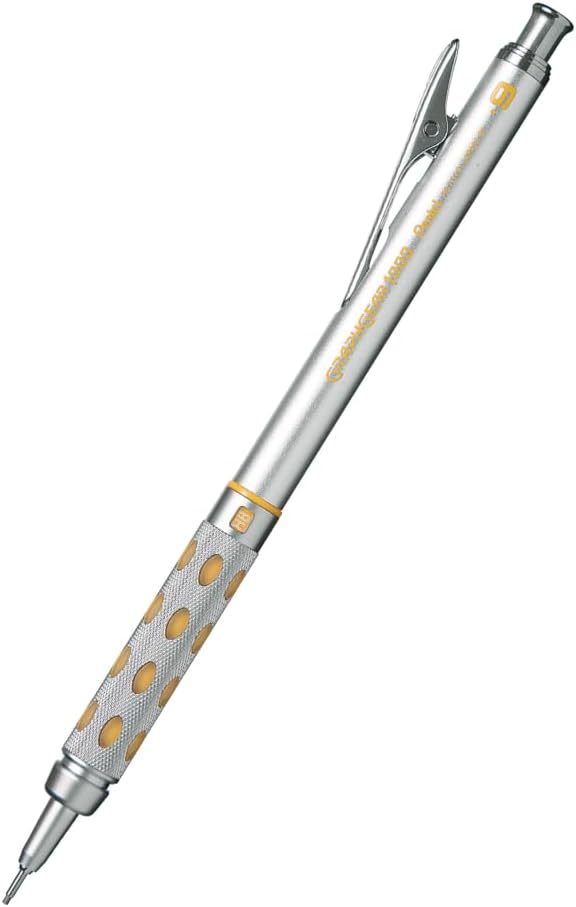
GraphGear 1000 – Mechanical pencils, my new favorite brand. These are great because the barrel sleeve retracts into the pencil to protect it. Comes in .3, .4, .5, .7, and .9mm leads. About $9.00
Compass – So many to choose from, (and a lot of crappy ones are in the mix). This one is a good all-around basic, practical compass that will last a while. $14.00
Still my favorite design and furniture book publisher. Here are my recommendations:
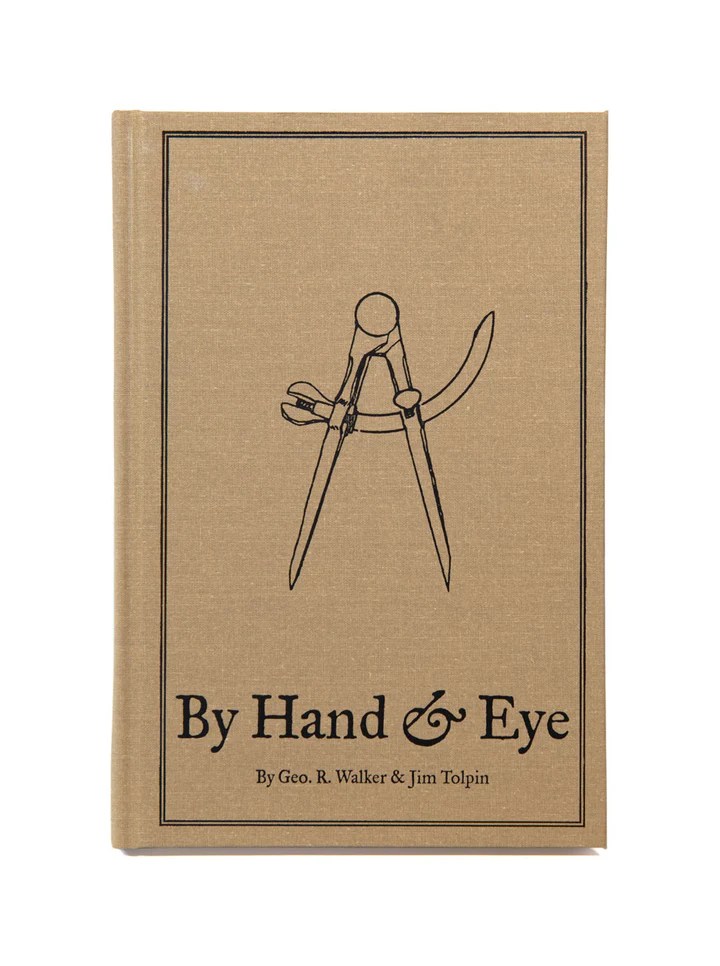
By Hand & Eye – $51.00. Another gem from Lost Art Press, this is probably one of the best design books written in the last 100 years. It outlines the world of design without a rule and using only dividers and proportional methods. I covered this in a previous post and always recommend it. Buy this and a good pair of second hand dividers from Ebay and you will completely change the way you think about design.
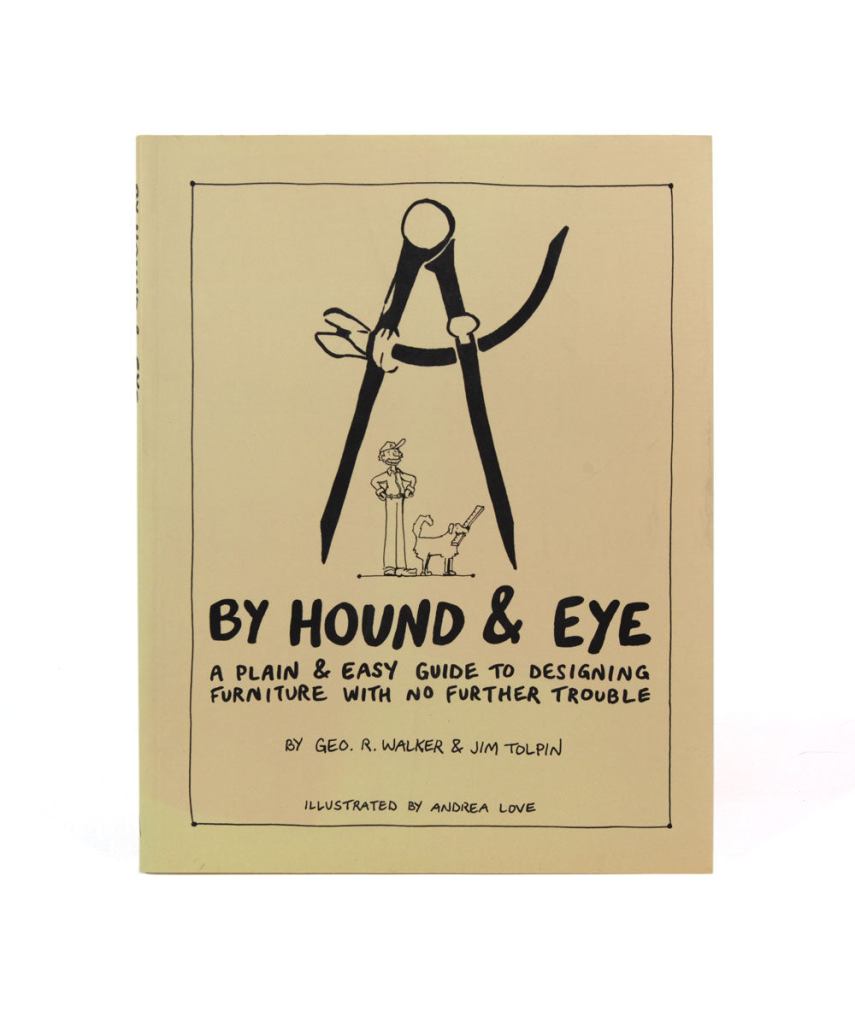
By Hound & Eye – $31.00. A companion workbook to By Hand & Eye.
A Field Guide To American Houses – Virginia Savage McAlester
Stair Builders Handbook – T.W. Love
Backstage Handbook – Paul Carter
American Cinematographers Manual – ASC Press
The VES Handbook of Visual Effects – VES Society
Designer Drafting For The Entertainment World – Patricia Woodbridge
The Classical Orders Of Architecture – Robert Chitham
Illustrated Cabinet Making – Bill Hylton
Styles Of Ornament – Alexander Speltz
McKay’s Building Construction – W.B. McKay
Neufert – Architects’ Data – Granada Publishing
Geometry Of Design – Kimberly Elam
Really, Really Last Minute Gifts
When you realize you’ve really screwed up and forgotten someone and have no time to run to the store, much less order anything, you can always gift a good app.
Log onto the Apple or Android store and gift your so-important-you-forgot-about-them friend one of these apps and your reputation will be saved:
“Every scene you will ever act begins in the middle. . . .” Michael Shurtleff
The casting director Michael Shurtleff wrote a book called “Audition”, which is a kind of roadmap for actors to use when preparing to try out for a part for a film or theatrical play. It lays out the basics of determining the psychological elements of a scene, even if the actor has only been given a single page from the script.
(An aside: if you really want to understand script breakdown, take an acting class. It will give you a new appreciation of actors too. Do that one better and go out for an audition, and then imagine doing that a dozen times a week for the rest of your career.)
One of the Guideposts in the book is titled, The Moment Before. Shurtleff explains that a scene always starts the middle of a situation. It’s the actors job to figure out what events came before, because a lot of times that information isn’t in the script. A general outline might be there but the small details are missing.
What just happened?
With films, a lot of the ‘personality’ of a set is the work of the Set Decorator. They give life to the structure of the scenery, and it’s a big reason why they share Oscar and Emmy awards with the Production Designer.
But you can only put so much lipstick and mascara on a goat, and if the sets ‘bones’ aren’t great, something big will be missing.
What does your set say about itself once the construction and paint crews are finished, before the set decoration crew even starts?
What happened in this room a week ago? A year ago? Twenty years ago? Was the house built before the development of modern plumbing? Do the mouldings indicate that it was built before electric power was available, and the “new” type of special moulding now hides the wires that snake along the baseboard and up corners of the room?
Once the set is dressed and filmed, are there elements that will stand out or tell a story about the “envelope” beyond the dressing?
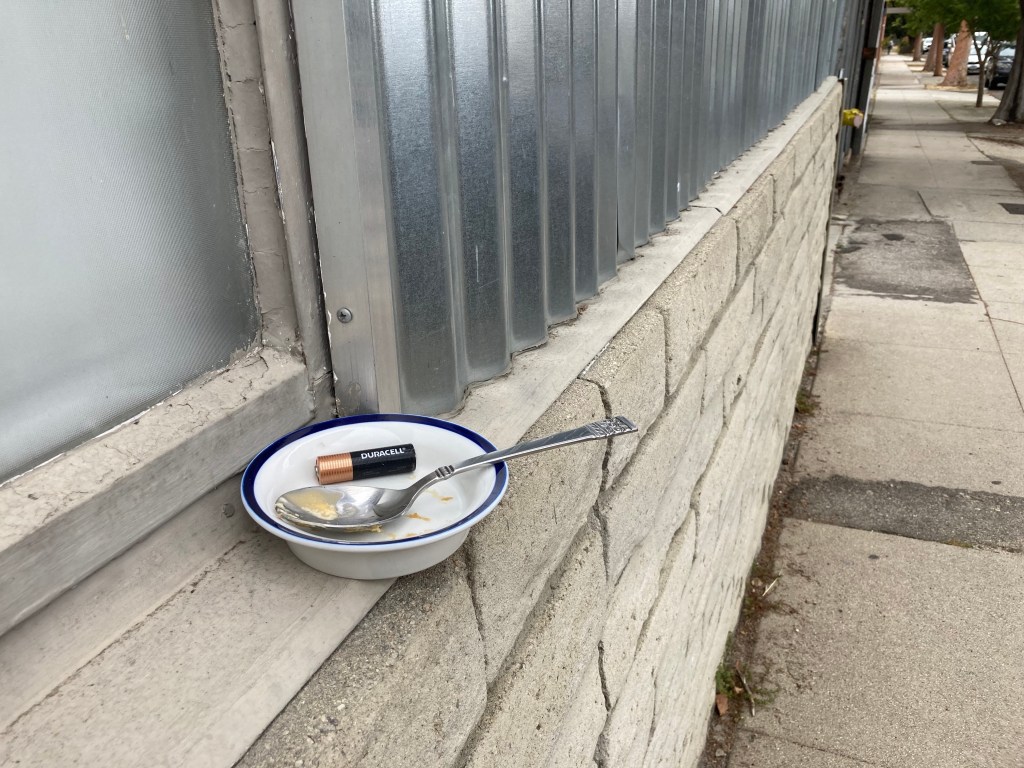
When I look at empty houses I always look for the signs of past human lifetimes. Most buildings will survive 4 or more owners, or generations. They all have their scars from surviving their inhabitants; the bad remodels and additions that don’t match, bad repair jobs or damage that was never repaired.
I got to tour a historic house from the 1830’s that was built in the Greek Revival style and was shocked when I saw the front parlor room. The second owners wife was tired of the classical design and had the room renovated in the then-current 1890’s late Victorian “Eastlake” style. The contrast couldn’t have been more odd if they had redone the room in a Mid-Century Modern style.
The historical society who owned the house decided that the Victorian remodel of the room was part of the history of the building and voted to not return the room to its original configuration. It may have not been ‘true’ to the origins of the house but it defined the ‘human experience’ that the home had gone through. It was some of the ‘finger prints’ that its inhabitants had left behind.
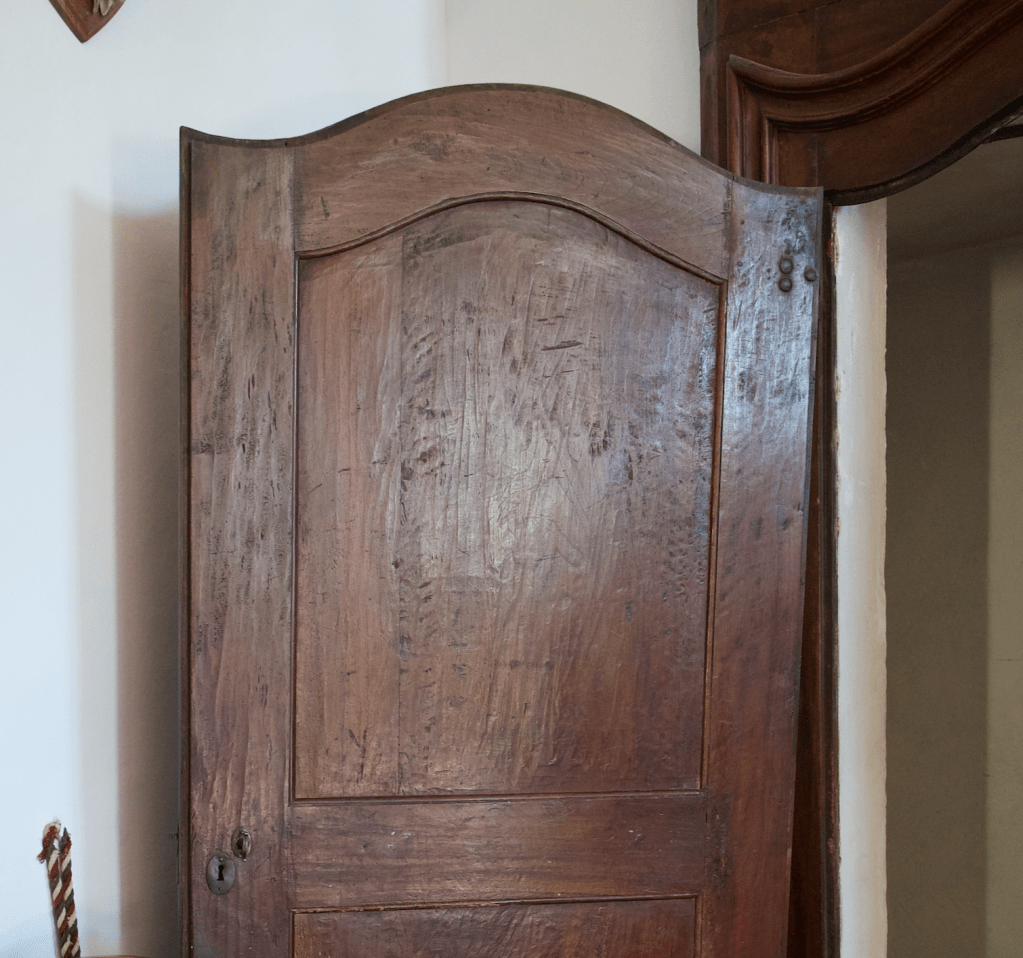
This is a photo of a door in a friends families 900 year old Castello in Northern Italy. I wondered about the deep gouges in the upper panel and they told me that they were a remnant from several hundred years before during a hasty removal of a carved crest that hinted at support of a then out-of-favor monarch.
The details of a set don’t have to be that subtle. It could be a bricked up window, a stairway in an odd but obviously not original location. or maybe the wallpaper in a room is torn in one corner, revealing three other layers behind it, or there are scorch marks on the wooden kitchen floor in front of the stove where a red hot cast iron skillet was dropped.
The ‘character’ can certainly come from the paint and age that the scenics apply and sometimes there is even more you can add. One person told me about arriving on a stage set one day for a shoot in a period kitchen set to find the Production Designer Dean Tavolaris bending over the tile counter with a one pound can of Crisco shortening, rubbing handfuls of the stuff in the corners and between the sink and stove.
Actors will often create past stories of their characters for themselves to help them flesh out the role that will give them personal emotional substance to draw on for their portrayal. This is information just for themselves and a lot of times they don’t feel the need to share it with anyone else, but it gives their performance extra ‘bones’.
As a designer you can do the same with a set. You can create the environment’s past lives that may have nothing to do with the story in the script but it will give it a reality that will make it feel like it hasn’t just materialized suddenly out of thin air, which, as scenery, it pretty much has. We think of spacecraft as modern, sterile environments that don’t have much character. Star Wars changed all that with some spacecraft that were past their expiration date and bore the marks of abuse and mechanical failure. It made them more lifelike and less like machines.
Whether you share that ‘history’ with anyone else is entirely up to you, but if you can tie it into the story or at least make it an interesting part of the design, it can help you sell your ideas to a director who will most likely appreciate that you are bringing a depth to the film that they hadn’t thought about.
That work will come from really analyzing the script, and there isn’t always a lot of time to do that. But, you can learn shortcuts, and that’s a whole other blog article.
For starters, I suggest these: Audition, by Michael Shurtleff, and the chapter on script analysis in Directing Actors, the first book from my absolutely favorite directing teacher, Judith Weston.
In 1998, I was working for Production Designer Bill Malley on a television show called Seven Days. The premise of the show was that the government had designed a time machine that could go back in time exactly seven days from the present and decided they could use it to “undo” or “back-step” major global political disasters.
The fictional location of the Time Machine was in a site in the Nevada desert called “Never Never Land”, a play on Area 51.
The irony of the shooting location, which no one has ever mentioned, is that we were the first production to shoot on the site of what was once the top secret weapons testing site of Lockheed Skunkworks in Burbank, California. But this site, the former Rye Canyon Weapons Testing site, was far from Burbank. Situated out in Santa Clarita, it was just across the road from the Six Flags Magic Mountain Amusement Park.
Before the park was there, and before Santa Clarita began to expand, the area was a remote location nestled in the hills where the Lockheed employees could work in relative obscurity. The site was, according to the remaining employees, so heavily populated with deer that one was bagged each 4th of July for the company barbecue.
There were still remnants of the original facility, including a building with an anechoic chamber where sound tests were done. One day they wheeled an old refrigerator into the room and with the flick of a switch, emitted a sound wave that blew the enamel completely off the metal of the appliance.
Rye Canyon Facility – Google Maps
At the south end of the lot was a strange circular concrete pad that I would only later learn the purpose for.
The Art Department and production office were set up in a modern building to the north end of the facility. It was a “quiet building”, especially built for Lockheed. The only windows were on the exterior walls. The inner chamber was accessed through a single electronic keypad-locked door. There were no windows and the walls were so thick that electronic signals couldn’t penetrate them to eliminate the possibility of outside surveillance.
The “Quiet building” – 4 CC Commons License
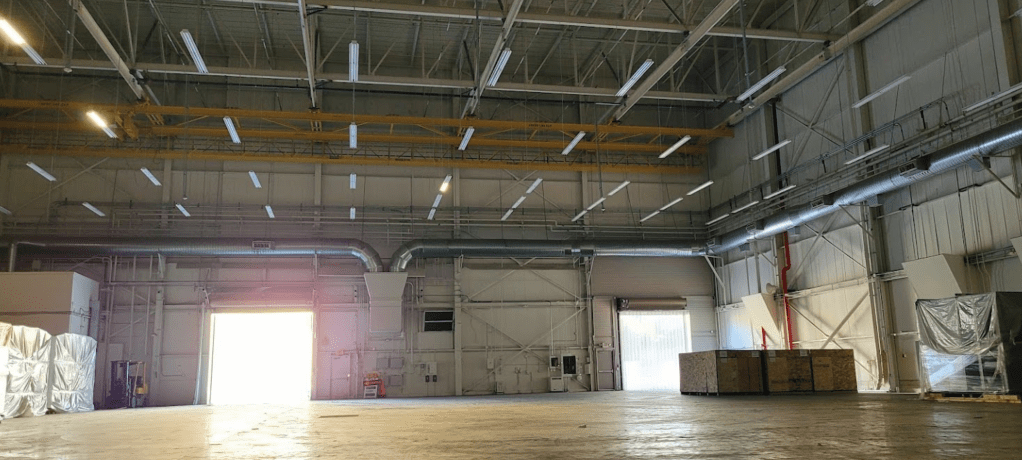
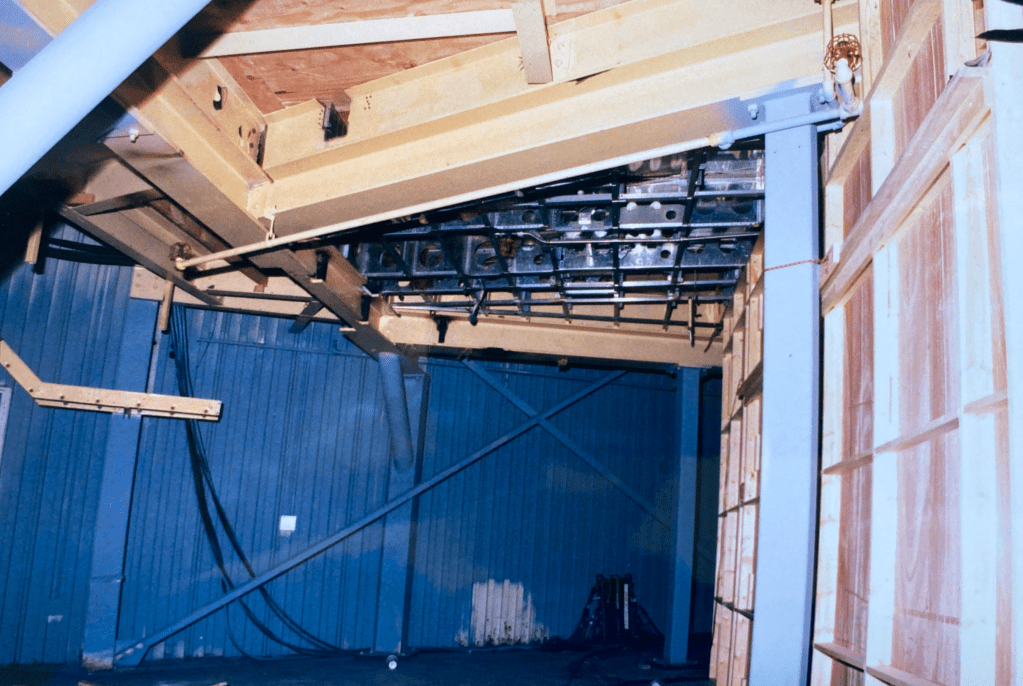
The stage was just south of the production offices. It was huge warehouse structure with high perms that were perfect for a soundstage. At the west end was a lower platform with a strange understructure that I looked at for a long time, trying to figure out the purpose of.
Stage 9 – Rye Canyon Studios
One of the facilities guards finally told me its purpose. I was staring at the underside of the remnants of the simulator for the F-117 fighter plane, the first stealth fighter. He told me that this was where the selected test pilots were brought for their initial trial period.
If they passed the tests in the simulator, they were shipped out to Groom Lake (Area 51) to test fly the actual plane.
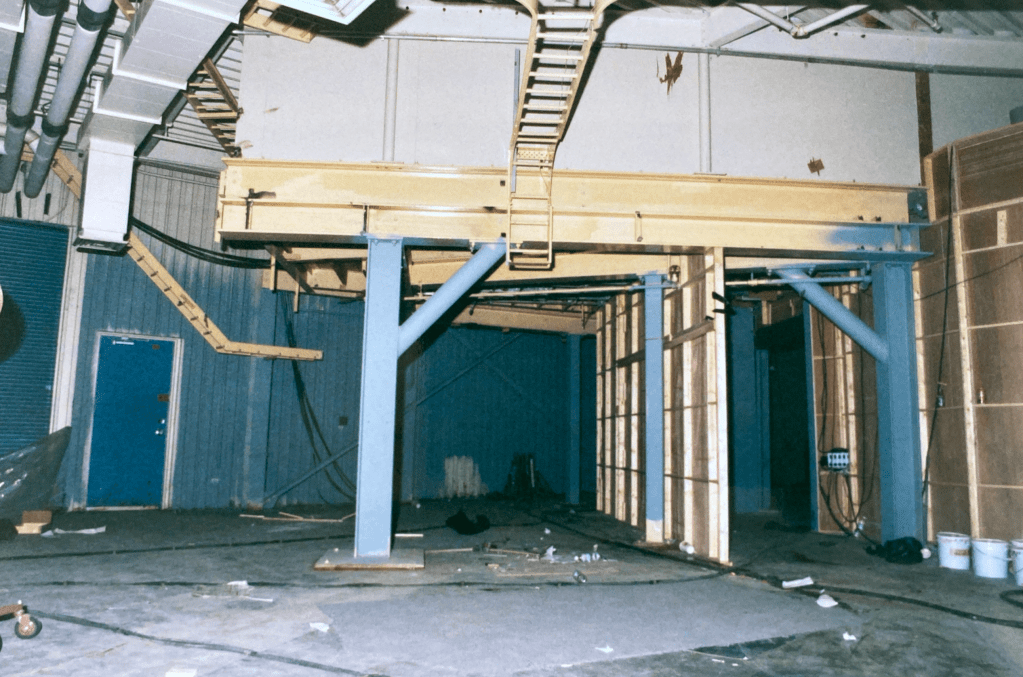
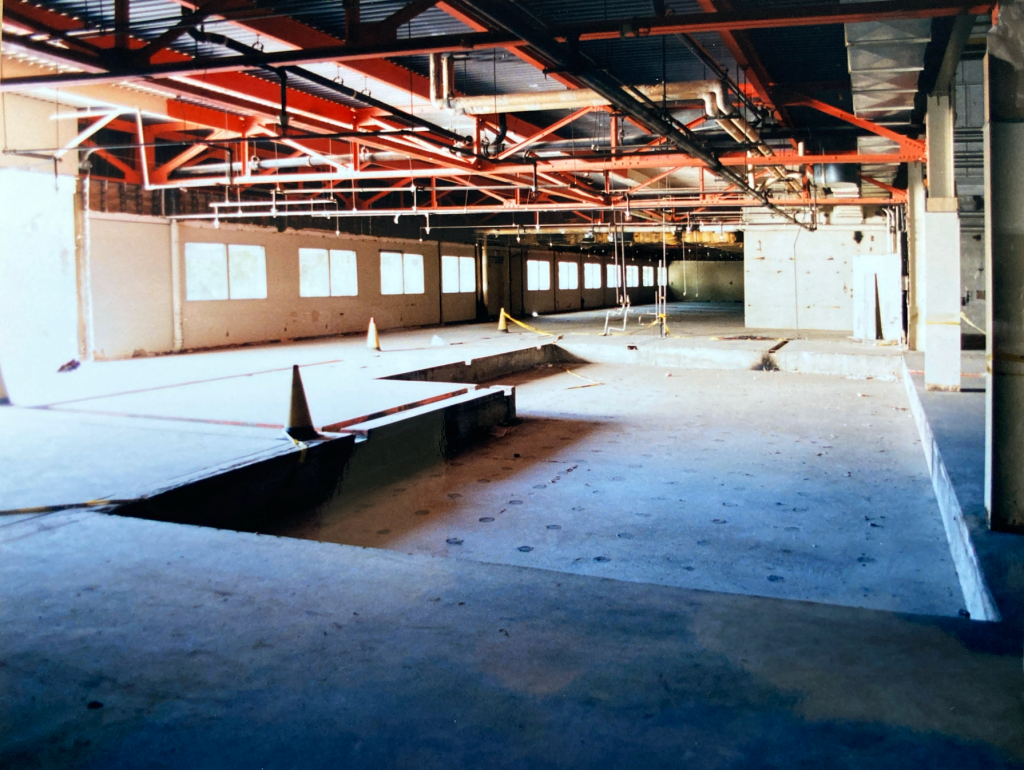
There was a large empty room to the west which once held a huge number of computer cabinets that were the ‘brains’ of the simulator.
Site of the simulator computer
It was then that I realized that our drawing boards were probably set up in the same area that the Lockheed engineers had been when they designed the first stealth fighters.
Bill told me that shooting a television show there was ironic for him. Years ago he had been suspected of revealing government secrets when he was designing a comedy for William Friedkin. Bill had designed a number of other features for Friedkin including The Exorcist for which he was nominated for an Oscar.
The picture,The Deal Of The Century, was a comedy starring Chevy Chase, about an arms dealer who steals a state-of-the-art fighter plane, the F-19X, from an international air show.
Someone with the government saw the production models of the mockup that they created for the film and told Bill they wanted to talk to him. An Air Force colonel showed up and began to grill him about the planes design. Where did he get the idea for it?
Bill explained that despite the famous cast of characters in the film, the budget largess didn’t extent to the film’s design. As is usual with large productions that feature a lot of well-known actors, the above-the-line talent eats up most of the budget. And what you are left with is the below-the-line limits of a medium budget film.
The colonel insinuated that Bill must have gotten the idea from somewhere, not believing that he had just made it up himself. Bill explained that the budget didn’t allow him do design a completely new kind of plane, so they had taken the basic design from the Russian plane used in the Clint Eastwood film Firefox, and just simplified it. Bill had told the crew to just make it boxier and use flat surfaces rather than the curved surfaces and dihedral of a typical jet.
Full size mockup of the F-19X – Warner Bros Studios
This would make it easier to create the full-size version that they would most likely have to create for some of the live scenes with actors, as they’d be able to use wood sheet goods rather than other materials to create curved wing surfaces.
The colonel eventually left, convince that what Bill was telling him was the truth.
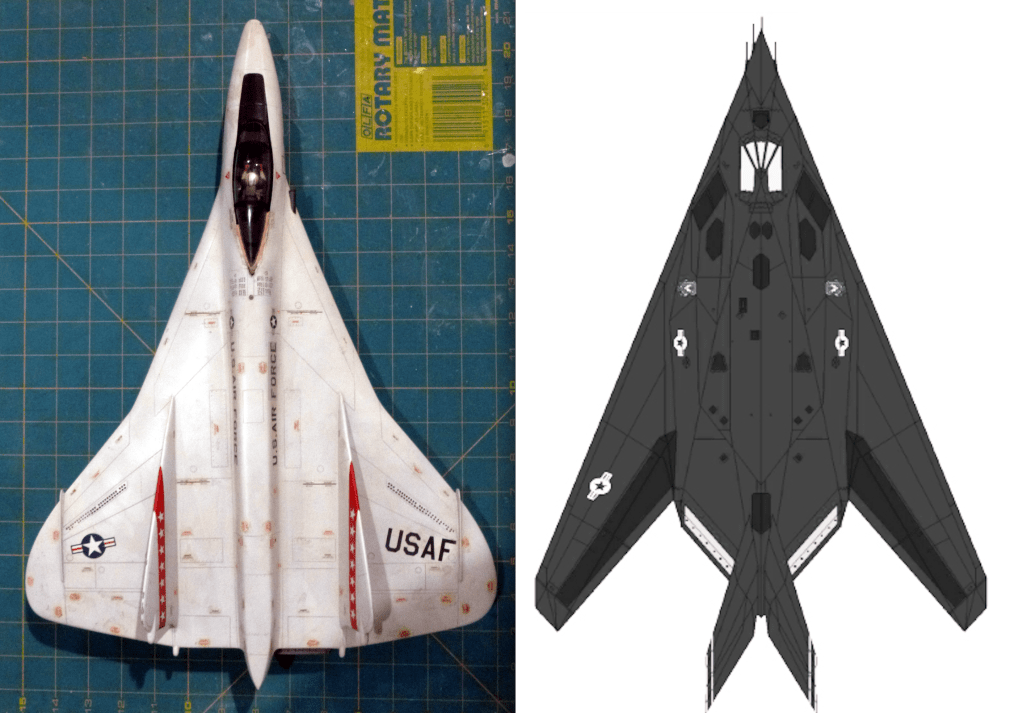
Bill was baffled until about 1988, when the military introduced the F-177 stealth fighter. The similarities didn’t seem that close to him, but someone who saw his fake plane was concerned that someone had leaked the F-117 design.
Side by side comparison of the plan views of the fictional F19X (left) and the F-117 stealth fighter (right) – F19X model photo by Joseph C. Brown
Bill didn’t know that those flat surfaces and the twin tails were what had set off warning bells in some government officials mind. The F-117 had been in design since the 1970’s. In the 1960’s a Russian scientist released a paper stating that an objects radar signature was more a matter of its surface structure than its size.
The government started a program called Have Blue, which was a proof-of-concept program to develop a stealth fighter. They discovered that flat surfaces were key to fooling radar waves into producing a small signature. The cement platform at the south side of the property was a test area for measuring the radar signature of different models until a final design was reached that was tested with a full-size mock-up at Groom Lake.
The program would result in the development of the F-117 stealth fighter.
Did anyone know about the fighter program, or the location of the Rye Canyon test site outside of the employees? It seems hard to imagined that someone didn’t at least have an idea that something unusual was going on there. The entire area was patrolled by armed guards 24 hours a day. Even a kid would have known that something must be happening there that was important.
Several months before our company moved in, a fleet of trucks reportedly arrived in the middle of the night. Apparently they were there to recover the remaining files that were stored in the vaults at the main building.
During the production, I found a site where declassified government satellite photos were posted. Among them was a large file of Soviet satellite pictures that the government had recovered from who knows where.
I checked them on the chance I’d find something. And yes, there they were, Soviet satellite photos of the Rye Canyon site. They may not have known exactly what was going on there, but they were sure enough that something important was happening there to allocate satellite attention to the area.
Location surveys can be a unique experience. You never know what you’re going to have to deal with when you survey an unfamiliar location. One of the perks of being in the Art Department of a film or television series is that you get to see places that aren’t normally open to the public.
It could be a historic building, or a ship, or a military aircraft, or, it could be a place you’re familiar with but never really thought to look at close-up.
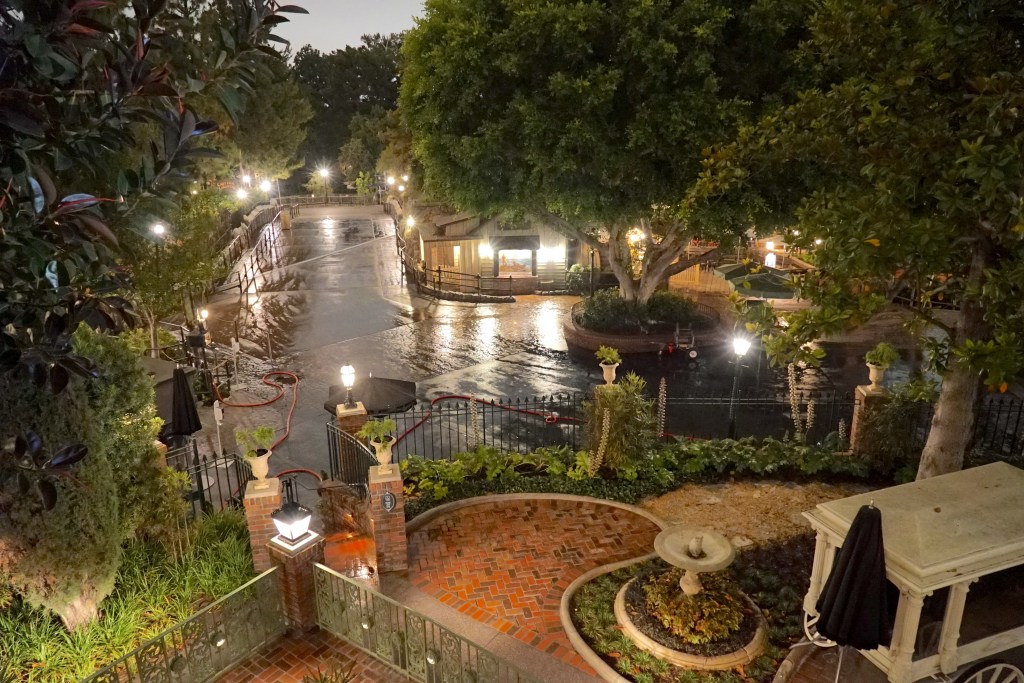
The Disneyland Haunted Mansion at 1:00 AM
A lot of times there are parameters that you have to work around to get all the information that you need. Usually these are limitations having to do with access to the location, either physical constraints or time limitations. You’ll do a lot of location surveys during your career. Often they will be a simple survey to determine a placement of a set piece or a simple drawing for a director’s plan for shot planning.
A deserted New Orleans square at midnight at Disneyland.
Other times you’ll have to do a detailed survey that involves recording a lot of measurements and taking photographic reference for either matching a location at another place or adding onto the existing structures.
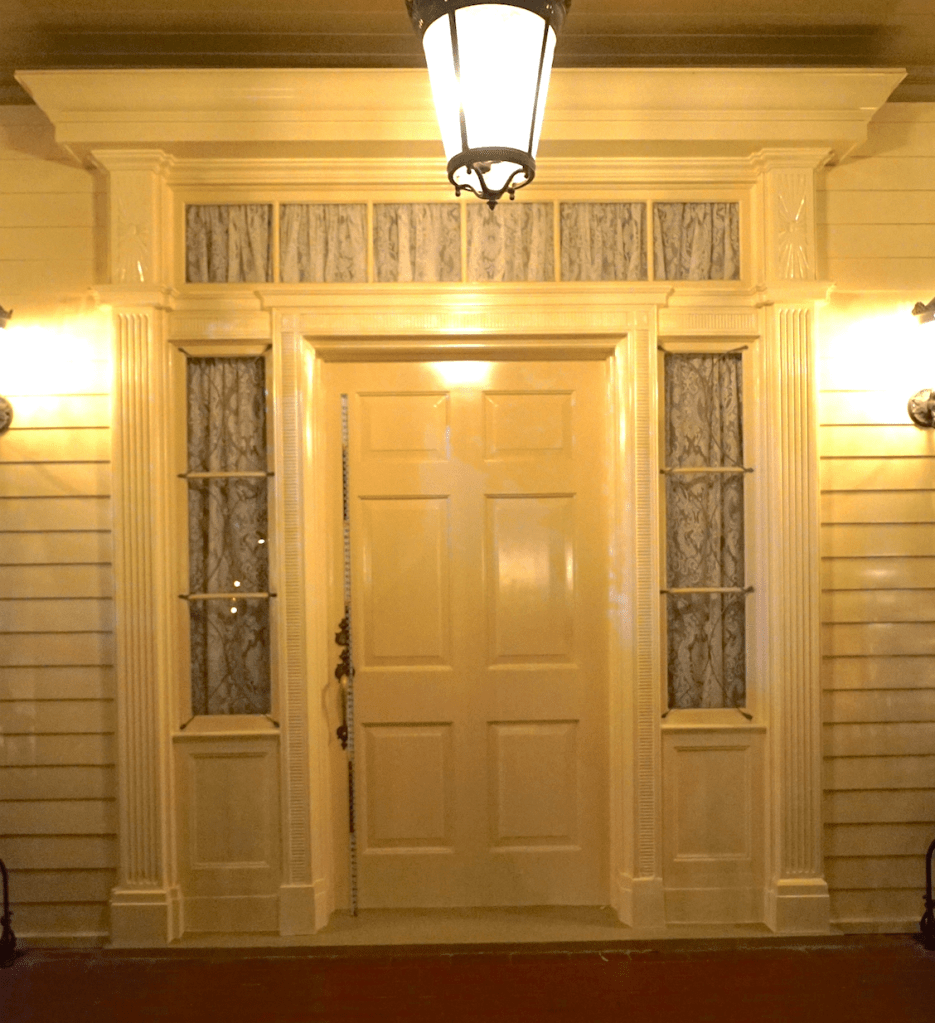
I got a call in June of 2022 to work on the recent Disney film The Haunted Mansion, and was told that my first assignment was to survey the exterior of the Haunted Mansion ride at the Disneyland park in Anaheim. We would be building a replica of it on a studio backlot in Georgia.
I asked if they had a set of the original plans for reference and was told “no”. For reasons I was never able to understand, it was important that the film set look very close to the original mansion at the amusement park, but, we weren’t allowed to have a copy of the original drawings from 1962. If you can figure out the logic of that decision, please let me know.
I mentally put together a list in my head of the equipment that we’d need to do an accurate survey of the building but that was immediately discarded when I was told about the limitations of the scale of the survey. It would have to be done at night, after the park was closed to the public. I would have a park employee to help who would also provide a ladder. One of the construction foremen on the film would meet me there to help with the measuring.
Despite not having any drawings to use as a starting point, the survey was only authorized for one night, between the hours of 11pm and 3am.
This wasn’t the first time I’d had to do a survey in a ridiculously small amount of time, but it would be the first exterior survey that I’d done at night. Taking theodolite readings to determine heights in the dark would be fun.
In the past, location surveys were usually scheduled several days to a week in advance and the persons involved were usually asked how much time they needed for the scout. This is rare now and it pays to have a fully-equipped bag of survey tools ready to go. You may have to survey a forest area for one scene and a complicated building interior for the next, so you need to have a wide range of tools in your kit.
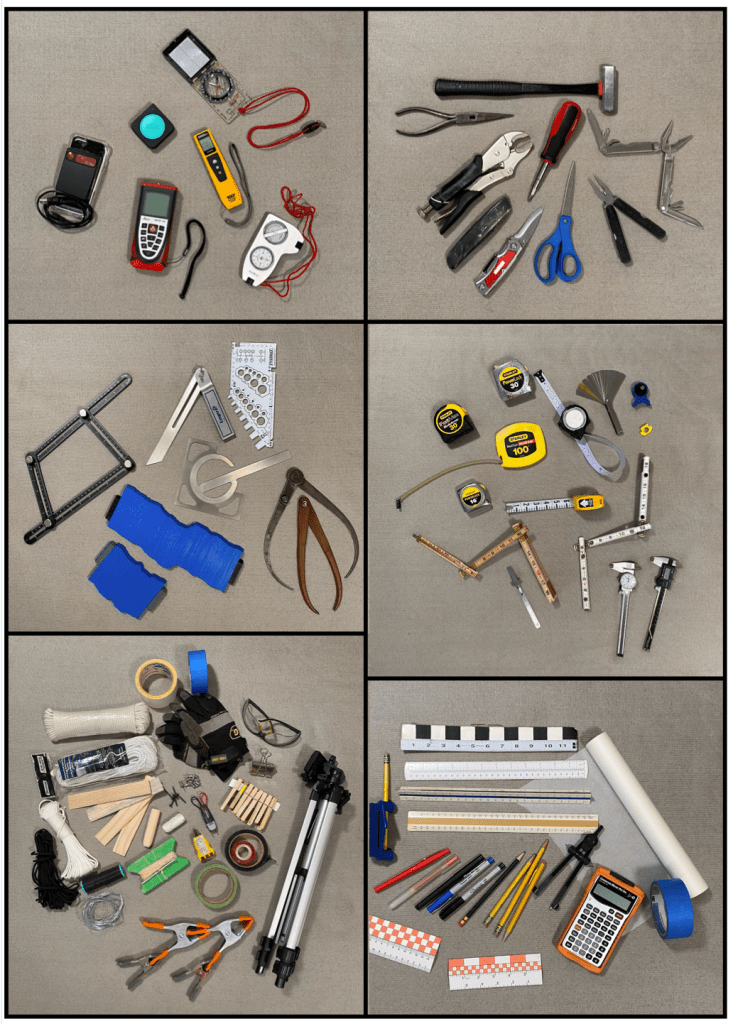
This list ranges from simple measuring tapes to laser measuring tools, levels, transits and plumb bobs, simple compasses to digital theodolites and clinometers. a compact tripod is a plus. Profile gauges or moulding combs are a must-have.
Some of the items that are part of my survey tool kit.
The tools pictured above are just a sampling. My survey bag weighs in at over 20 pounds. You’ll notice some duplicated tools. This is intentional. When you have traveled a long distance to do a survey, sometimes across country, a tool that’s not working or dead batteries isn’t an acceptable excuse. Sometimes you have to improvise when you are confronted with a situation where the tools you usually use won’t fit the bill. I once had to find a rural hardware store open where I could buy the supplies to make a water level when the location that I was surveying made using a laser level impossible.
Pre-scout research is usually key to accomplishing a successful survey and I immediately looked for any reference that I could find online. I was sure that someone had to have uploaded some of the original drawings from the 1962 construction. It took some digging but I found the 1/8th inch scale elevations. Now I wouldn’t have to try to get overall heights but I still had a lot of details to record.
When I’m confronted with a tight time schedule I have a checklist:
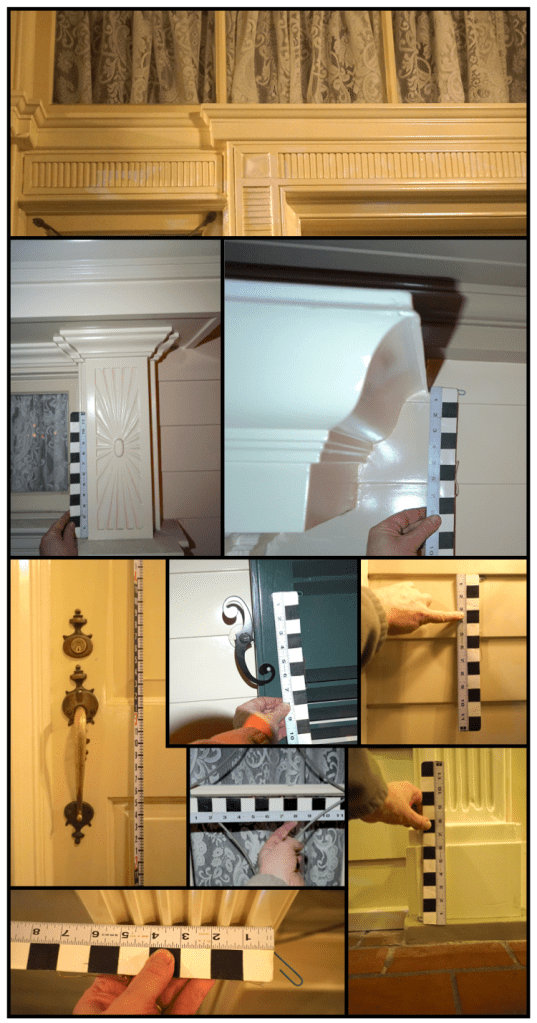
1- Overall photographs with a collapsable surveyors rod in the shot so I can scale from the images later.
2- Detail photos using a small story stick so that those can also be used for photo-scaling. The photos are important as I know I will often run out of time and the photos are a visual record that can be referred to if I haven’t been able to get a hard measurement with a laser or tape.
3- Overall measurements; ceiling and soffit heights, other measurements that would be impossible to scale from photographs.
4- Details. Here I am as thorough with measurements as I can be as the time allows.
A photo of the front door of the haunted mansion with a surveyors rod in the picture for scale reference.A few of the hundreds of scaled photos that I took at the mansion to recreate the details for the backlot reproduction of the mansion in Georgia.
We covered the ground floor of the facade while we waited for a technician to get us to the balcony area. This is accessed only through a small door to the south side where you are immediately confronted with an 14′ tall, narrow ships ladder. We struggled to climb that with the equipment and set to work getting the details there.
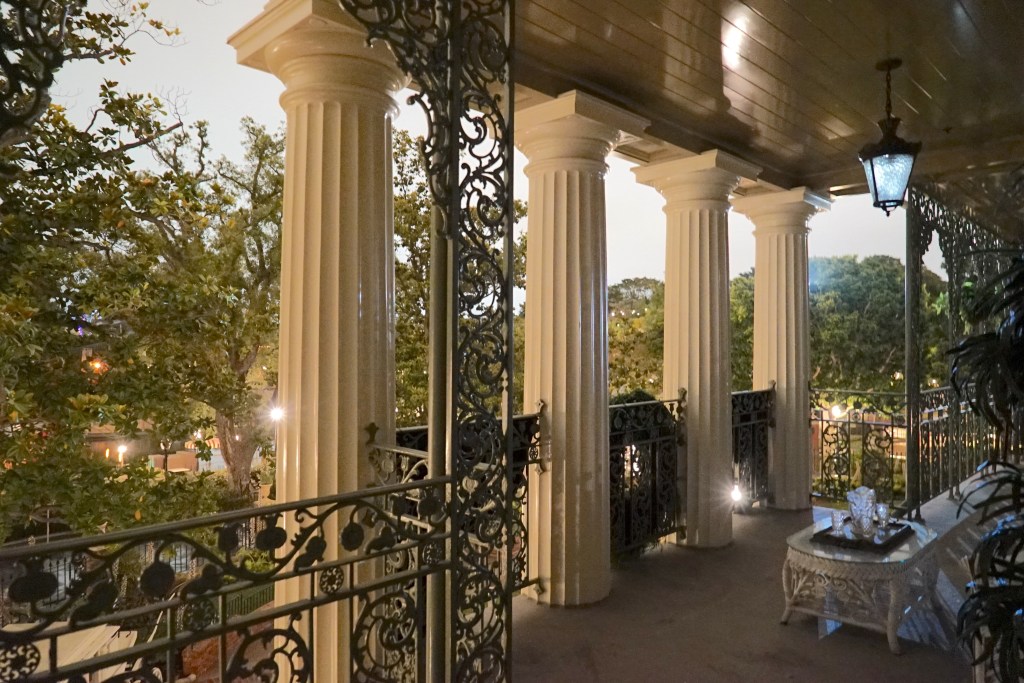
The balcony of the Disneyland Haunted Mansion at 1:30 am. The photo was taken with a Sony A7S camera whose lowlight sensor makes the image seem like it was taken in daylight. In reality it was very dark and the ceiling details were not visible to our eyes.
In case you wondered, everything on the balcony is bolted, nailed, and glued down. No need to worry about wind carrying anything off.
As we started to record the second story area at about 1:30 am, all the lights around the mansion went out. Luckily we had headlamps in our kits and I had a Sony A7S camera whose incredible sensor makes photos look like they were taken in daylight.
We waited for a tech to take us to the roof to measure the cupola. He never arrived. Maybe the thought of crawling around on the roof in pitch darkness was the scariest thing about the house he could imagine.
3:00 am came sooner than I wanted it to, but I felt pretty certain that we had gotten the most important information.
Was it a spooky experience? The only thing I was afraid of was that the next day I would realize I’d missed a critical dimension.
Next post I’ll talk about how we integrated all that data into the backlot build. Hint- sometimes proportion is not your friend.
This is the first day of the International Production Design Week events that have been organized and curated by the Production Designers Collective, an international group of Production Designers whose mission is to be a hub for designers from around the world and to elevate the profession by bringing awareness and acknowledgment of the craft of art direction around the world to the public’s awareness.
The nine day series features nearly 200 seminars, exhibitions, meetups, tours, and lectures with acclaimed Production Designers from 27 countries. Some of the events are presented online for viewing from anywhere while others are held in specific sites for a live audience.
Here is the link to the schedule of events which is searchable by day, city, language, and event category.