3 Methods Of Scaling From Photographs


photo-6
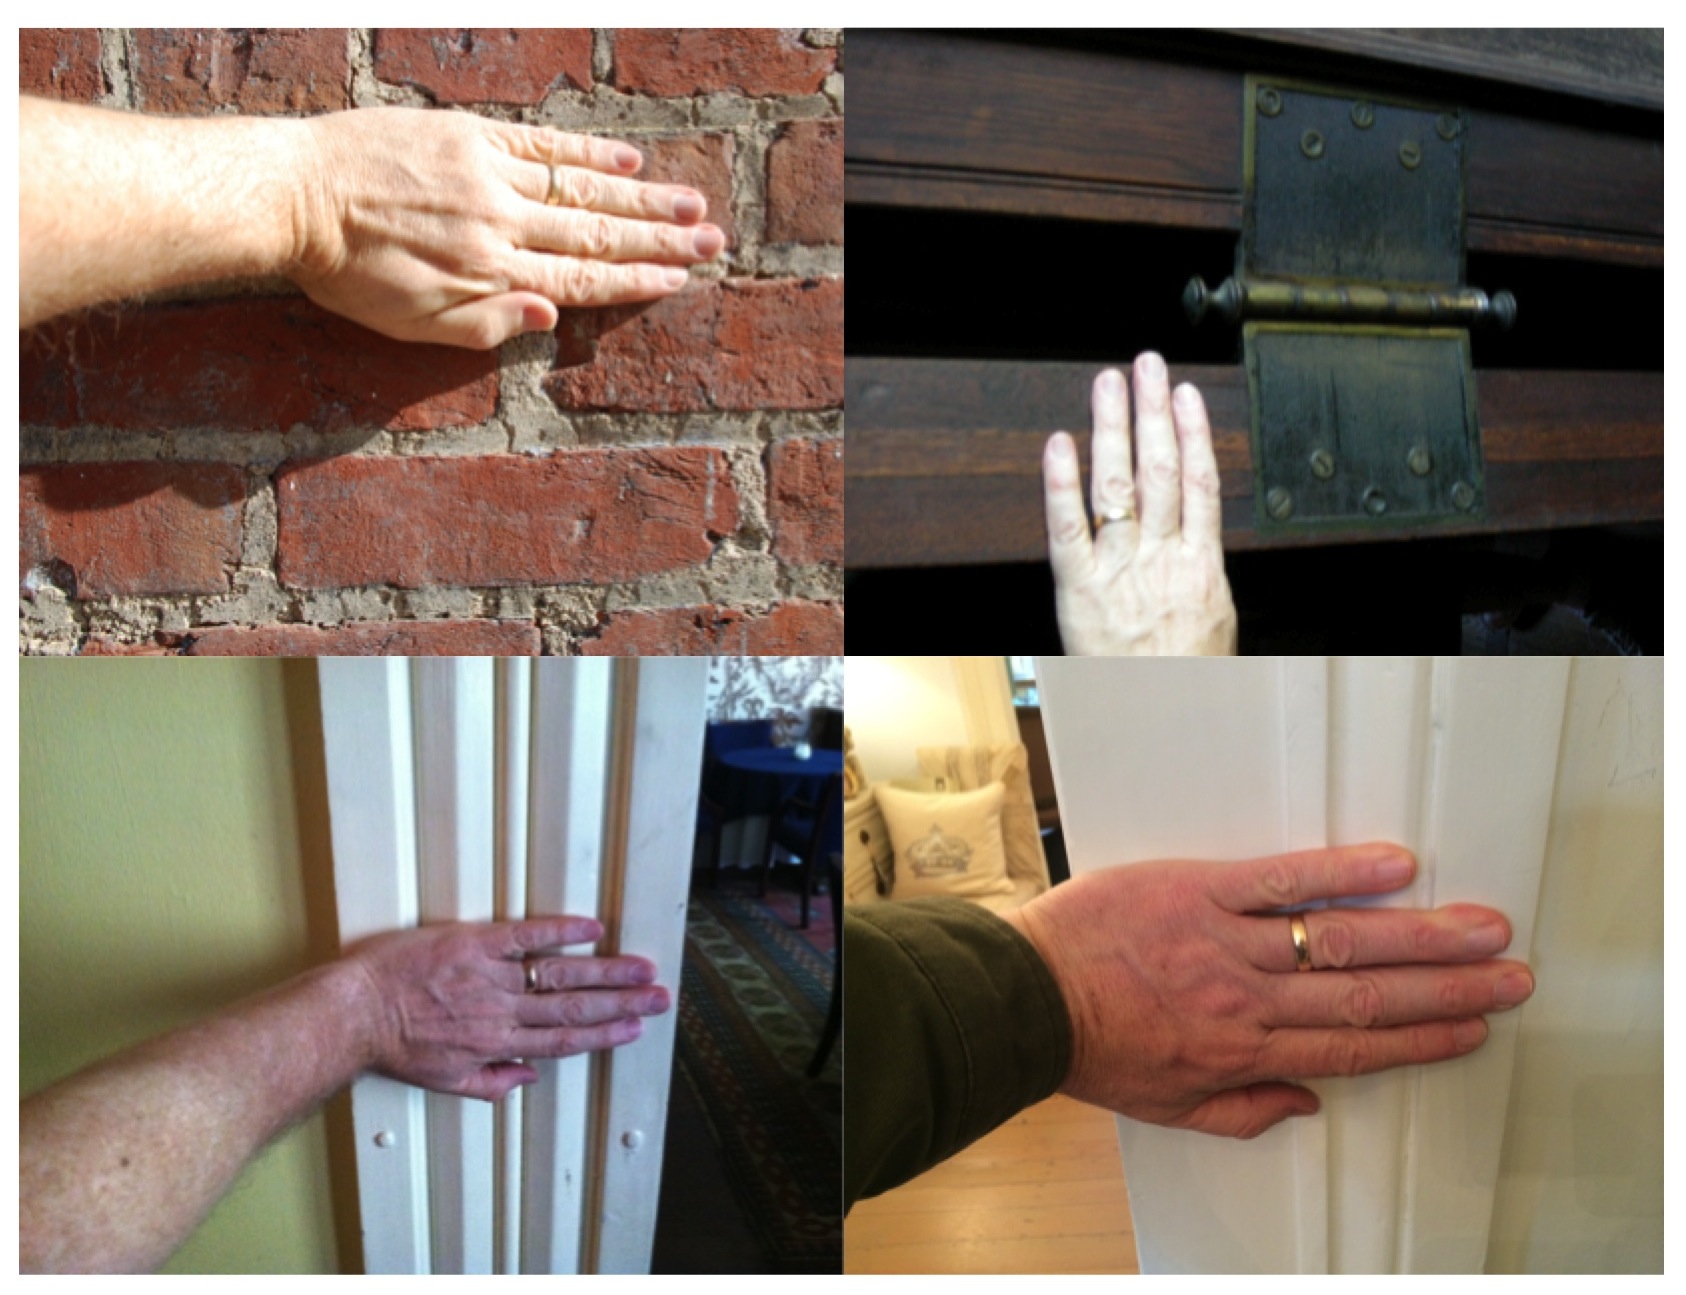
In February I posted an article about using your hand in photographs as a scale reference but didn’t go into how you extract that information once you have a copy of your photos. Here are three methods, two analog and one digital, that you can use to figure out hard dimensions from objects in photos.

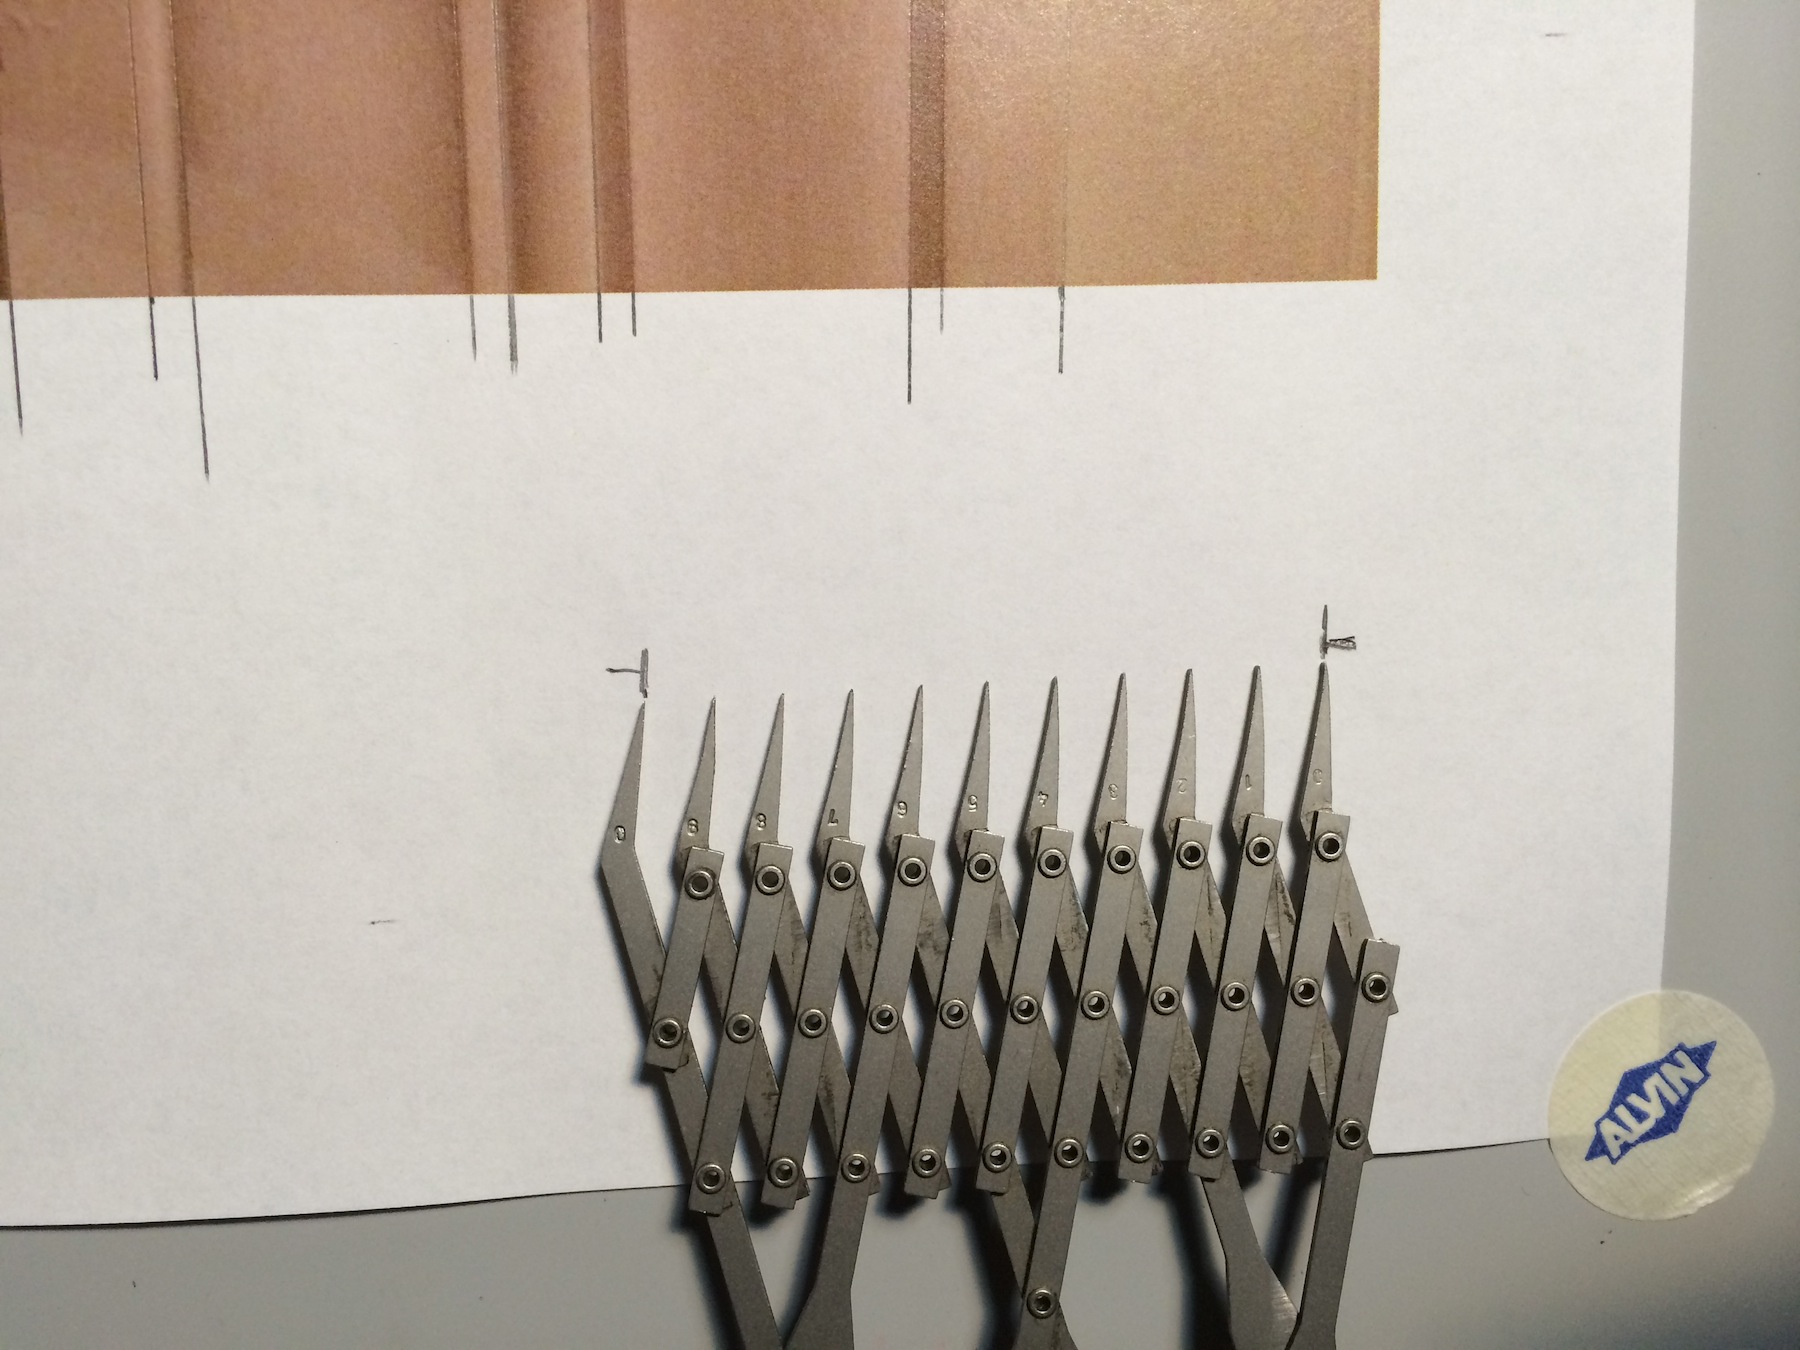
Equal Space Dividers

Once you have had some practice, this is the fastest method of the three, even faster that the digital method and you can use them right off a photo from a book or even a smart table screen. If you don’t have a set of equal dividers, also called 10 point dividers, you can buy a new pair for between $250 and $300 from various sites such as this one, or this one . They sometimes show up on Ebay but plan to pay around $75 to $100 for a used set.

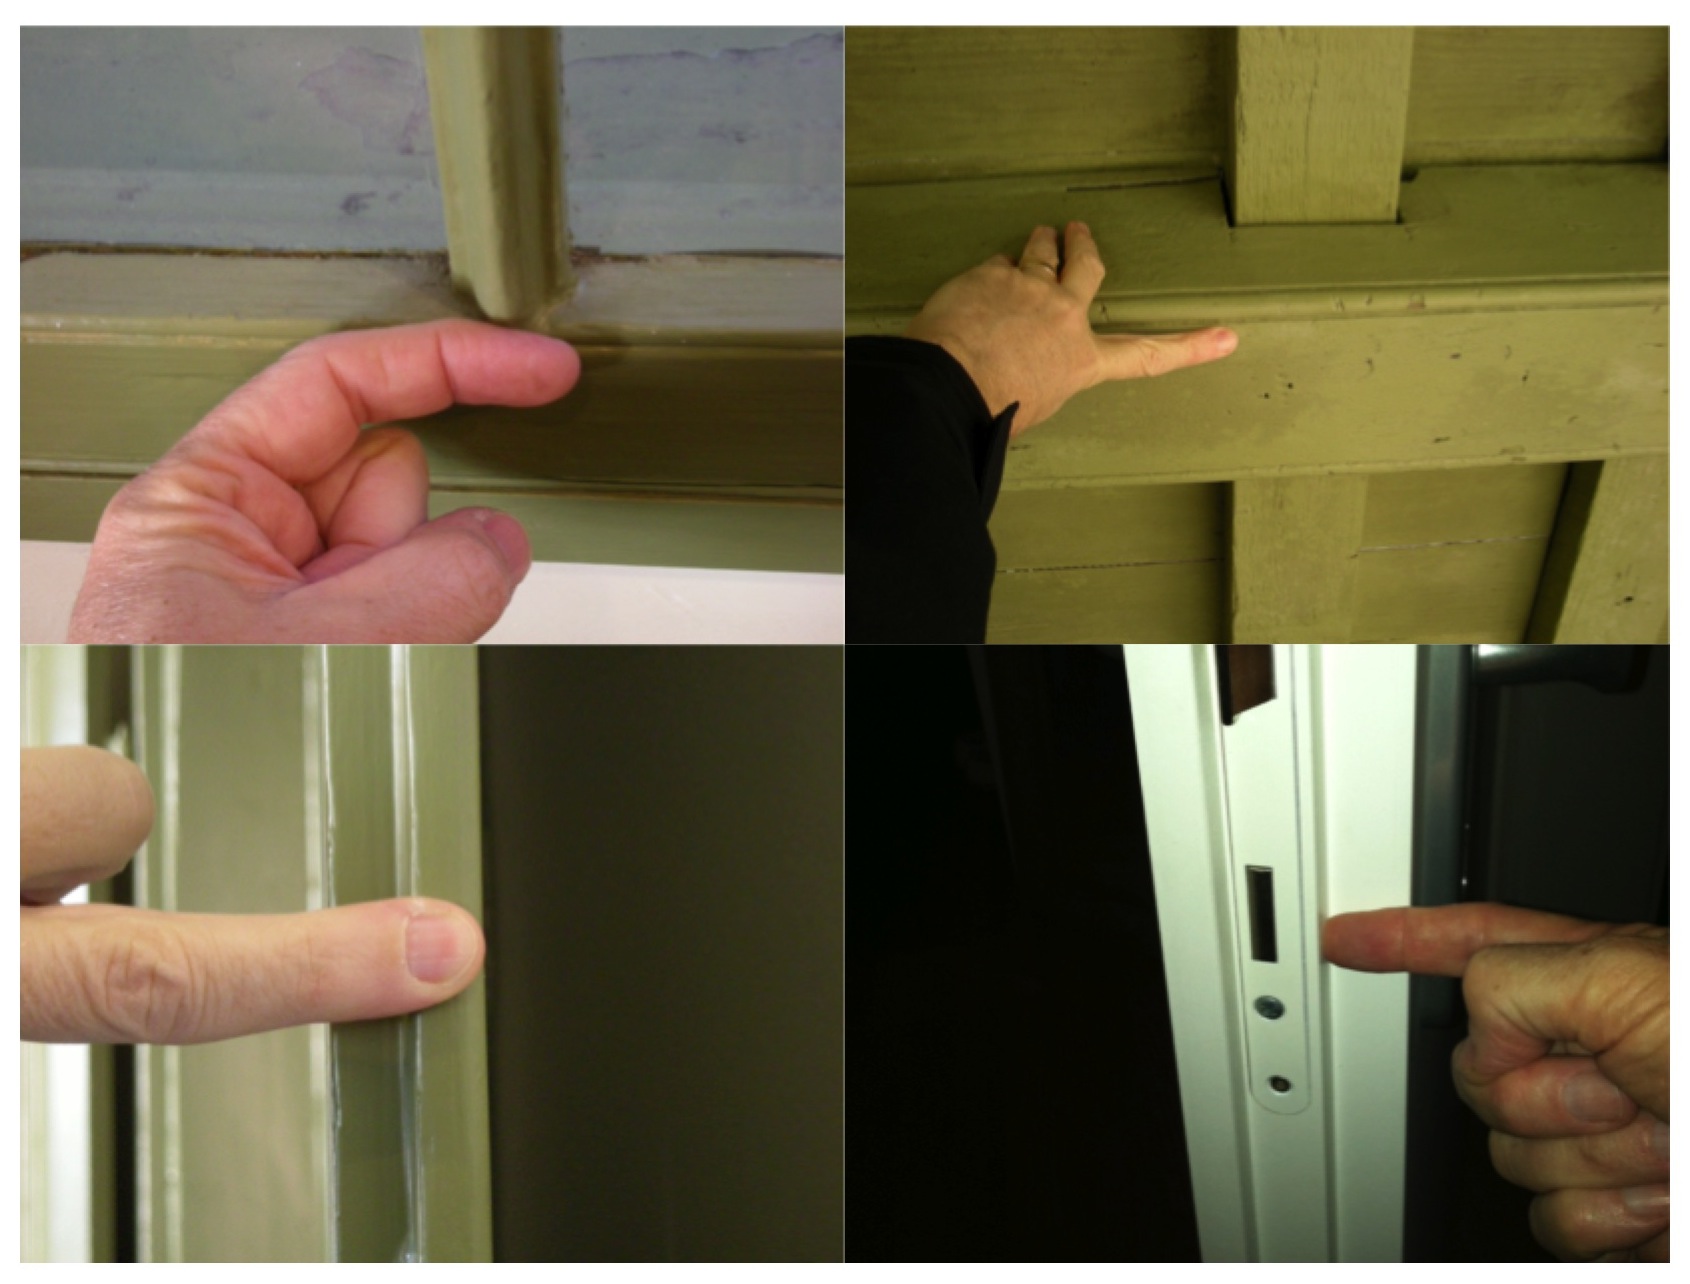
In this photo of a 1840’s Greek revival casing, we’ll scale the actual size using the hand in the photo as a reference nomen.

IMG_6890
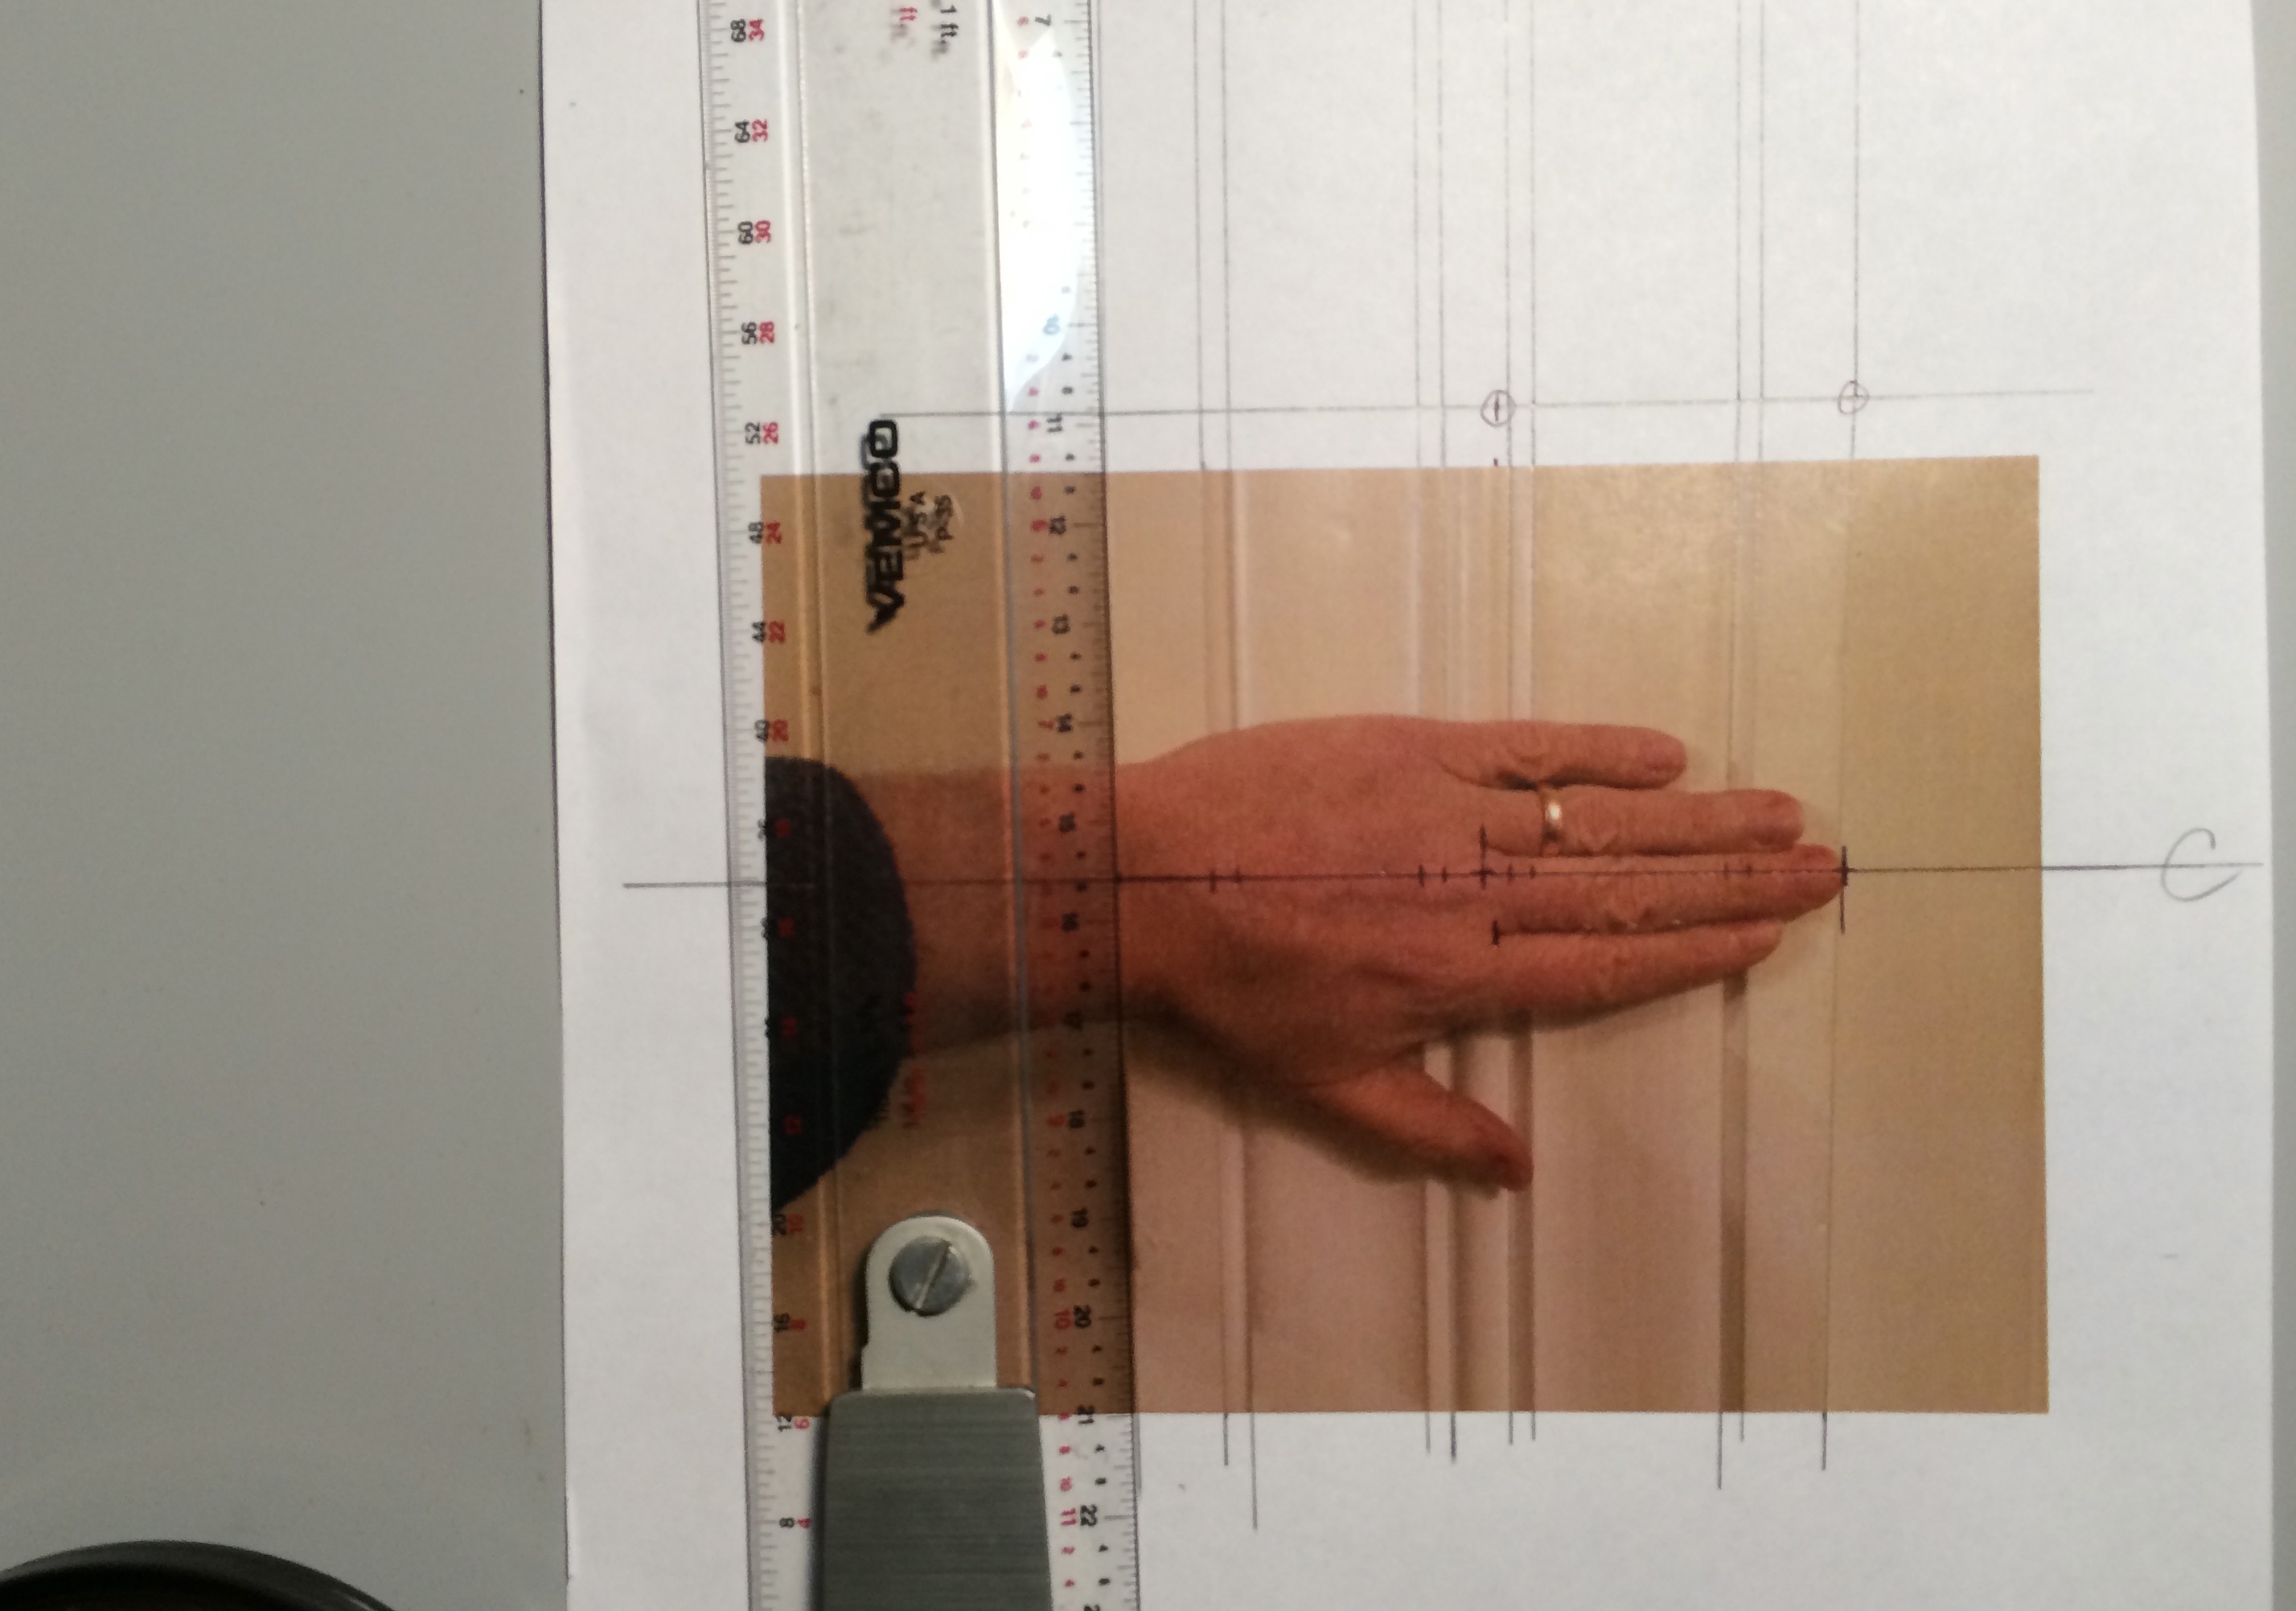
The first thing you’ll want to do is draw lines outlining the sides and edges of the moulding details, then you’ll draw a centerline through your scale, whether it’s a hand or tape measure. Then draw a line parallel to this at the top of the picture crossing the outlines. Now continue the lines perpendicular to this new datum line so that they are parallel which eliminates the perspective/foreshortening effect of the photo. Then mark a known distance on the original centerline, in this case it’s the distance from the tip of the middle finger to the end crease which is 3 3/4″.

IMG_6886
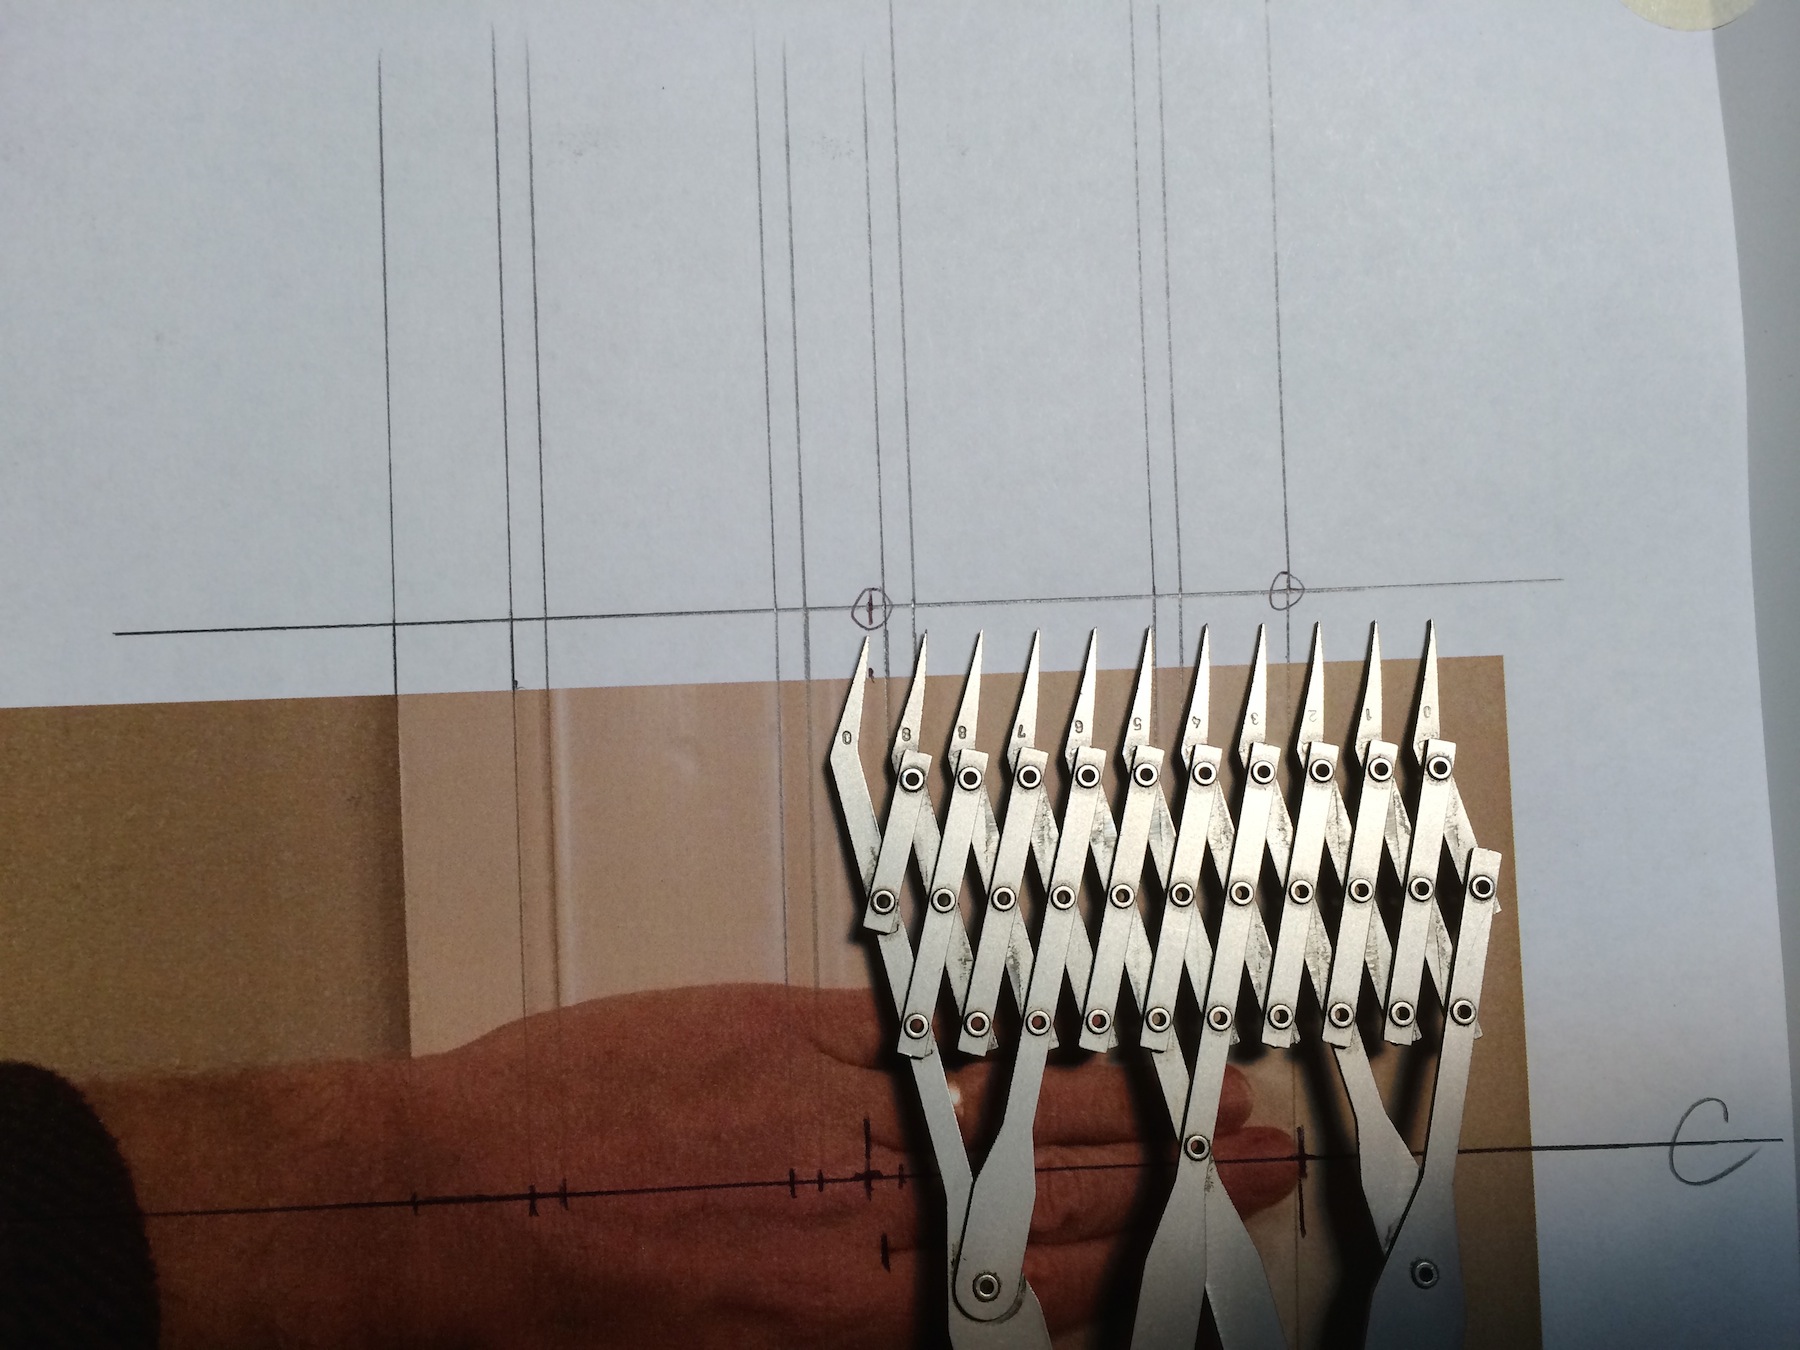
Now transfer these two points to the new datum line at the top of the photo. With the dividers, open them along this datum line allowing the distance between each point to equal 1/2″. They can represent any distance you want them to, but 1/2″ works best for this example. This means that 7 1/2 spaces will equal 3 3/4″ scale inches along the new datum.


IMG_6887Once you have these marks set, carefully move down to the bottom of the page and mark the distance at the first and last point. As each space represents 1/2″, the distance over the width of the dividers is a scale 5″ along the nomen line. For accuracy you’ll want to continuously check the spacing of the dividers against this ‘master’ to be sure you haven’t changed the setting. Most dividers are manufactured with fairly ‘tight’ joints but you can easily bump them while you’re working and throw off the setting.


IMG_6891Now we have a scale to measure the spacing between each of the line extensions above the top nomen line. You can mark the distance at the middle point and reduce the spacing of the dividers to equal 1/4″ in scale and so forth. I came up with an 8″ width, which when I checked the casing with an actual measuring tape, found it to be in reality 7 7/8″ to 7 15/16″. Not bad, well within the accuracy of most applications.


Digital Calipers

mutoh digital calipers
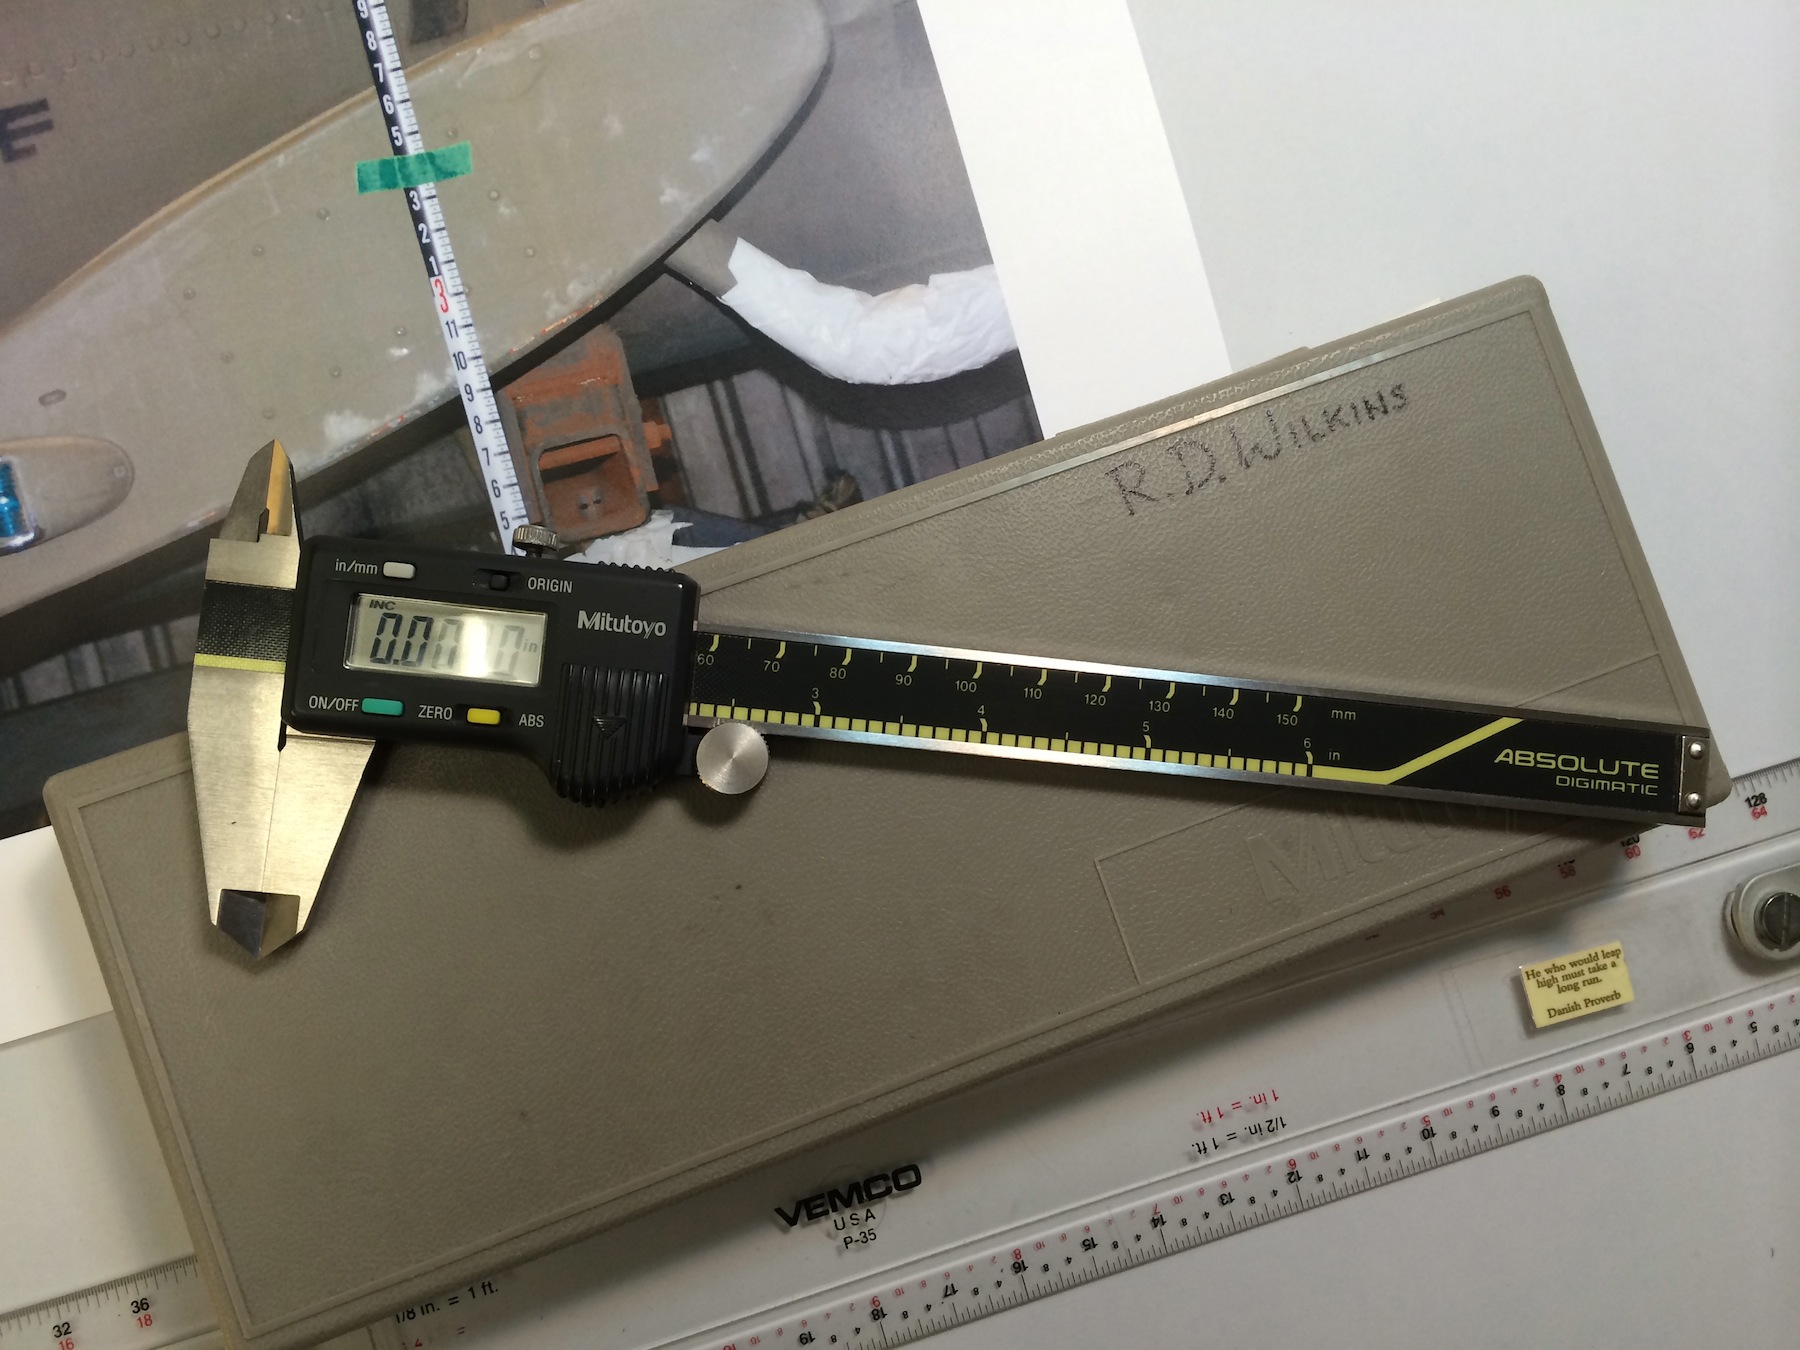
This method is not only more accurate than the equal space dividers but is a cheaper method as well, just not as fast at first. I have a set of Mitutoyo digital calipers which run about $180, but you don’t need anything that accurate. You’re going to be dealing with nothing finer than a thou of an inch and even that’s pushing it. A $12 pair like these are more than adequate, in fact this $9 cheap plastic pair are even better as the sharp points on the jaws of the better calipers will rip the crap out of the surface of the page of a book or the emulsion of an enlargement. They’re a lot safer to use when you’re scaling off a computer screen as well! They all have the ability to be set for decimal inches or metric.

IMG_7157
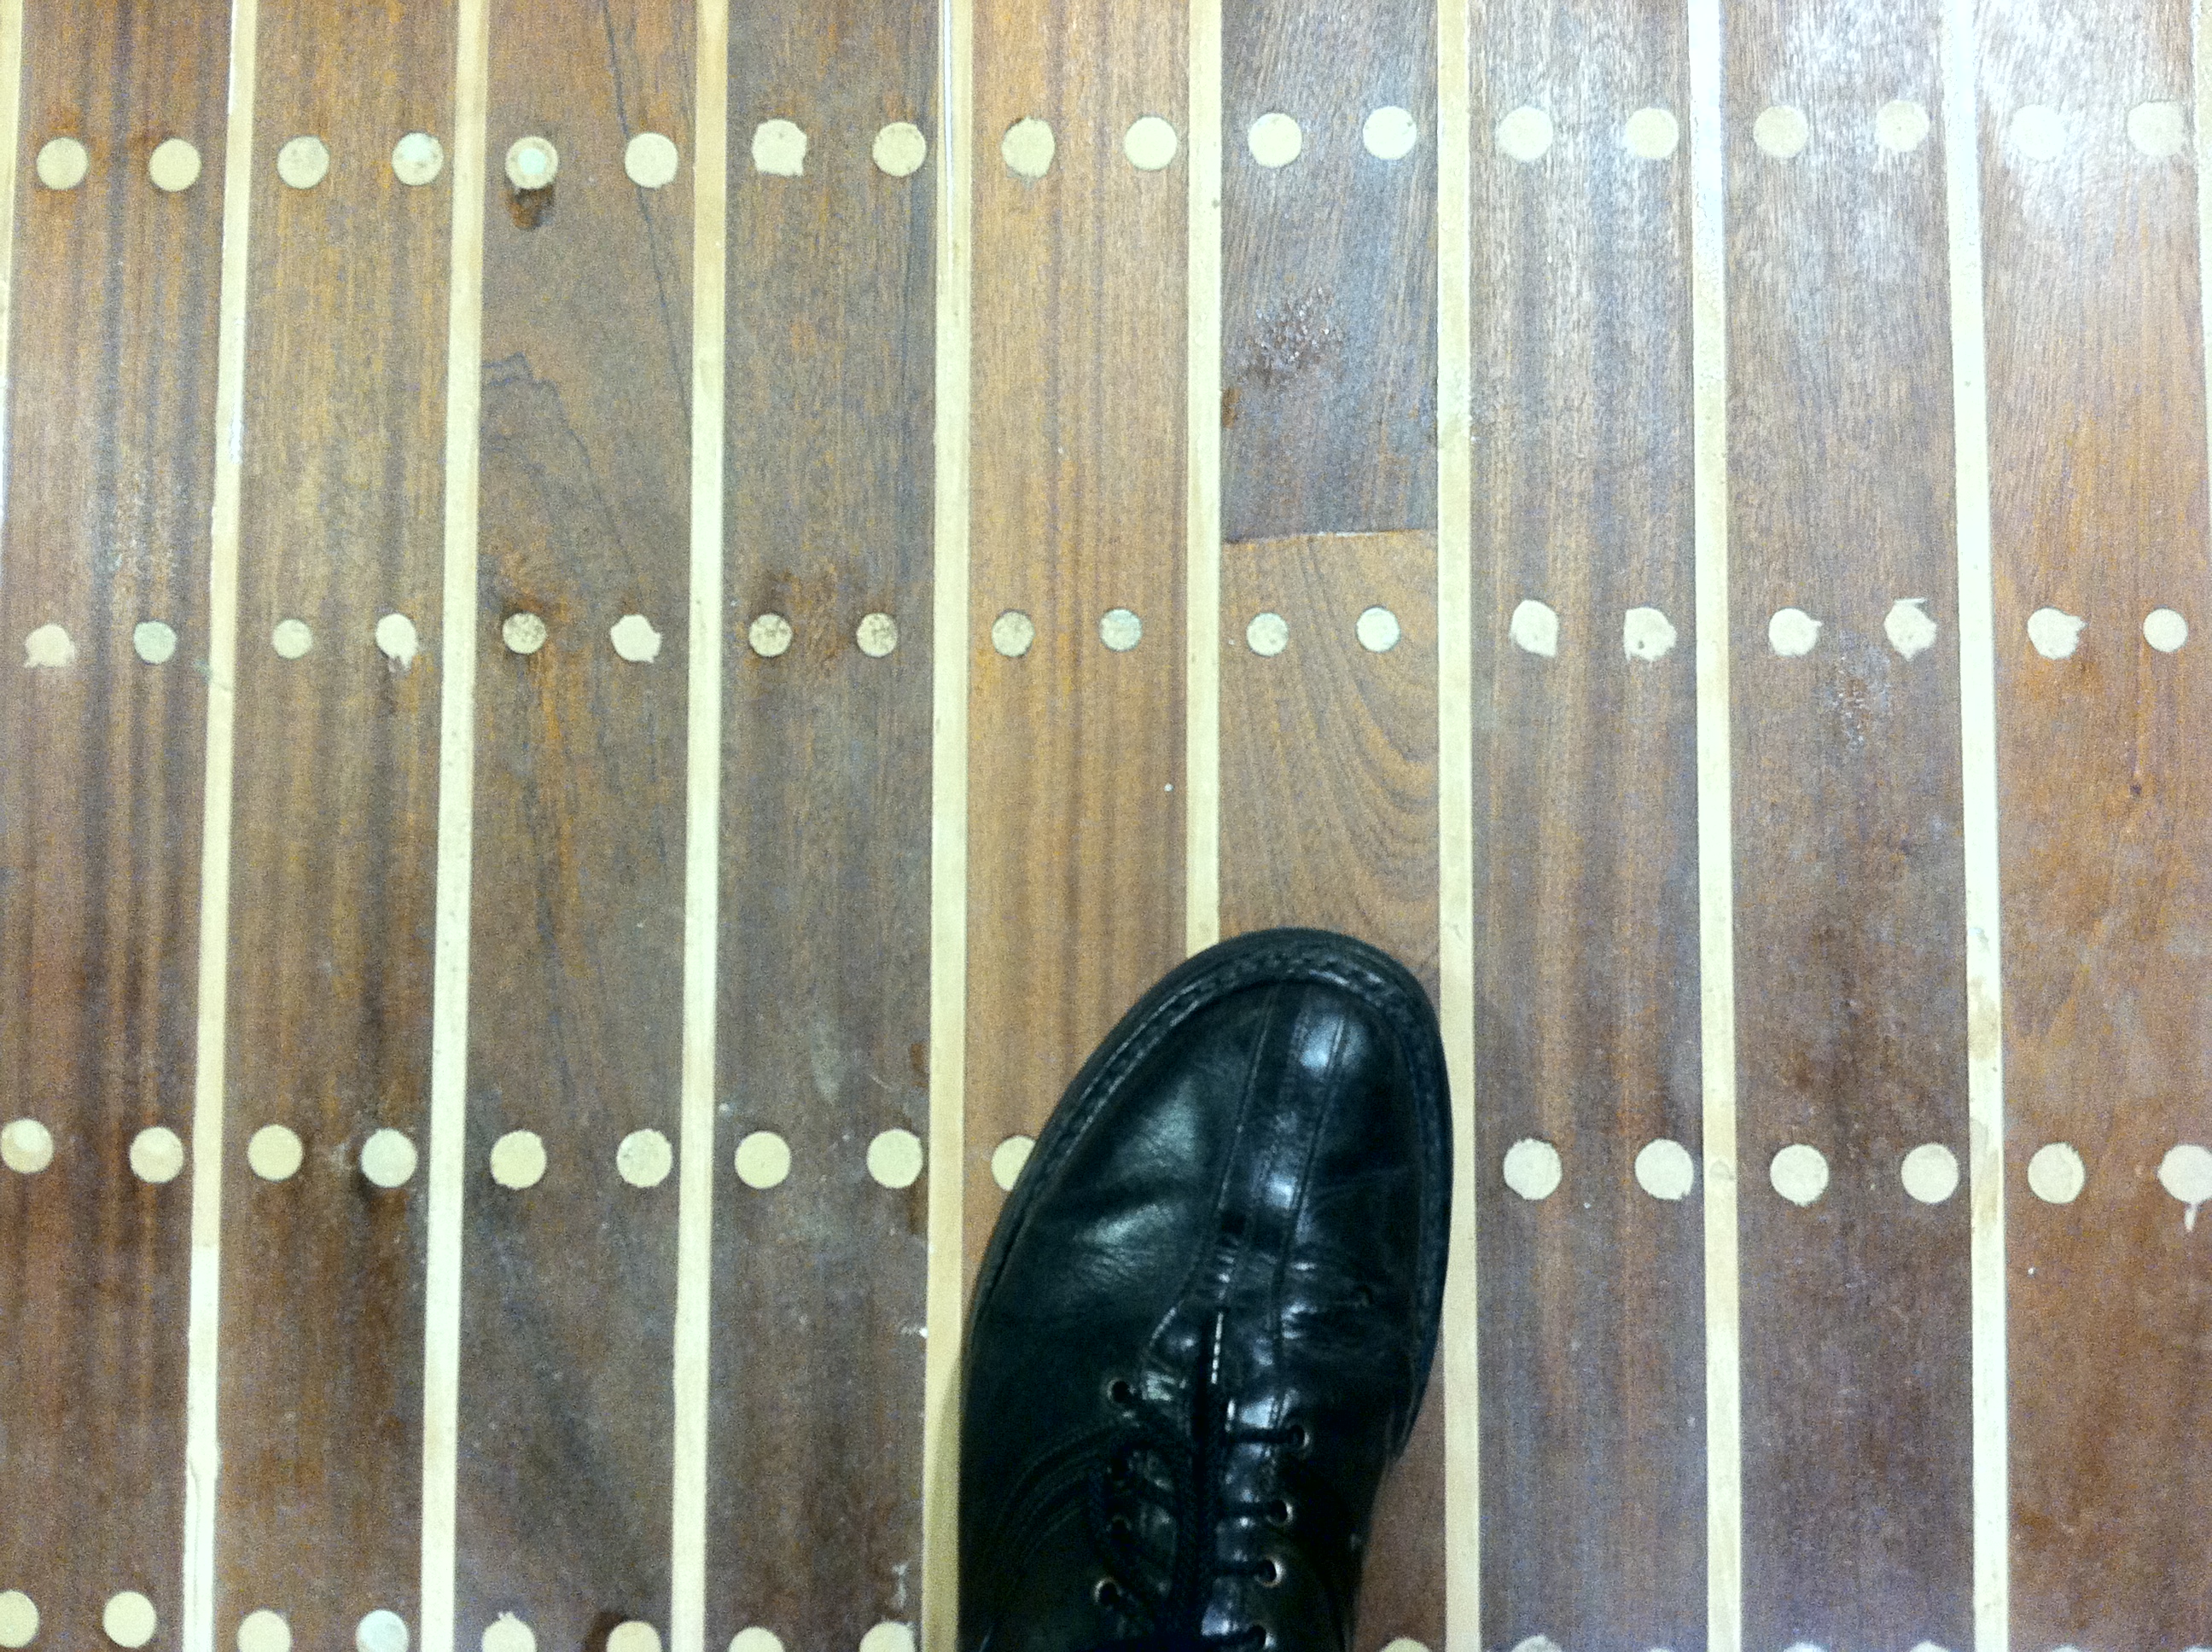
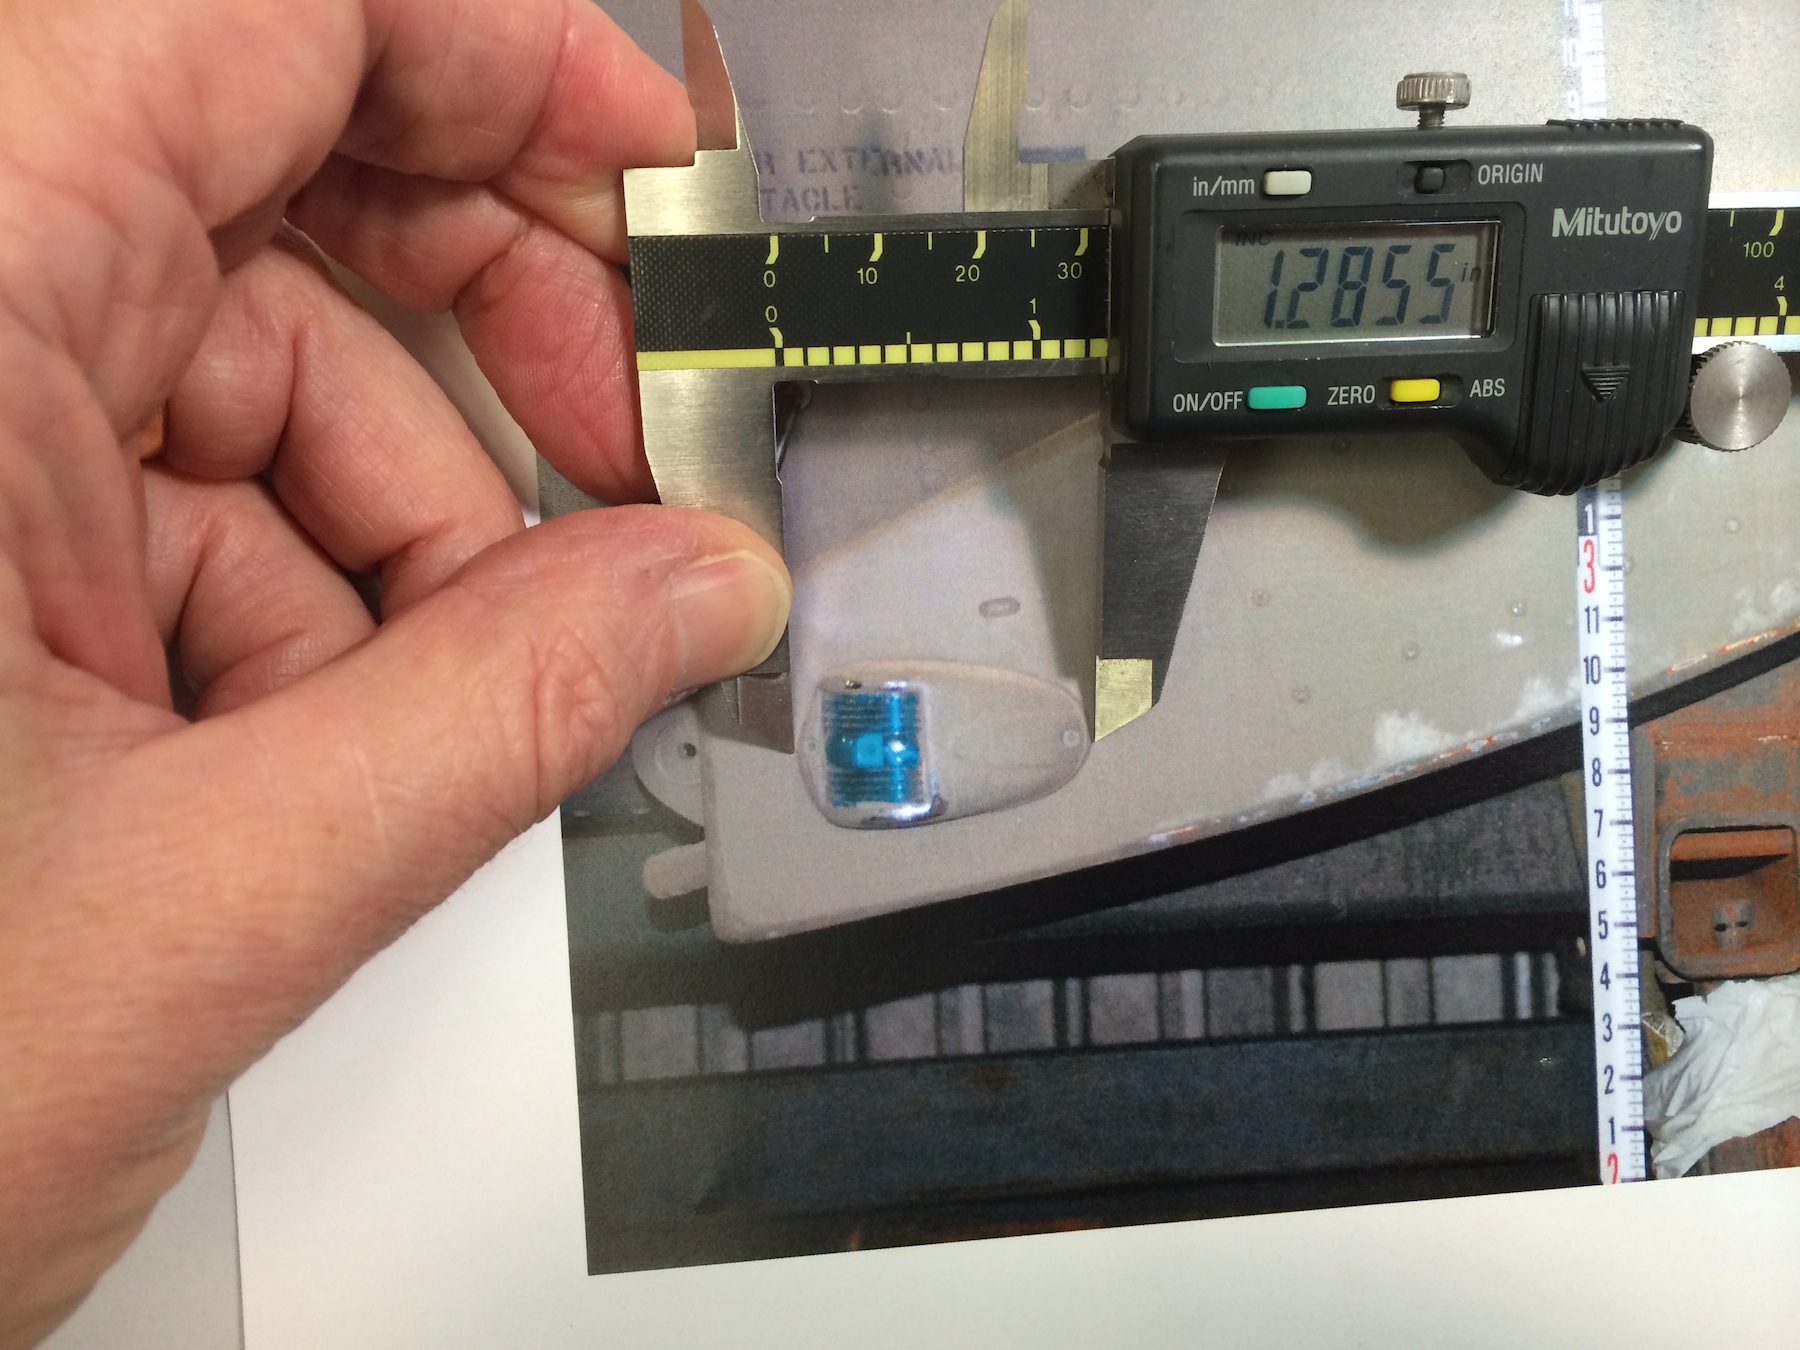
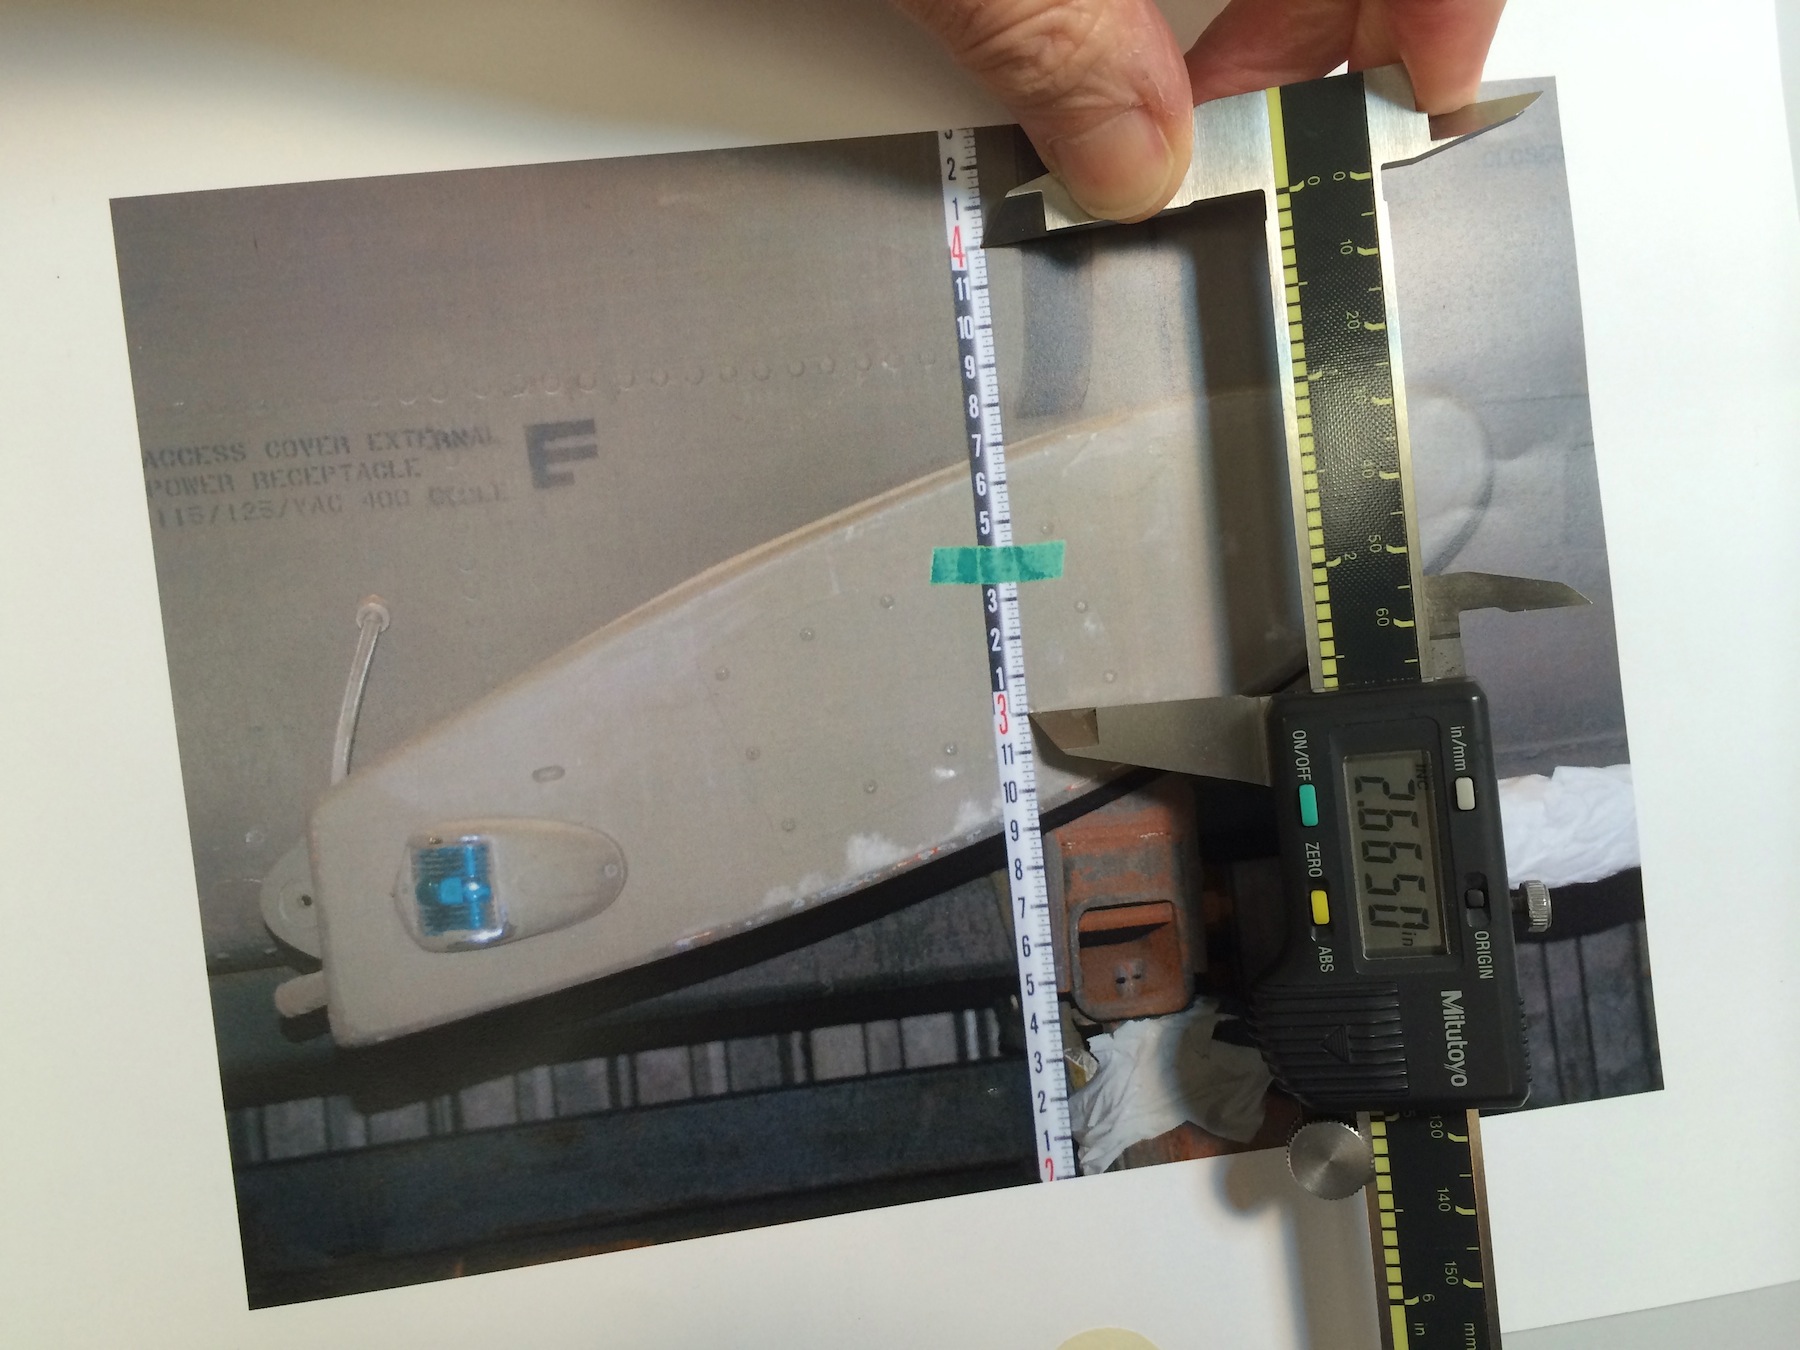
The nomen in this photo is a Keson Pocket Rod, a retractable builder’s survey pole, ( don’t know if it comes in a metric version) if you don’t have one, get one right now. You’ll wonder how you got by without it. With a graduated scale in the photo it’s easy to find a correct scale. Turn the calipers on, squeeze the jaws together and zero out the reading. then you just set the jaws between a one foot increment and record the reading.

IMG_7158
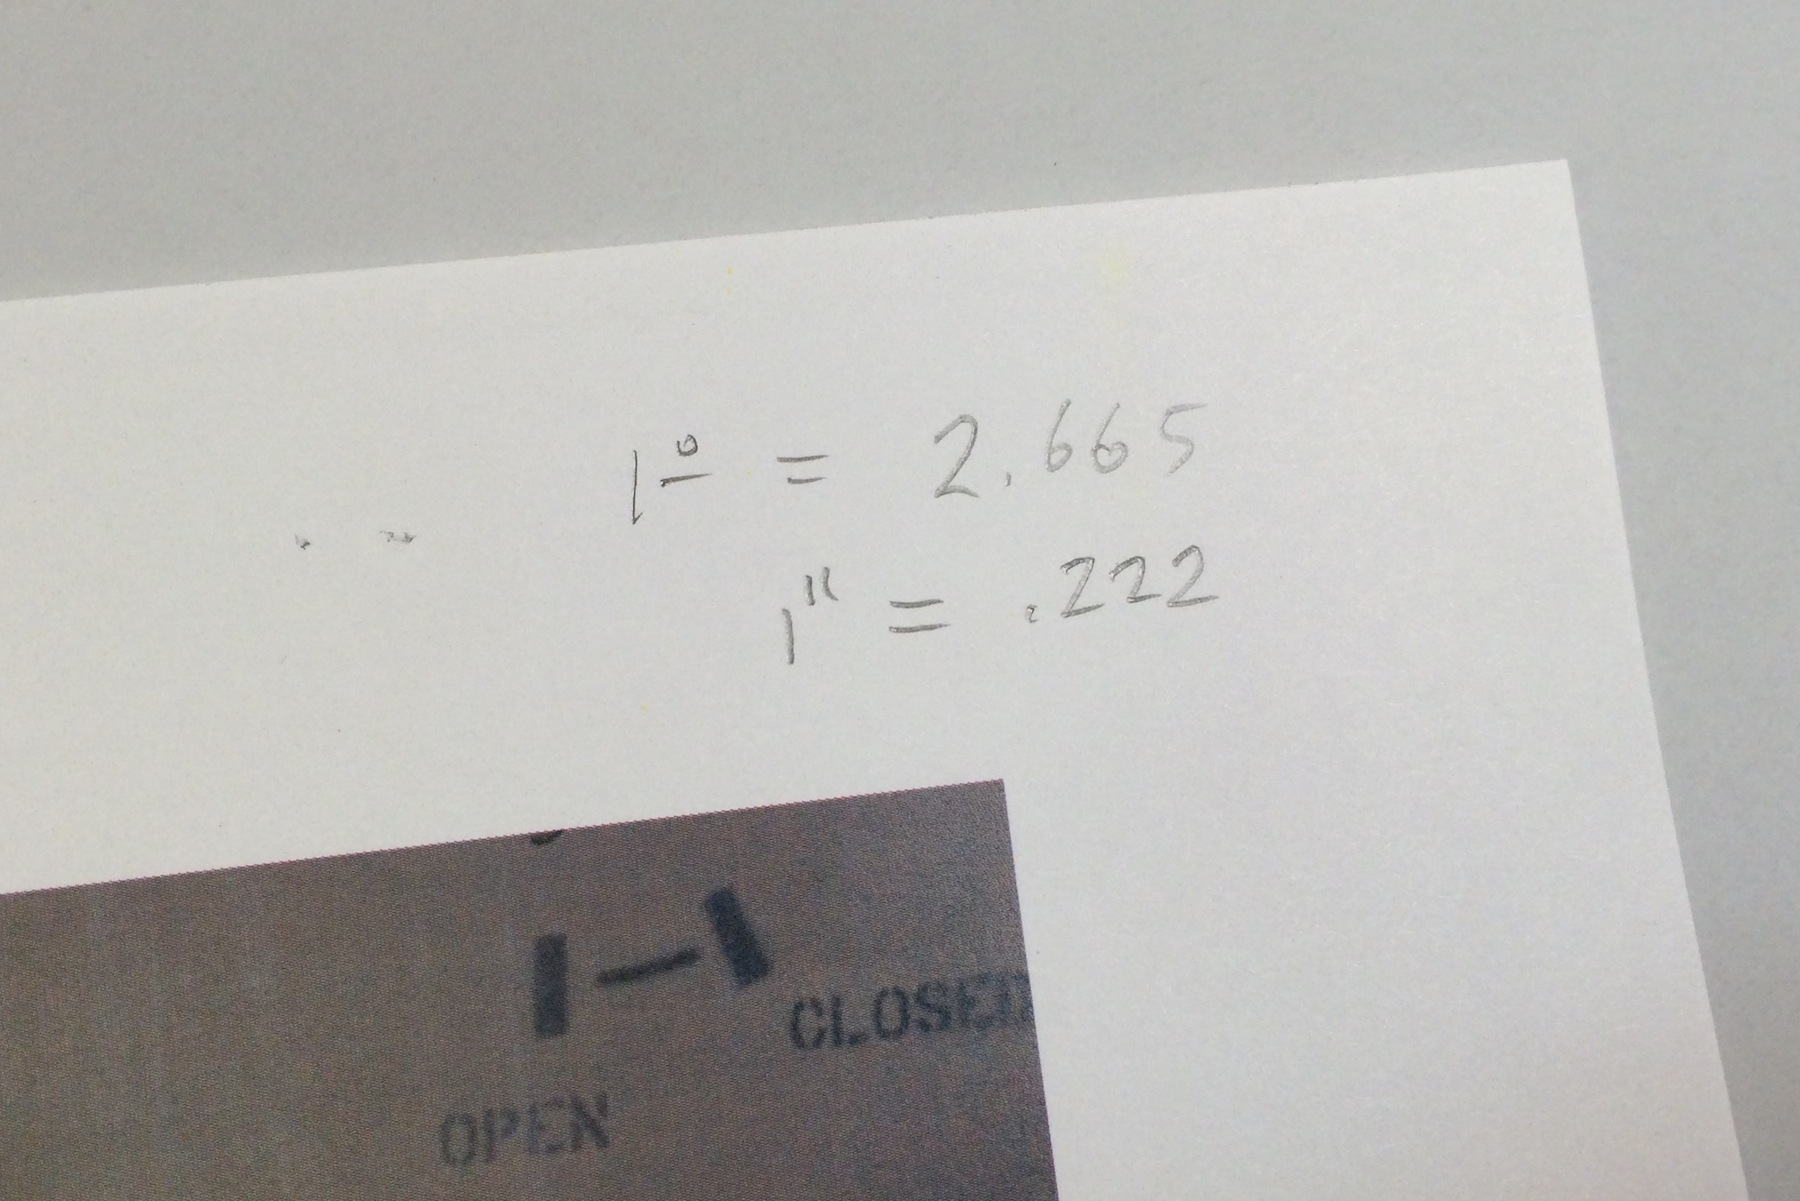
In this example 1 foot equals 2.665 inches. Divide this number by 12 and you come up with .222 inches equaling 1″ in the photo. Record these numbers for reference at the top of the photo. Remember that this equivalent will only be accurate over the whole area of the photo if you have been careful to make sure your camera was perpendicular to your subject matter.

IMG_7159


I could go into allowing for foreshortening and lens distortion calculations but that would take an entire chapter of a book.


IMG_7161
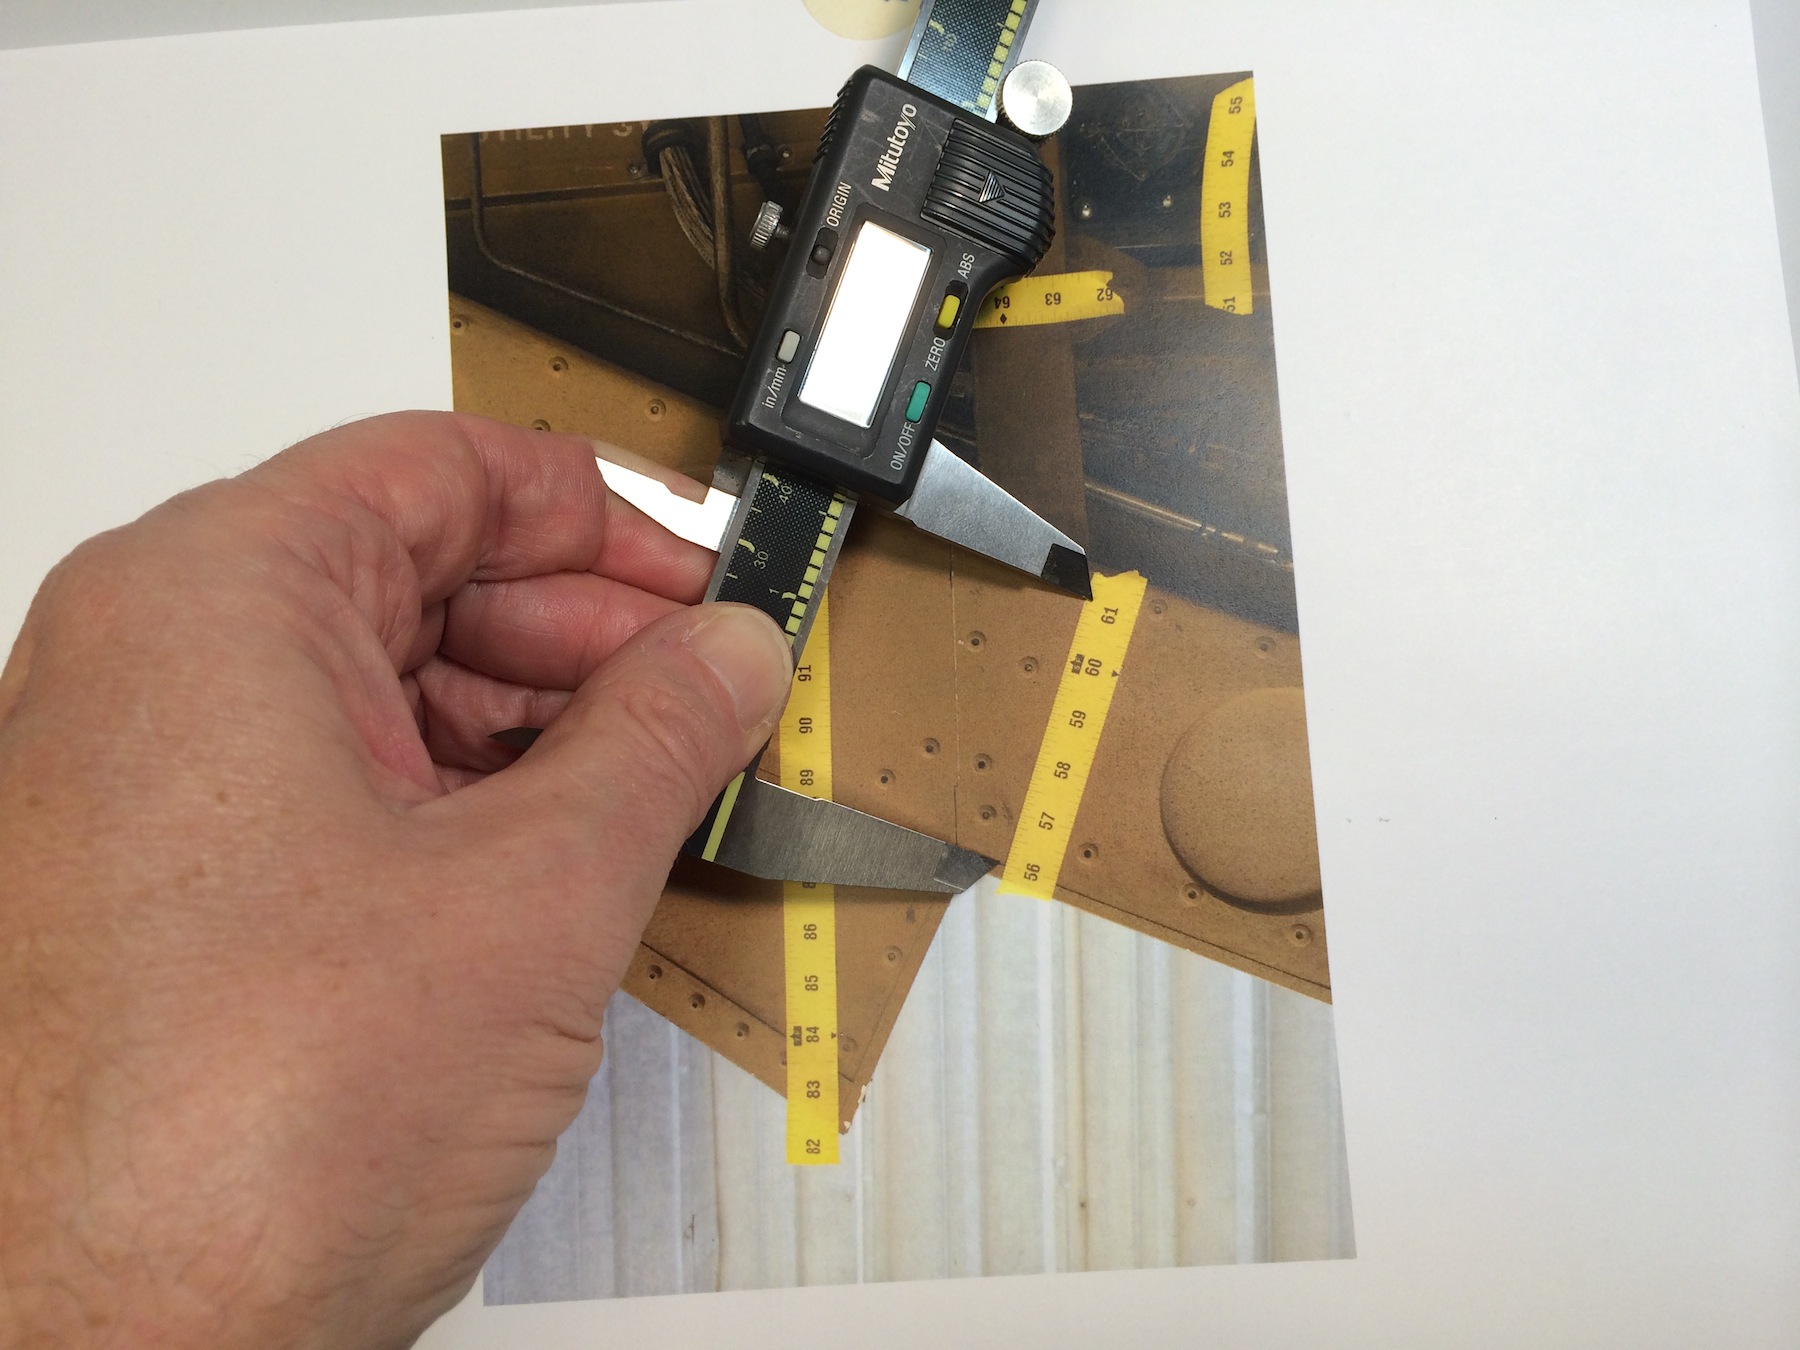
There are other options to the survey pole or tape measure. Richard Mays introduced me to graduated adhesive tape on a movie several years ago and it’s a great tool. You can put several pieces within the frame and you’ll quickly see if you have  foreshortening issues. Art Director Jim Wallis has provided a manufacturer and source for ordering some for your kit. Or this one, Or this source for both imperial and metric with story pole writing space.

Photo Scaling With Sketchup

I know there are a number of ways to scale from photos digitally but if you pla
n to do any 3D modeling with them, Sketchup is a good place to start.Screen Shot 2015-04-09 at 4.36.35 PM

In Sketchup you’ll create a horizontal face and import your photo using file/import. Be sure to import the image as a texture. Stretch the image to fill the face and click. The image will tile itself over the face, so just trim  the excess repeated images.


Create a Group and double-click to open it for editing. This is an especially important stepScreen Shot 2015-04-09 at 4.38.50 PM if you already have other object or images in your model file. With the Pencil tool you’ll draw a line along your nomen marking out a specific distance, in this case 12″. the longer the line the more accurate your scaling will be.


With the ruler tool, measure this line from one end to the other. Ignore what it tells you theScreen Shot 2015-04-09 at 4.38.50 PM length is. Type the length you want it to be which will appear in the Value Control Box in the lower right corner of the window. When you hit return , a box will appear asking you if you want to resize the object. Click ‘Yes’ and the object will shrink/grow to the correct size and your photo image will now be at full size scale.

Screen Shot 2015-04-09 at 4.39.50 PM


Now you can trace any area you like and the tape tool will give you a correct length, Screen Shot 2015-04-09 at 4.42.54 PM
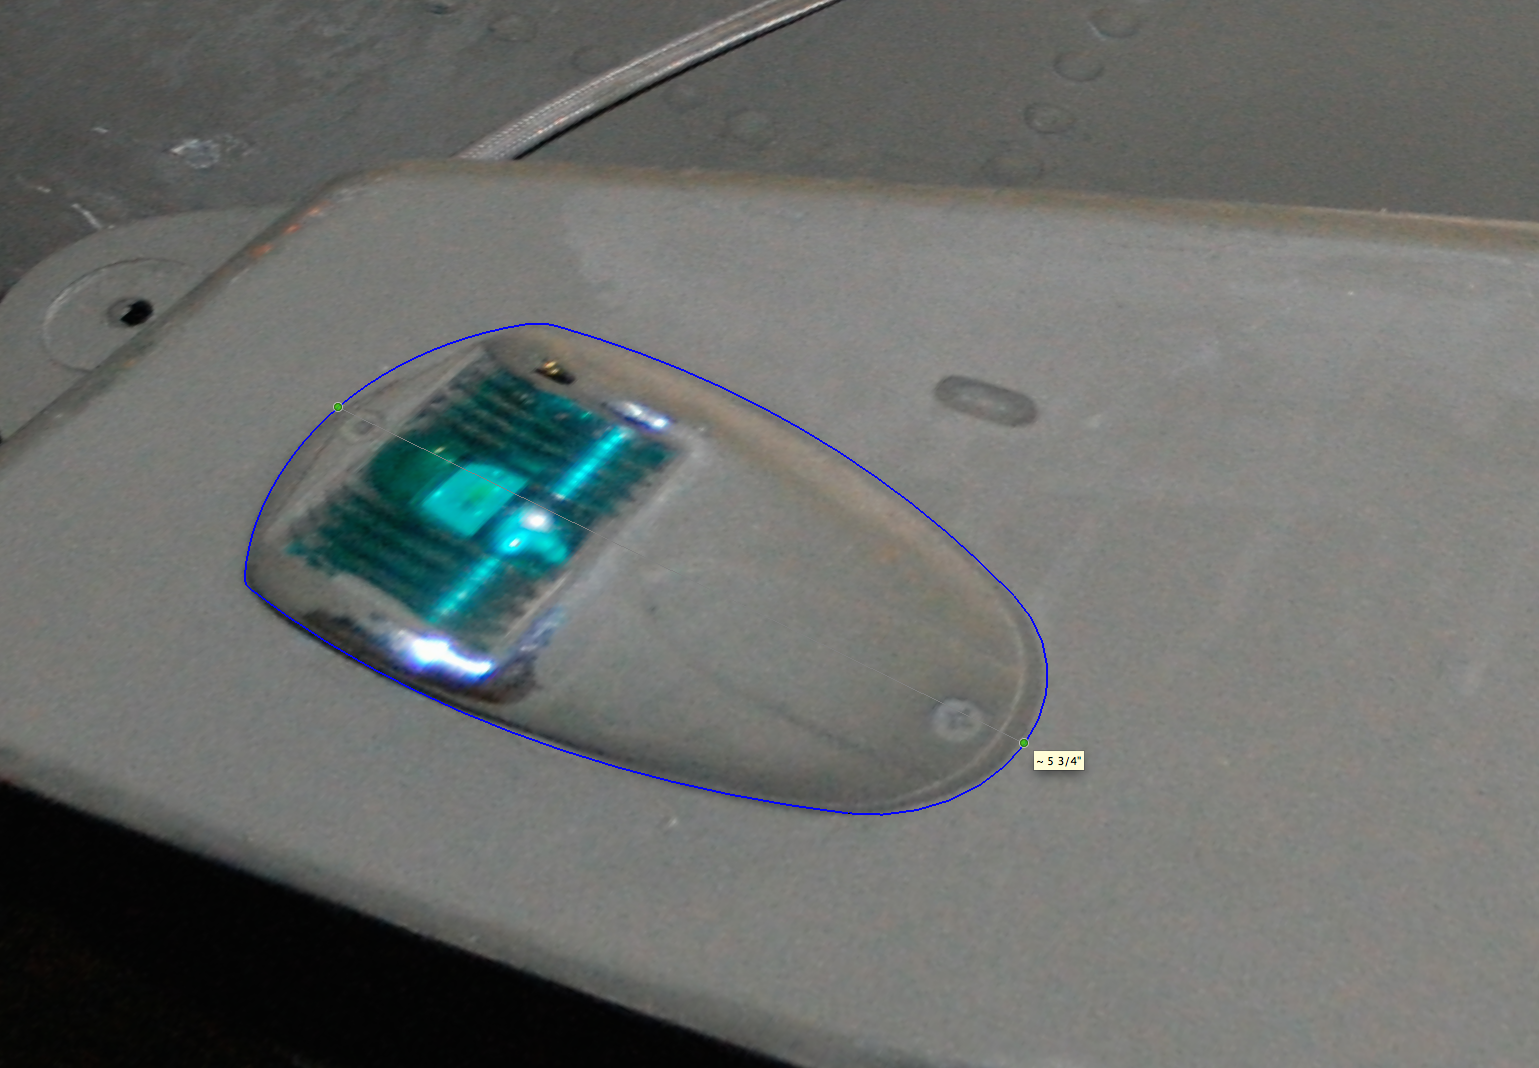
providing you are measuring in the same focal plane as the nomen. Obviously if you are measuring something in the foreground or background the measurement will be off, which is why you need lots of survey photos  if your subject is complicated,


–  R.D. Wilkins


Protected by Copyscape Original Content Check

The Measuring Tool At The End Of Your Arm

I like photographing architectural details. But they’re only really useful if I have a scale in the photo. Measurements written down in a journal somewhere are bound to get separated or lost and the photo won’t do me much good if I want to replicate the detail. I rarely carry a tape measure with me all the time and usually carry a small paper ruler in my wallet, but that often gets lost of left behind.

When those times occur where I need a scale in the photo, i just use my hand. It’s handy because it’s always with me, I know how big it is and I can always refer to it later when I’m scaling the photo. It’s my built-in story-stick.hand photos_1

The hand has been a measuring device for thousands of years and is still used as a measure of the height of  horses in the U.S. and UK. The hand’s width was standardized at 4 inches by Henry VIII in the 16th century, the hand’s breadth, (just across the 4 fingers) at 3 inches, making the average finger width 3/4″.

hand measurements_1

The first joint or distal phalanx makes a handy scale for small details as well.

finger photos_2

And don’t forget your shoe makes a good scale object too.

IMG_4324


So what do you do with these? How do you translate these into working documents? Next time I’ll explain the basics of scaling from photos using dividers.

But in the mean time, this video by writer and woodworking instructor Jim Tolpin and animator Andrea Love gives a great intro into designing with hand and body proportions.


For more on proportional design, get Jim and George Walker‘s book, By Hand & Eye from Lost Art Press. George also writes a great blog on design you can find here.

And if you want some hands-on help, Jim will be teaching a class based on By Hand & Eye at the Port Townsend School Of Woodworking on March 21-22.

-Randall Wilkins

Google Earth Pro Price Drops From $400 To $0

Google announced last Friday that they were going to start offering their Pro version of Google Earth at no cost. The Pro version was meant mainly for developer, architects, contractors and real estate agencies who need both more advance measuring tools than the basic version offered plus higher resolution printouts.


Here is a table showing the differences between the two versions.

Screen Shot 2015-02-03 at 8.54.07 AM

The Superdome is 66.82 Smoots In Diameter

Unlike with the free version the Pro version allows you to measure diameters, heights and 3D paths and polygons.

Google Earth Pro 2 Google Earth Pro


How Accurate Is It?

I decided I’d test the measuring tools on something small to test the accuracy. I zoomed over to Colonial Williamsburg Courthouse which I built the model of years ago based on HABS surveys. The footprint measured out to be accurate within 99% and the height to within 98% accuracy. That’s pretty amazing.

williamsburg courthouse


You can download the model here and check the results for yourself.

Your Next Phone May Be A Real-time 3D Scanner

In February Google launched what they call “Project Tango”. They have developed a smartphone which is also a 3D scanner that can map the surrounding area and build a visual map of it. Processing over 3 million reference points a second, the device can build a virtual, scalable model of a room in the time it takes to walk through it.

Schematic of how the Tango device works

Schematic of how the Tango device works

They have currently hand-picked 200 developers to create applications for the device which as of now only runs on Android devices. Imagine what this would do to those never-ending time-consuming location surveys. Would you ditch your iPhone if you could have an Android phone that did this?


Can’t wait that long? If you’ve got $4500 and want the latest in room scanners, go over to Matterport and watch their demonstration video of their room capture camera system.


3D Scanners For Your Pocket – Coming Soon, Very Soon.

There must be something in the water in Boulder. A lot of technology is coming out of that little town including two new devices which could continue to revolutionize the way we work. Location survey work has never been much fun and always comes with unknown challenges that often leave you stymied, ike that billboard you suddenly learn you have to measure, or the block-long row of buildings that you have to survey with two hours of sunlight left in the day.

Using 3D scanners for location surveying and object duplication in the past has been something people have wanted, but the price of most of these devices usually makes their use too cost prohibitive. The iPhone and the many apps that accompanied its popularity have been a real help in many Art Department workflows but their uses are currently limited as far as true 3D capture and augmented reality functions.

Two companies, Ike GPS and Occipital are trying to fill a need for low cost 3D scanners with two inventions which act as add-on devices for digital phones and tablets. By harnessing the power of these devices, their creations enhance products that most people are already using.

Ike is a company which has had previous success with hand-held scanners and was looking to create a device which could be small enough to fit on a smart phone. They’ve come up with a small device called Spike which attaches to an iPhone or other smart phone and uses the devices built-in accelerometer, compass and GPS functions to make it possible to measure the size, height or even the volume of buildings and even create a 3D model to export to a modeling program.

5543da38df27e38fafd40a7ac07248a7_large

The company is currently running a Kickstarter campaign to raise interest as well as funds to develop the device which they plan on having ready for the market by next May. The device will come in two versions; the Basic version and the Pro version which will generate 3D model files, geolocate buildings and allow for pulling measurements from the digital image.

f5b20da41992f026ed2e151a0ad21154_large

For a donation of $389, you’ll get a prerelease Spike Pro which the company says is around half of the final retail price, meaning the street price of the Pro unit is going to be somewhere in the $800 range. That may seem pricy but the next closest device I know of that can provide similar functions is about 5 times more,  both in size and price.

Here’s a video from the company website:


Occipital has developed a device they are calling the Structure Sensor which attaches to an iPad and can create 3D scans of objects or rooms up to about 550 square feet with a range of 3 1/2 meters. The file can be imported into a CAD package or output for 3D printing.

Structure Sensor

The Sensor Kickstarter program is fully funded but for a $330 pledge you can still get a Sensor at a significantly reduced price than it will retail for when it becomes available early next year.

Check out the video below:

Here are the links to the Kickstarter pages:

Structure Sensor

Spike Pro

The Importance Of Locations

I’ve always thought the “A film by” credit was unwarranted. Take any film, imagine it being made with a different cinematographer, editor, composer, production designer, costumer, much less a different cast, and you’ll have a completely different film no matter who’s directing it.

There are a number of films you could say the same about if you had a different location scout. Sometimes a location affects the look of the entire film. It can dictate the look of the stage sets. It can set the psychological mood of the story. A good location scout can bring so much to a film that very few people will ever realize.

The Seaside Community in Seagrove Beach, Florida which served as the main setting for the film The Truman Show.

The Seaside Community in Seagrove Beach, Florida which served as the main setting for the film The Truman Show.

In 2000 I was working on one picture where the head of locations was trying to find a house that set up the story. He found three houses that he believed would all work for the setting. The director mulled them over but said he wanted to see more choices. Every week he and is team would scour the town looking for the perfect house, talking to the owners, doing a full photo survey of each which consisted of photographing the house in and out, processing the film with 4 copies of each frame ( this was pre-digital) and then taping the photos into manilla folders including the long taped-together panorama shots.

These folders soon filled file boxes. A lot of them. Someone from the studio called up wondering how we could have spent over $10,000 in film processing. We told them to come look for themselves.

Playing a hunch, the locations manager went back to the director with another folder. Exasperated, he said he had found one last house that he really felt was the right one. The director looked at the photos, nodded and said condescendingly, “Why did it take you so long to find it?” The locations manager flipped the folder over and pointed at some notes on the back with a date. “It didn’t”, he said. “This is one of the original three houses I showed you two months ago.”

Criterion has released a new edition of the 1997 film, The Ice Storm, (a film I didn’t work on). In this video from the Criterion site, Production Designer Mark Friedberg talks about the importance of finding just the right locations that would convey the psychological picture of each of the families.

Measuring Heights Without A Tape Measure

Here are three high-tech to no-tech ways to calculate the height of a building or tree or pole or anything else you need to know the size of but can’t determine with a tape measure.

1. Theodolite Pro

Theodolite Pro is an app for the iPhone, iPod Touch and the iPad.  Made by Hunter Research & Technology , it’s a multi-function augmented-reality app that combines a compass, GPS, digital map, zoom camera, rangefinder, and two-axis inclinometer. Theodolite overlays real time information about position, altitude, bearing, range, and inclination on the iPhone’s live camera image, like an electronic viewfinder.

At $9.99, it’s worth more than 4 times the price.

Theodolite Pro screen

The apps screen data gives you your position in either latitude and longitude or UTM units, as well as the time and date and your elevation. On each side are the horizontal and vertical indicators in tenths of a degree. The device has a one-button calibration function as well as a 2x and 4x magnification for pin-pointing a particular object. There are several options for the center crosshairs, one of them are a pair of multicolored floating boxes which merge and turn white when you are plumb in both directions.

You’ll get a much better result if you mount the device on a tripod. For an iPhone, the method I like is with a Snap Mount. It has 1/4″ female sockets for mounting in either a vertical or horizontal direction.

Snap Mount device for the iPhone 4

Once the phone is mounted, you point the center at the top of the object and push the “A” buttton to take a reading. Then tilt the device toward the bottom of the object and take  the “B” reading.

Then the app will ask you for your distance to the object. The more accurate your answer the more accurate the result will be. So, you’ll either have to pace off your position or measure the distance with a reel tape or laser measure device.

If this isn’t possible, you can use the option to determine the distance and height, although this will probably not be as accurate.

There is also an optical rangefinder built into the view screen that works by way of a series of concentric circles in either size factors or mils, that you can use to determine distance if you already know the size of an object in the foreground.

optical rangefinder rings

This app has been a best-selling navigational app for some time and has become a very useful tool in many different fields. You’ll find it’s very useful when doing field surveys and it’s certainly a lot cheaper than an analog theodolite.

2.  Clinometer

A clinometer, or inclinometer is a device which measures the angle of slope and uses basic trigonometry for estimating height. My clinometer is a combination clinometer and optical compass made by the Finnish company Suunto and is called the Suunto Tandem. Like the iPhone, you’ll get better results if it’s mounted to a tripod and the Suunto has a 1/4″ socket for this.

The Suunto Tandem

You look through the peep sight, leaving both eyes open. The graduated scale is superimposed over the object you’re centered on and you can read the results as either a percentage of slope or degrees of elevation.

You sight the top of the object in the device and read out the angle. Then you refer to the cosine table on the back of the device. From there it’s just a simple trig calculation. Adding the height from the ground to the center of the clinometer will give you a very close figure for the objects height. Like before you need to know your distance from the object you’re measuring, so it would be a good idea to determine your average stride to have a semi-accurate way of pacing off distance when surveying.

The back of the Tandem has tables of cosines and cotangents printed on it to make calculations easy.

The list price of the Tandem isn’t cheap, but I’ve seen them go for $20 on Ebay, so you should check there before you buy a new one. The results may not be quite as accurate as with the Theodolite app, but you’ll never have to worry about a dead battery and the device will still work perfectly 50 years from now. Like the Theodolite app, it’s good for shooting grades and taking elevation surveys as well.

A handy addition to both the above devices is to get a Keson Pocket Rod. It’s a collapsable surveyors stadia that rolls into it’s case. It has black and white graduated scales on one side and red and white on the other. It’s a great tool to have to put in location survey photographs as well for accurately scaling details from photos when you don’t have time to measure everything at a location. They come in both Imperial and metric units.

Keson Pocket Rod

3.  Biltmore Stick

This is the cheapest and easiest method of determining height but it’s also the least accurate. This is a trick I learned from my Boy Scout days. It’s based on the Biltmore Cruiser stick which is a way of determining the heights and widths of trees and how much lumber they would yield. The Biltmore Stick ( sometimes called a hypsometer ) gets it’s name from the famed Biltmore Estate in Asheville, North Carolina and was invented in the 1890’s by a German forester named Carl Schenk who was the master forester at the estate.

A real Biltmore stick has graduated markings that take into account for foreshortening but there’s a less expensive method. We were taught to use a yard stick (not very compact) or a 6 foot folding rule, which is a little wobbly to hold vertically. I like to use a Four Fold rule which is the original folding rule from the mid 19th century. They were sometimes called Blindman’s rules because the numbers are large and easy to read, making them perfect for this use. Garrett Wade carries a good reproduction of them. They fold down to just 9 inches long and fit nicely in a survey bag.

The way to use this one is to pace off 25 feet from the tree, building, etc. Turn and face it, holding the rule at arm’s length. 25 inches from your eye is the ideal distance. hold the rule so that the bottom of it lines up with the bottom of the object, like so:

using the Four Fold rule as a Biltmore stick

Read off the number than lines up with the top of the object and that will give you the height in feet. If the object is above the 25 inch mark, back up another 25 feet and multiply the results by 2. If it is still above the 25 inch mark, back up to 75 feet away and multiply the results by 3, and so on.

This method won’t necessarily give you a really accurate height, but it will give you a number that will be pretty close, say within 3% to 4% of the true measurement, providing you are very close in the distance increment and the rule is very close to 25 inches from your eye.


Apple Releases New Location Survey Tool

Actually that’s not entirely true. It’s not really a new tool and it wasn’t made specifically for location survey work. The iPhone has become a ubiquitous item on film sets now. The number of apps created specifically for film work is over 50 with others being released monthly.

There have yet to be any released specifically for the Art Department but quite a number of them, including those designed for other occupations, are really useful to have.

Among these are the two apps, Photo Measures and My Measures And Dimensions. Both work very similarly and are great for recording and transmitting measurements of locations or of objects.

Basically they both work by either taking a picture with the phones camera or importing an image from the library. Them, dimensions are added, both linear and angular.  Zooming in to the photo allows for accurate placement of arrows as well as allowing you to delineate small details. Notes can be added as well using a text tool.

As you can see, both applications are very similar, but one advantage of Photo Measure is, the basic application is free as compared to $2.99 for the basic My Measures. Photo Measures also has an enlargement window that makes it easier to precisely place dimension arrows. Give it a try and see if it’s useful for you. If you don’t own an iPhone, many apps also make versions for the Droid.