

Visualization skills are something anyone can learn. You just need to understand the basics of scale. Once you familiarize yourself with the basic scales that are used in design you can start to train your brain to correctly imagine anything and visualize it in an actual space.
I created the diagram above for a blog article I wrote about model scale. The article was about choosing a proper scale for physical models rather than digital ones.
The article didn’t clearly explain what ‘scale’ is or how it’s used in technical drawings. It also didn’t explain the difference between a ‘scale unit equivalent’ and a ‘ratio’, or how to use scales to help you with visualize objects in your mind.
Drawing Scales
Drawing in scale is a way to clearly communicate the size of something, either physical or imagined, in a visual way to help the viewer understand the proportions and size of an object. Either on its own or in relation to other objects.
Some drawing scales are noted by using a measured unit and comparing it to a life-size unit, such as 1/4″ = 1′-0″, which is a popular scale for architectural drawings.
This means that 1/4″ as measured on the drawing is 1′-0″ in actual size.
On the diagram above you’ll see the use of scale ratios. Note the ratio of 1:48 has the 1/4″ scale in parenthesis. The ratio scales can be interpreted as dividing the full size unit into that number of divisions. If you divide 1 foot into 48 segments, each of those segments would be 1/4″ long. So, a drawing with a ratio of 1:96 would be the same as 1/8″=1′-0″. A scale of 1″=1′-0″ would be a ratio scale of 1:12, as there are 12 inches in a foot.
Look at your shoe. If you are an average size person, the length of your shoe is about 1 foot long (28 to 30cm if you use the metric system). If you wanted to draw the outline of the sole of your shoe in, let’s say 1/2″=1′-0″ scale, that would be an equivalent ratio of 1:24. 12 inches divided into 24 parts would each be 1/2″ long.
If you use the metric system you’re in luck. You don’t have to deal with a silly fractional system and you use a strictly ratio system for drawing scales.
Analog Is Best
A scale of 3/4″=1′-0″ is a very common scale for drawing architectural details, but not for designers who mainly work in the theater. Because of tradition, in the theatrical world, such as Broadway, the standard size of plans and elevations is 1/2″+1′-0″.
A detail of an elaborate doorway will obviously look much larger when drawn at the 3/4″ scale than at 1/2″ scale. If you are used to looking at details in one scale, the same details will look ‘wrong’ in the smaller or larger scale.
I worked with a designer who asked me to not draw details in 3/4″ scale because he was used to visualizing designs full-size while looking at them in 1/2″=1′-0″ scale. Seeing them in a larger scale was disconcerting for him while visualizing.
As far as visualizing in scale, seeing a drawing printed on paper is better than looking at it on a computer screen every time. In terms of viewing images on a computer screen, the screens will lie to you every second of every day, in all kinds of ways, particularly in regards to size comparisons.
Imagine you’re looking at a drawing of sofa that is drawn in 1/2″ scale, or 1:50 in metric, on a computer screen. On your desk is a drawing of a room plan in 1/4″ scale, or 1:25 in metric. If the sofa drawing was on paper you could easily convert the sofa in your mind to the smaller scale to imagine how it would fit in the room.
If the sofa drawing is on a screen, how can you be sure if the scale is correct? You can’t. Even if the software is telling you that the image is being presented in a scale that is true to the stated size, most people could not make the visual transformation unless they were very experienced in doing it.
The Packets
You can download the Visualization Chart packets from the links below. If you’re in the States, you want to download the packet marked “Imperial units”. If you’re anywhere else in the world that uses the non-fractional, uncomplicated, easy-to-use measuring system known as Metric, be sure to download that one.
The packet with Imperial /foot/inch scales contains 8 sheets with 5 scales: 1/8″, 1/4″, 1/2″, 3/4″, and 1″. There is also a copy of my Multiscale in the event that you don’t own an architects scale.
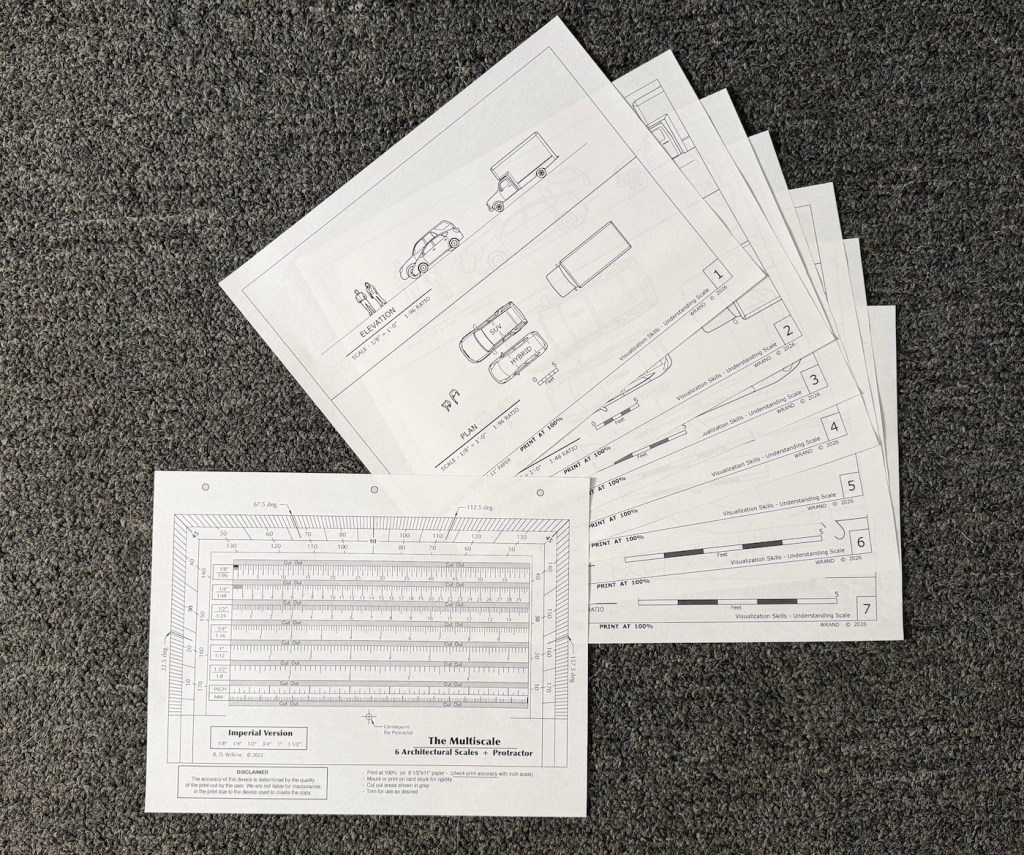
Print these all at 100% on letter size paper. Be sure that the print setting is at 100!
The metric packet contains 7 sheets in 4 scales: 1:100, 1:50,1:20, and 1:10. The seventh sheet is a Multiscale in metric. The Multiscale includes the 1:25 ratio which I didn’t include in the diagrams. That ratio doesn’t seem to be much used anymore. Let me know if that isn’t the case.
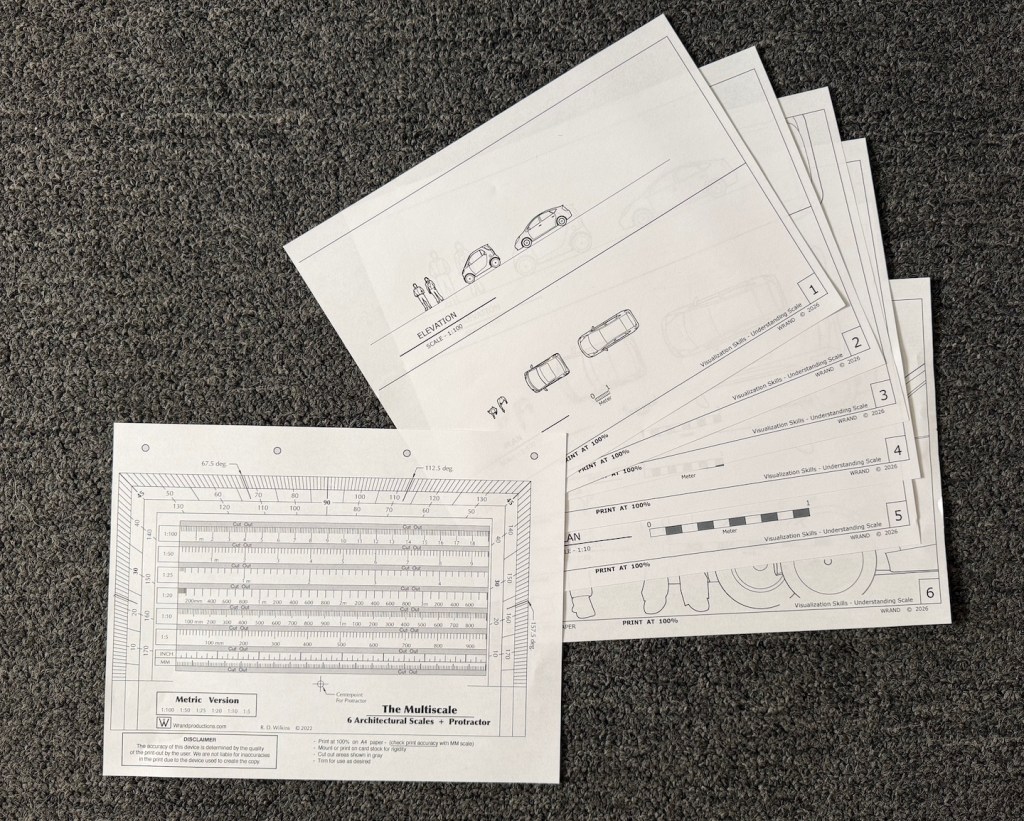
Print them all on A4 paper at 100%.
Using The Diagrams
Prepare The Multiscale
Print it out at 100% and check the lower scale markings against a known ruler or measuring tape to be sure it is printed correctly.
Cutout the gray areas for ease of measurement. You can also glue it to a piece of cardstock or a file folder to make it stiffer.
Exercise #1
Get familiar with the different scales. Examine the way objects look in the Plan view from above as opposed to the Elevation views from the sides. Does either view make the object, either the people or the vehicles seem different in scale?
How do they compare to each other? Place one scale sheet beside another and notice how the perceived distance caused by the smaller scales affects your perception of their proportions differently than the larger scales.
Exercise #2 – Thinking Vertically
Pick an object that’s relatively large in size such as a sofa, a piano, TV in your room. Now using the scale on the Multiscale, draw the object on the scale Elevation sheet next to the people or the vehicle.
Notice its proportion and size compared to the things on the sheet. Does it seem smaller or larger in comparison than what you visualized in your mind before to drew it?
Take a measuring tape and measure a wall of your bedroom or living room, and draw it in scale on a sheet or another piece of paper. Now look at a framed picture or mirror or wall hanging from another room or another location. Try to imagine it on your wall. measure the piece and draw it in scale on the scale wall drawing. How does it look? Does it take up the same space that you imagined it would when you visualized it on your wall?
Exercise #3 – Thinking Horizontally
Measure your bedroom or another space of your house. Now try to visualize one of the vehicles on the scale sheets appearing inside your house. Using the Plan view of the 1/4″ sheet or the 1:50, draw the floor plan of that room in the chosen scale using the Multiscale. Using pencil, you can draw the space right on the scale sheet. Does the vehicle fit in the space you measured? If it does, does the space around it seem to be the same as what you imagined, or is the space larger than what it feels like when you are standing in it?
Exercise #4 – The Teleporter In Your Head
Take the scale floor plan you’ve drawn of your room and go to a store where they have furnishings. Now look around at things like sofas, large TVs, or beds. Take a tape measure with you or use the measurements they provide at the store. Imagine them in the space.
Test your power of scale conversion by estimating the area of the floor the objects would take up. Draw them on the plan with a pencil. You will eventually be able to estimate foot or metric increments visually on a scale drawing. In 1:50, the width of the tip of a finger is about 1 meter in scale. In 1/4″ scale, the width of a finger is about 3 scale feet. The width of a thumb is 4 feet.
When you get home, test your guess. How close were you?
