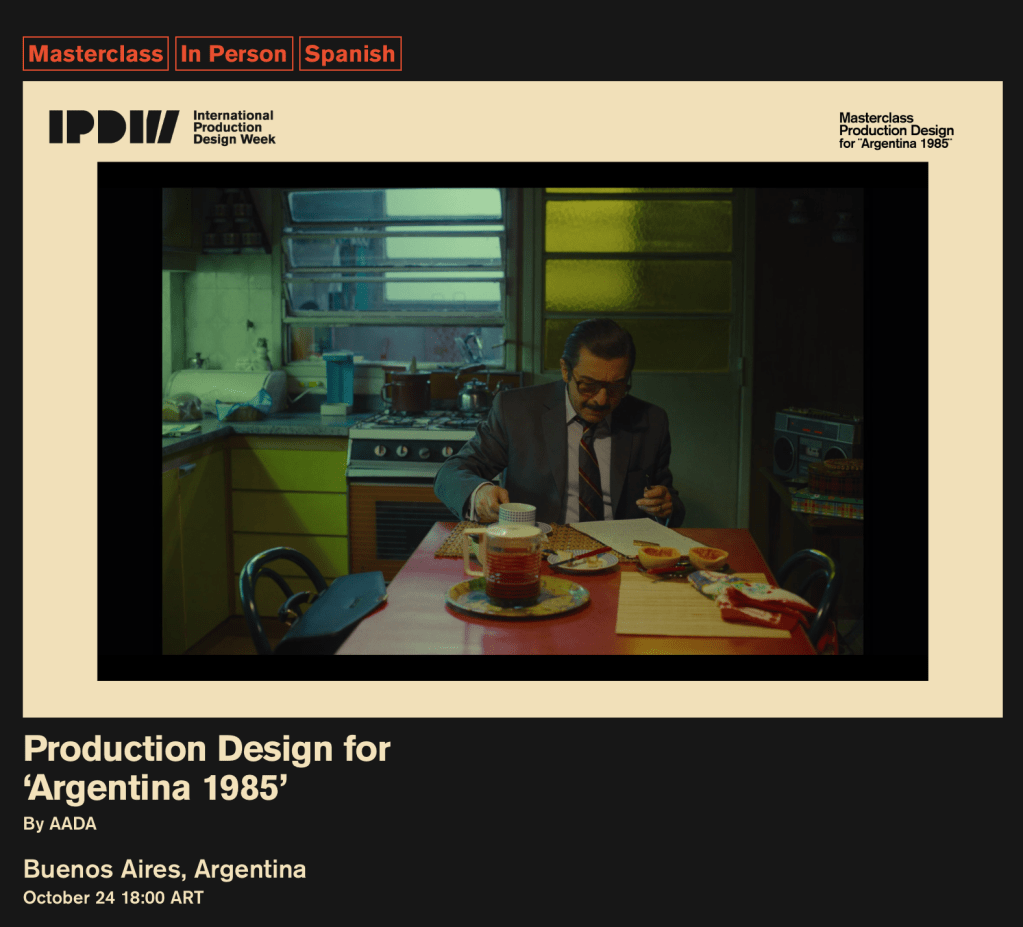
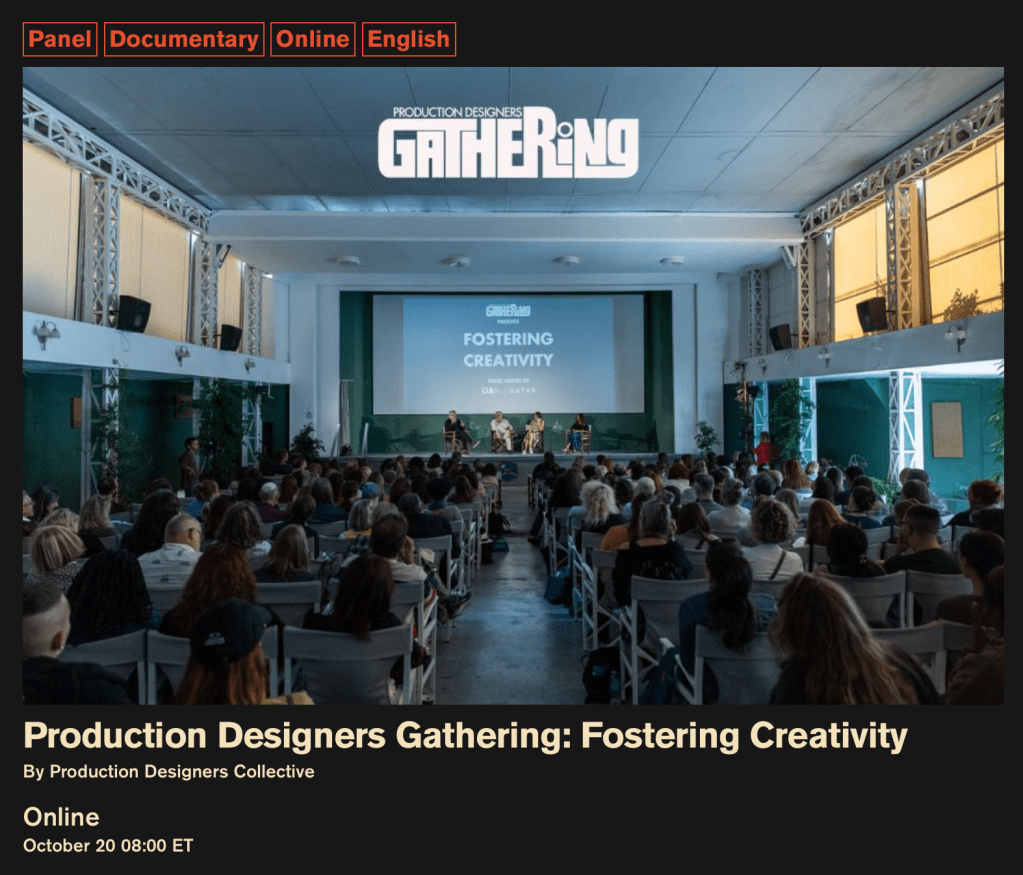
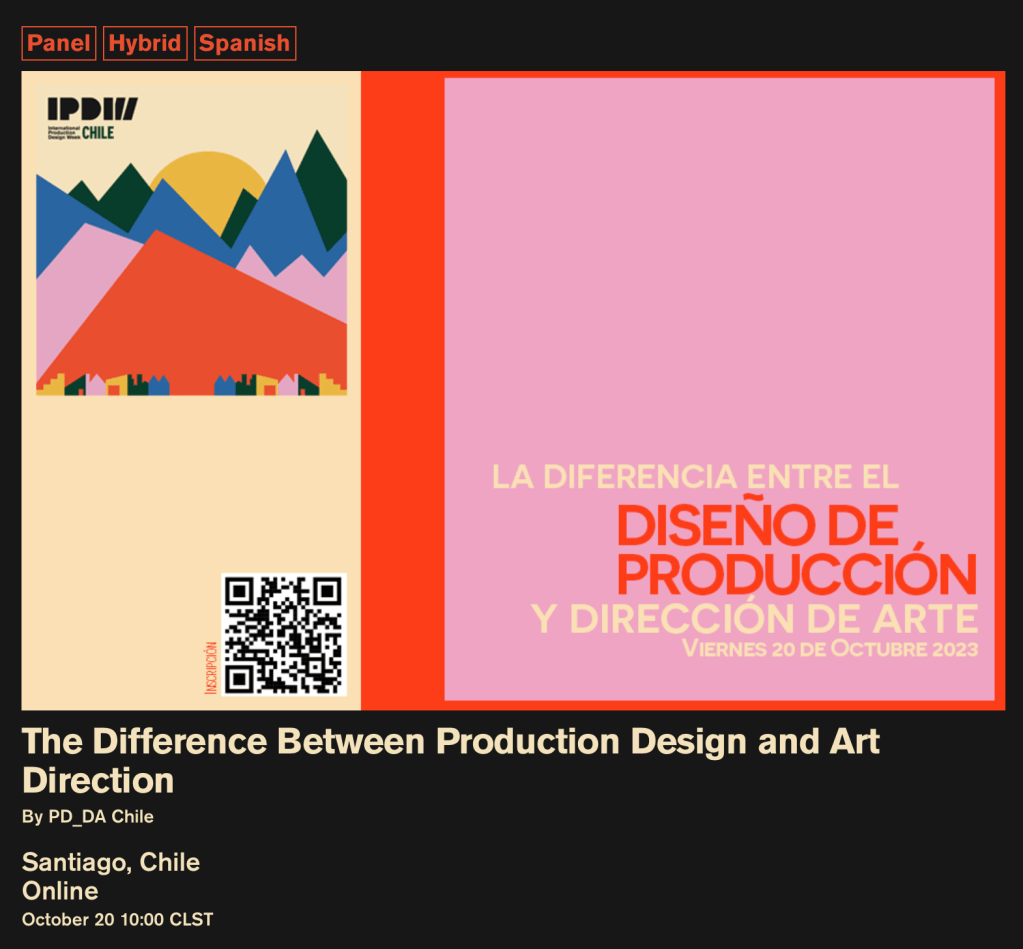
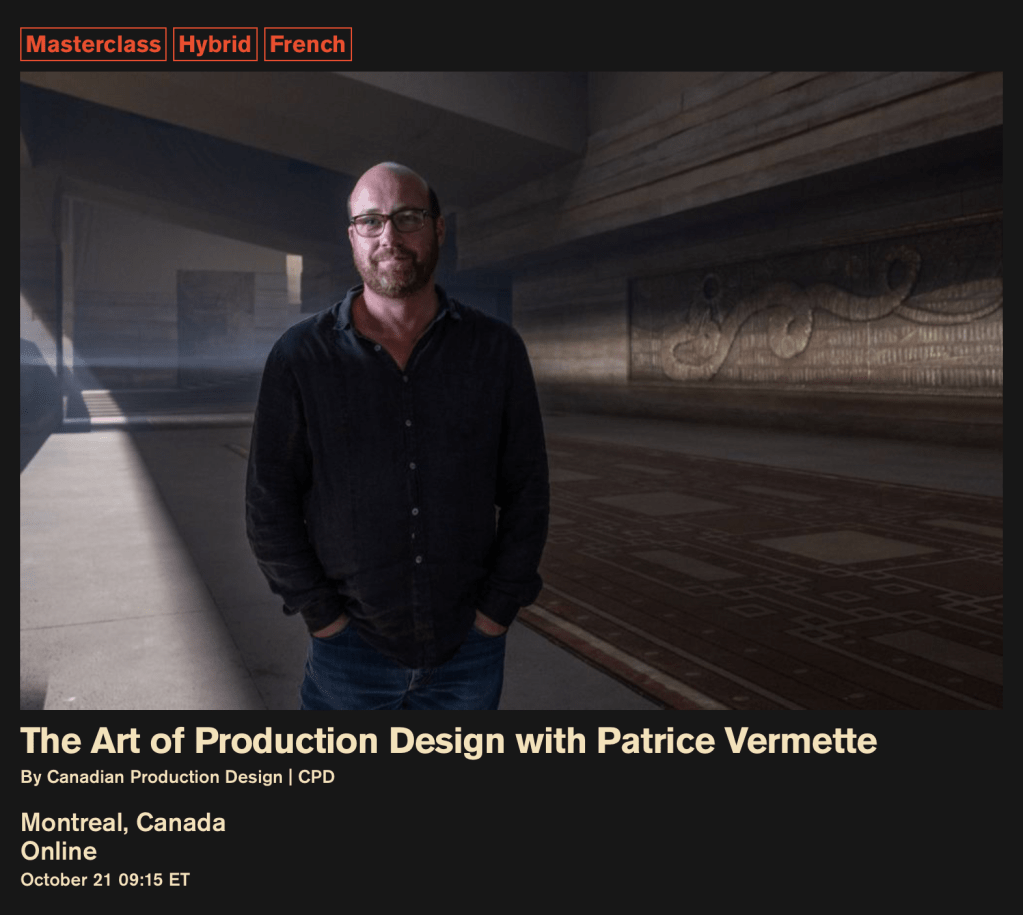
This is the first day of the International Production Design Week events that have been organized and curated by the Production Designers Collective, an international group of Production Designers whose mission is to be a hub for designers from around the world and to elevate the profession by bringing awareness and acknowledgment of the craft of art direction around the world to the public’s awareness.
The nine day series features nearly 200 seminars, exhibitions, meetups, tours, and lectures with acclaimed Production Designers from 27 countries. Some of the events are presented online for viewing from anywhere while others are held in specific sites for a live audience.
Here is the link to the schedule of events which is searchable by day, city, language, and event category.
The Must-Have Desktop Device of The Future? Coming in 2028 – The all-in-one 100 Petabyte AI generator, espresso machine, and desk lamp.
The topic of AI-generated content has suddenly dominated the news, or at least as far as the entertainment business is concerned. The subject is certainly a factor in the recent Writer’s Guild strike that is now in progress as it’s one of the sticking points that caused negotiations with the studios and the producers to break down, and not without unrealistic concerns on the Guild’s part.
The discussions around AI-generated content have been percolating in the background for some time but only recently has it seemed that people are taking it seriously. At first, it was just educators who were worried about students using ChatGTP to generate papers or do tests for them. But now several fake Drake songs and a photographer winning a photo contest with an AI-generated picture have suddenly focused the public’s attention on the possibilities.
Photo: AI image by Boris Eldagsen
If the studios can eliminate or minimize writer’s contributions to story and script development, how long will it be before they eliminate actual designers from the process? Are Art Departments seeing their extinction on the horizon?
Twenty years ago the Film industry, at least from the Art Department’s perspective, looked askance at computers. They weren’t to be trusted. The secret fear was that once they became ensconced in the design part of the industry, a lot of work would evaporate. Once something ( a location, a set, a detail drawing) was committed to digital information, jobs would begin to evaporate. The exact opposite happened.
The idea that digital information is permanent, for one thing, is now hysterical. For another, the idea that they would reduce the need for individuals is also funny. The possibilities for design exploded. Now you could do many versions of versions in less time, create renders of drawings and models, create visual displays that would have been unthinkable before. The average size of Art Departments on most medium to larger films has doubled, sometimes even tripled. You need people to generate all that work and now that process is the norm. On one feature not long ago there were over twenty Set Designers and a dozen Illustrators where there would have been a third of that number before.
As for the permanence of digital information, that happens only with excellent human oversight. On one feature we were instructed to copy all of our files to two different external hard drives for safety and to ensure the files would be available for the film sequel. We assumed that by doing so we were pretty much insuring that we wouldn’t be working on said sequel.
A year later I got a call asking if I was available to work on the sequel. It seems that one of the hard drives had gone missing. The other one was located but wouldn’t be of any use. The person responsible for keeping it safe had decided that they needed to back up their music library, and rather than spend $50 on a new hard drive, had erased what I estimated to be over $1,000,000 worth of design work. We were all hired back to redraw what we had drawn once before.
Had the drawings been done on vellum, they could have just pulled the sheets out of the file and made new prints. Which medium is more ‘permanent’?
A recent article at the Center For Data Innovation website outlines the issues that people are commenting about when dealing with AI. The author, Daniel Castro, argues that people are worrying about the wrong issues when discussing AI.
He argues that while AI systems should certainly not be exempt from complying with intellectual property (IP) laws, they should also not be held to a higher standard than humans are when it comes to ‘artistic influence’, as it were. he argues that AL will create more opportunities for artistic creation and that training AL software with copywritten images is no different than what humans do when they are influenced by artwork and music when creating new work.
Ed Sheeran recently won a lawsuit brought against him for supposedly copying a Grammy-winning song by Marvin Gaye. Sheeran defended himself by noting that the same chord structure and melody he used in his song was common to hundreds of other songs which were similar but yet different.
The case was watched very carefully by the music industry as well as artists everywhere, as it would have had a huge stifling effect on music creation as well as future artistic work if Sheeran had lost.
Current laws do not make it illegal to create generative AI work that is similar to another piece of art or image, but they do prevent the creation of a work that is identical or nearly identical to another work. Of course that description of what constitutes as a copy has the danger of veering into a very subjective territory.
In his article Castro makes the point that rather than limit the pool of information that AI has access to in creating generative artwork, it is incumbent on policymakers to strengthen and enforce IP laws, which would protect artists in other ways as well.
There may be a time when a producer or director decides to “pre-design’ a show using AI technology. Architects and Interior Designers are using it now to create basic designs and floor plans. But I think its usefulness is limited. Without a deep knowledge of stage work, period design, an understanding of the story, technical knowledge and an artistic eye, much less personal aesthetics, drawing ability, and color sense, with generative AI you will basically have an interesting collage /scrapbook instead of a fully thought-out design.
Until now, no one has created a class that explains cameras to designers.
You’ll not only learn the technical information that will help you understand the mechanic of cameras and optics, but you’ll learn how they capture your scenery and how they can affect your design decisions.
Image: Warner Bros Studios
As a film designer you must understand how cameras capture and record images, because that’s how the audience sees and experiences your work.
Few if any film design schools include optics as part of the curriculum leaving film designers with a huge disadvantage when working with the cinematographer on a new project. The information in this course will help you create effective and believable sets that help the camera tell the film’s visual story as successfully as possible.
Image: Netflix
With this course, you will be able to discuss the camera requirements for your sets with the cinematographer and visual effects supervisor and not be excluded from important decisions that affect your designs. It will further your knowledge for a successful career in the Art Department as a set designer, art director, or production designer.
What you’ll learn in this course:
Cameras – Film vs. Digital
Lenses – spherical vs. anamorphic, prime vs. zoom
Specialty lenses – lenses and attachments that solve tricky shooting issues
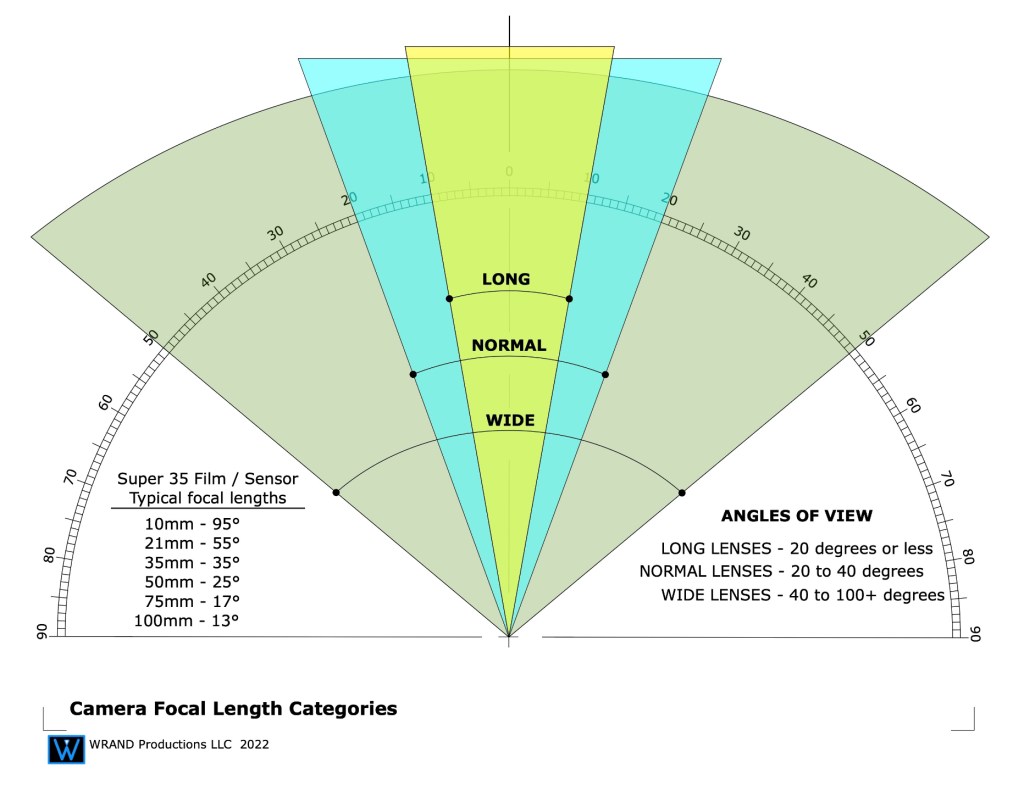
Understanding focal lengths
Understanding depth-of-field
Aperture settings – F-stops vs. T-stops
Dynamic range – over and under exposure comparisons
Lighting – color temperature, typical lighting styles
The Inverse square law of lighting
The basics of optics for in-camera effects such as foreground miniatures and forced perspective sets.
Understanding color grading vs. color correction, and digital intermediates or D.I.’s
Why is resolution important? Understanding the race for more pixel depth.
User Manual – you’ll get a manual with both text and diagrams that explains the concepts of the course for later reference
You will also get access to the weekly Community Lounge where you can get questions answered and meet other members of the film community.
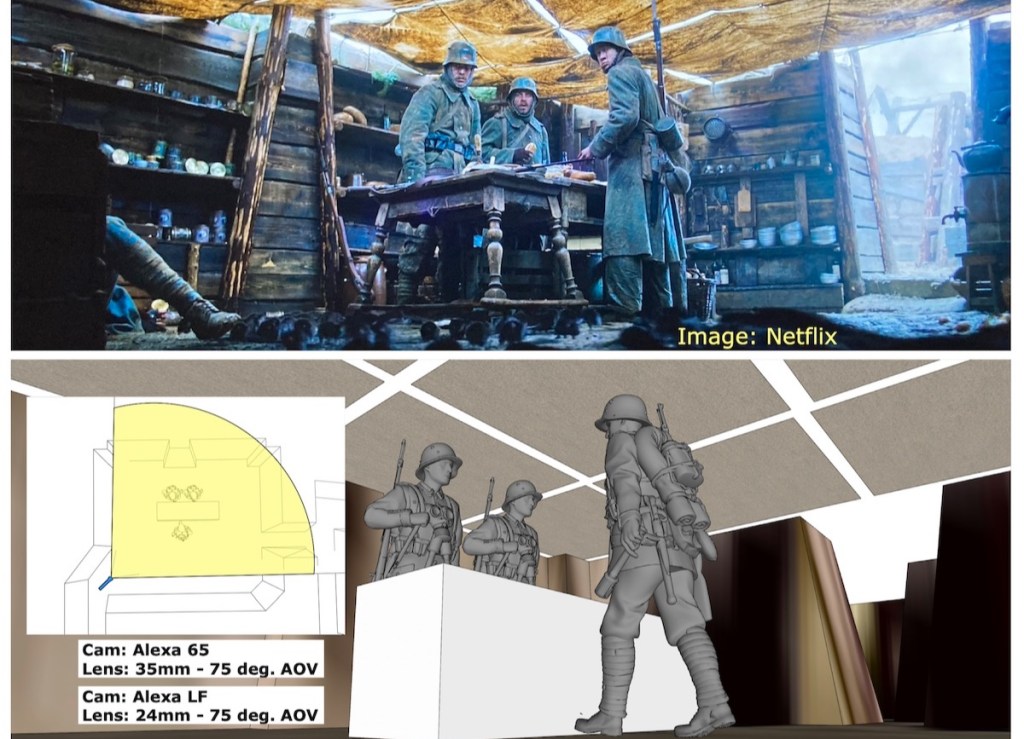
In addition, I’ve included a special section that analyzes a number of the shots from the new German film, “All Quiet On The West Front” (Im Westen Nichts Neues). which won Oscars for both Best Cinematography and Best Art Direction in 2023.
With 3D model recreations of some of the sets and locations, I’ll discuss why certain shots were difficult to get and how they achieved them. I’ll also discuss how physical locations and built sets can sometimes make shooting problematic and how careful pre-planning can avoid frustrating situations during production.
That’s a typical question I get from people when I tell them my job title. People assume many different things, based on what they’ve heard from others, or read in a magazine. And most of the time they have an incorrect idea about my job description.
It’s not their fault, really. Our industry does a lousy job of explaining job titles in the entertainment world. They just leave it up to people outside the business to figure it out for themselves. It doesn’t help that the same jobs sometimes have different titles depending on what part of the U.S. you’re in, much less what part of the world you’re talking about. Many people who now work in the entertainment industry had never heard of the Art Department or knew that film design was a career option until after they had finished college.
I received an email from Bruno Anselmo, a Set Designer in Brazil. He was curious to know how our job descriptions might differ even though we have the same job title. His background is both in theater and film and video so I’m sure he experiences the same confusion with people he meets who aren’t familiar with the film industry. (Bruno, tell me if I’m wrong here.)
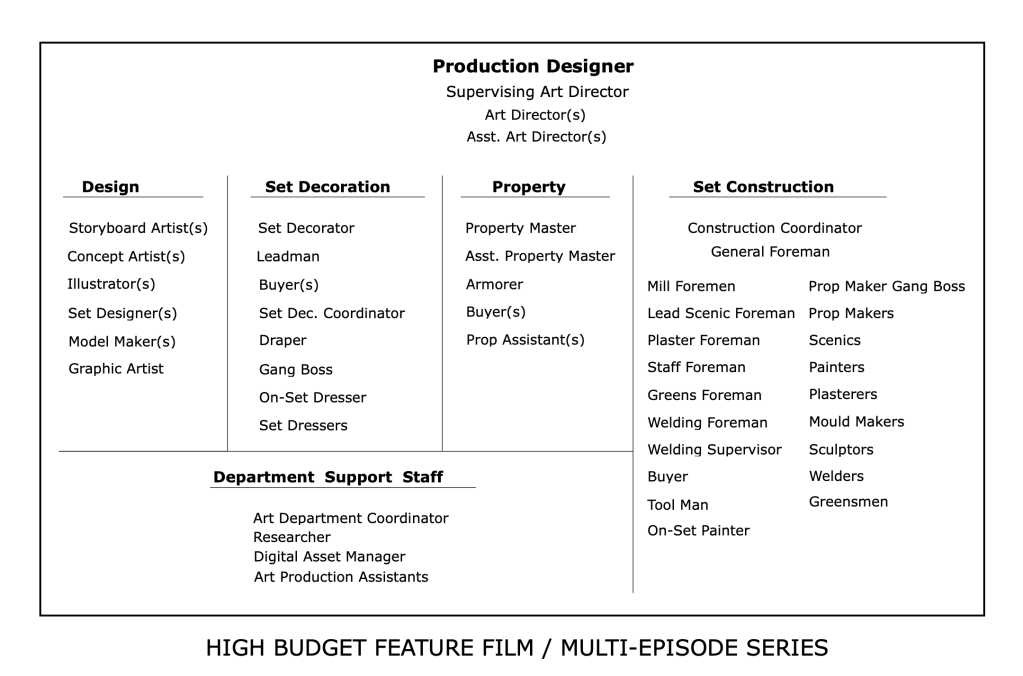
The job title ‘Set Designer’ means different things here depending on the end-product. In the professional theater field, the Set Designer is the lead artist for the creation and implementation of the visuals for a stage production. In the film and television industry, this role as head of the visual aesthetics of a project is given the title ‘Production Designer’.
To make matters even more confusing, the title ‘Production Designer’ is a department head title, not an actual job description. All Production Designers in the professional film and television entertainment industry are Art Directors. The Production Designer title is given to the head of the Art Department, and this title must be approved by the Art Directors Guild for shows which are produced under the union contract.
Let’s look at a typical Art Department:
Some will argue Set Decoration is a separate department as the Set Decorator works in tandem with the Production Designer rather than as a sub-department. In some cases and projects this may be true, the Set Decorator is absolutely a major contributor and an influence on the look of a film. But still, this department is under the Art Department umbrella and the winner of an Academy Award for Art Direction goes to the Set Decorator as well as the Production Designer.
You’ll see that the Set Designer designation is in the table above in the ‘Design’ category. I usually tell people that a Set Designer in the film industry is a close approximation to an architect in an architectural firm. They are in charge of creating the working drawings that are used by the Construction Department to construct the stage sets and scenery that is used at a location.
Traditionally the Set Designer position was a starting point for Art Directors but this is not always the case. Some Art Directors come from set decoration or a scenic artist position.
Here’s a general list of what a set designer in the entertainment industry, i.e. film and television, is responsible for creating:
Surveying locations and creating accurate as-built drawings.
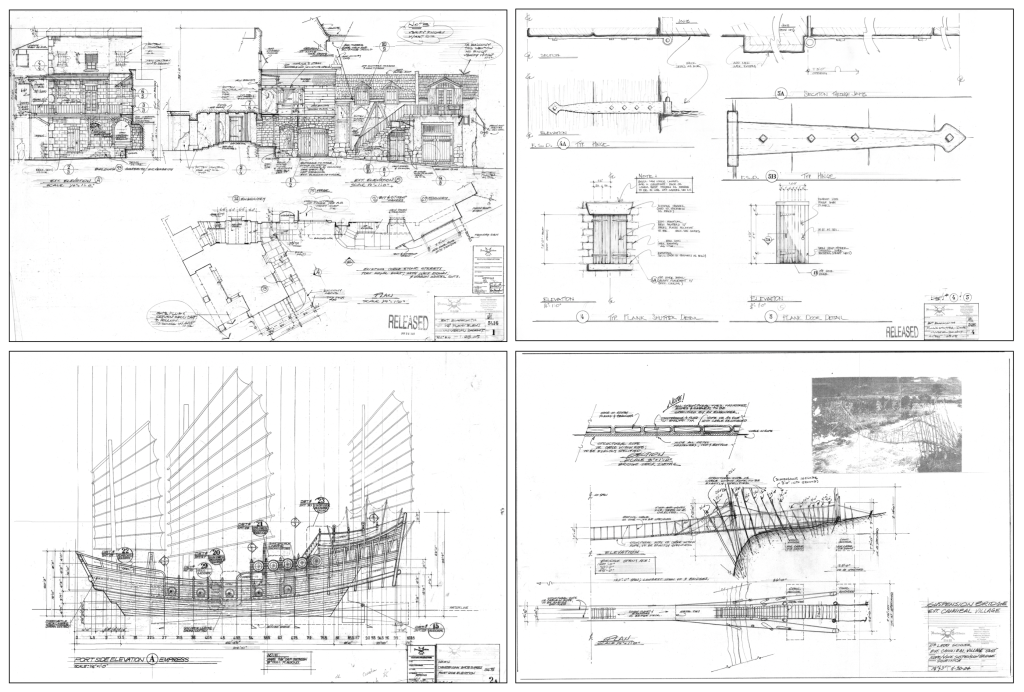
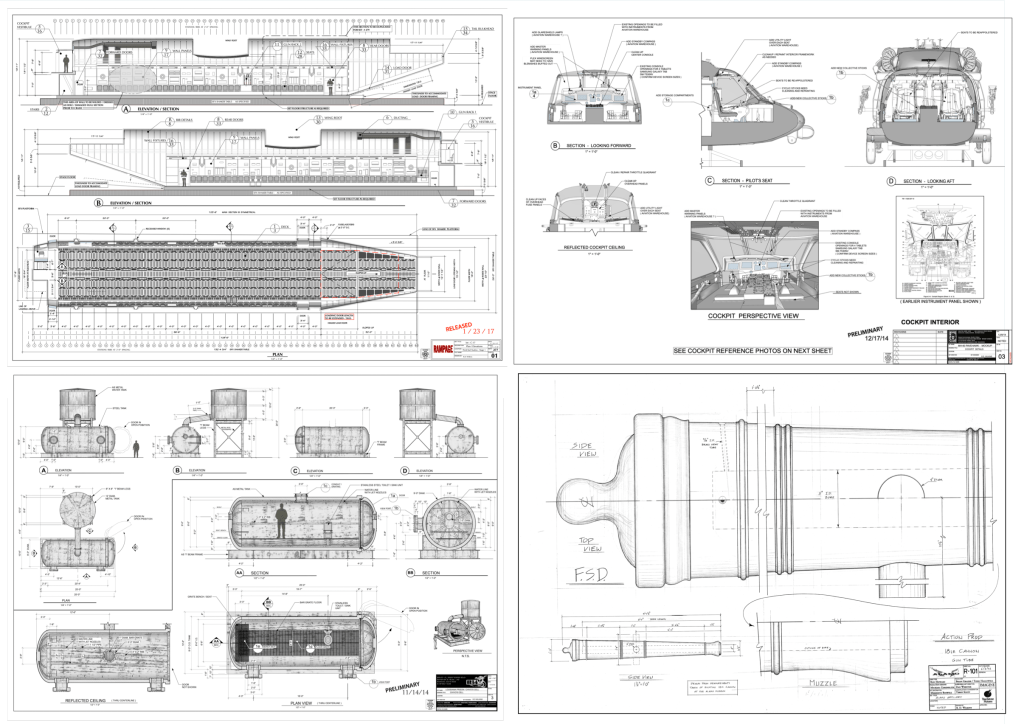
Construction drawings of stage sets; plans & elevations, scale detail drawings, FSD’s (full size details). These may be architectural or mechanical in nature.
Working drawings of any period of architecture as well as fantasy or futuristic/science fiction designs.
Working drawings of organic elements: topographic maps, terrain creation, volcanoes, mine shafts, caves or subterranean features, other planets.
Working drawings of vehicles: automobiles, aircraft, ships or marine craft of any period.
Working drawings for furniture and props.
Working drawings for special effects shots.
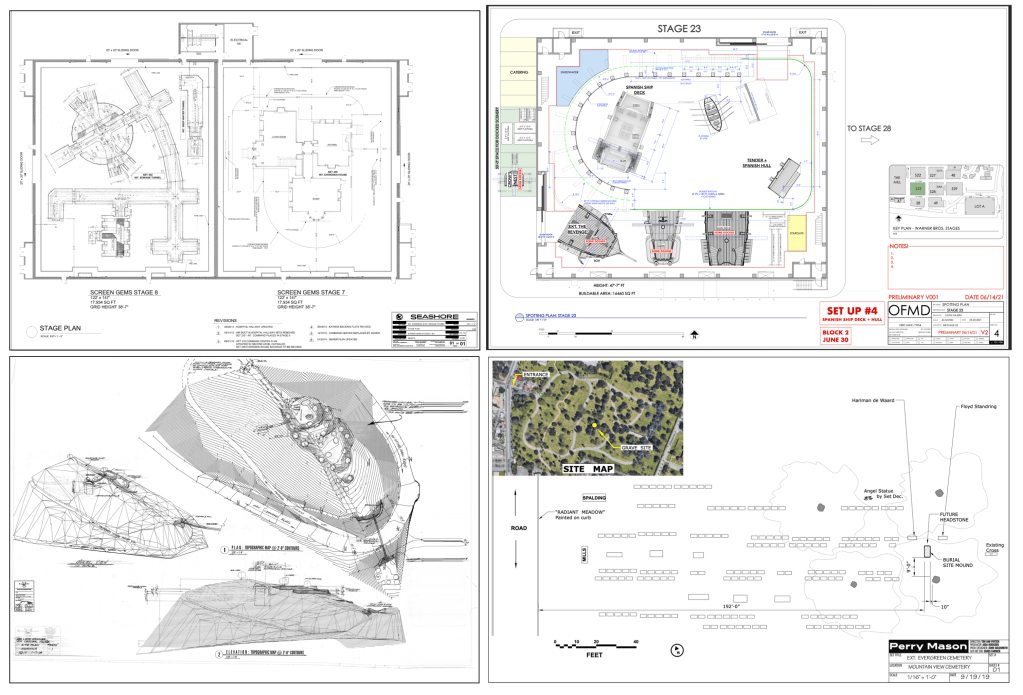
Director Plans, stage plans, and location layouts.
Dimensional study models of paper and wood as well as 3D digital models with photorealistic textures and other elements like furniture or vehicles.
Architectural Drawings. Images: HBO, NetflixFuturistic & Science Fiction. Images: Paramount PicturesPeriod & Fantasy subjects. Images: Walt Disney PicturesVehicles & Props. Images: Warner Bros., Touchstone PicturesLocation Builds. Images: Universal PicturesStage & Location Plans Images: HBO, Walt Disney Pictures
As you can see, probably the biggest difference between a set designer and an architect or an interior designer is that over the course of a career you’ll get to design and draw things that no one in either of the other two professions would if their career lasted 300 years. Instead of worrying about building code or structural concerns, your main focus is making sure the final result looks fantastic. The design is the main focus, not an afterthought.
So, what skills do you need as a set designer? Well, one of the big plusses for me and for most people that work in the industry is that you will never stop learning. You won’t be stuck drawing reflected ceiling plans the rest of your life. It will be a constant learning process.
If you want to design vehicles as well as architecture then you can. If you ONLY want to design vehicles, you can. Many people develop a specialty and primarily just do the type of design that they like best. It’s a never-ending smorgasbord of design possibilities. After having done over 80 films, there are still things I’d like to create that I haven’t yet done.
So, what are the primary skills you need? I’d start with this list:
The ability to draft – You have to know how to create proper working drawings and unlike fine art drawing, anyone can learn how to draft. It can be exacting because precision is important. But, as they say, it isn’t brain surgery. You can learn it.
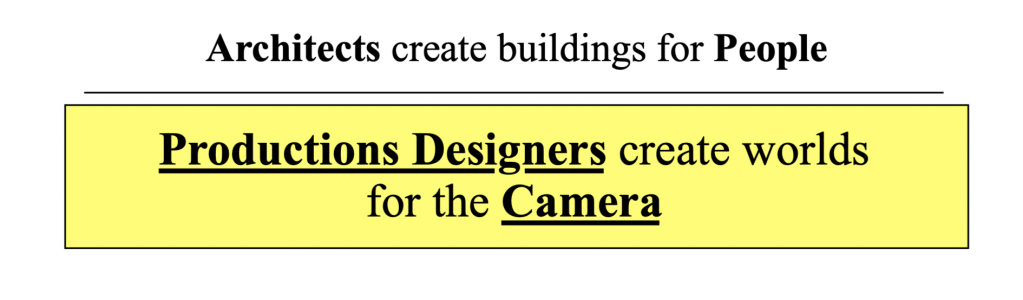
Camera basics – We design scenery, not permanent buildings. We design for a camera. I tell people that basically, we create beautiful reflectors. A film is a record of light particles that have bounced off of people and scenery and passed through a glass lens. Making it look good is the main objective. Understanding lenses and how they work is a big part of successfully designing stage sets.
Architecture & proportion – You’ll never know everything, but knowing the basics of building history is a must. You’ll be drawing details of doors, windows, stairways, and furniture. You’ll specify hardware, mouldings, plaster details and finishes. There is very little that we order from a catalogue. Almost everything is custom made by studio craftspersons.
Set Construction – Understanding how sets are built and knowing correct nomenclature is a key part of being able to draw studio sets. A lot of our drawings are similar to architectural drawings but there are some big differences between them. The layout styles, nomenclature and notation have more in common with theatrical and 1920’s architectural drawings.
Also, you’ll need to understand basic physical special effects, how to create and lay out backings, both painted and photo backings, know how to create scale drawings from photographs and artwork, understand visual effects requirements, and do location surveying.
The list seems overwhelming but remember, you will learn a lot of these things on the job. You just need the basics and a good portfolio to get your foot in the door.
You’ll need to be proficient with computer software. There will probably be one program that you will do most of your work in and that will be a personal preference. Unlike architecture, there is not a standard program that we use, so you may work on a project with many people using a wide variety of programs.
Currently, in the U.S., the most-used software programs for set design are Vectorworks, Sketchup, Rhino, Blender, Modo, Autocad, Moment Of Inspiration, Z-brush, Solidworks, and a few others like Photoshop, V-Ray and Twin Motion for renders.
Don’t try to learn them all. Software diversity is great but it’s better to get really good a just one or two.
There are a lot of choices of film schools in the country, but if that is the route you choose you’ll have to check to be sure that they have a course in film design or a Production Design track. Many schools don’t.
If you are thinking about schools and looking for an alternative to a four year program, we offer specific classes in set design that focus on the basic skills you need to get started.
Our 10-Week Set Design Fundamentals series is available on-line and is self-paced so you can progress on your own schedule. It is now on sale for 40% off until May 30, 2023.
When the work print arrived from the lab, I couldn’t get it up on the flatbed editing machine fast enough. These were the days when you didn’t know for at least 24 hours whether or not you had captured anything on the film stock, much less something that looked any good.
A miscalculation in an exposure setting wasn’t something you could see beforehand on a monitor. If you had flubbed up, it could mean jettisoning the whole scene altogether. Sometimes reshoots, like this one, were just impossible. It wasn’t for nothing that I was nervous. The first scene of the film would end up having to be reshot twice. Once because of a mislabeled neutral density filter and another because of a sloppy meter reading.
This was when you kept Pepto Bismol handy for the times when you finally saw your footage and realized you had just spend a lot of time and money on film and processing for nothing.
The print ran through the viewer and the scene appeared on the screen. It was just a single-light print but I was relieved. We got a good shot. The next scene looked good too, exposure wise. Still, there was something that bugged me.
Never Work With Children Or Animals, Or . . . .
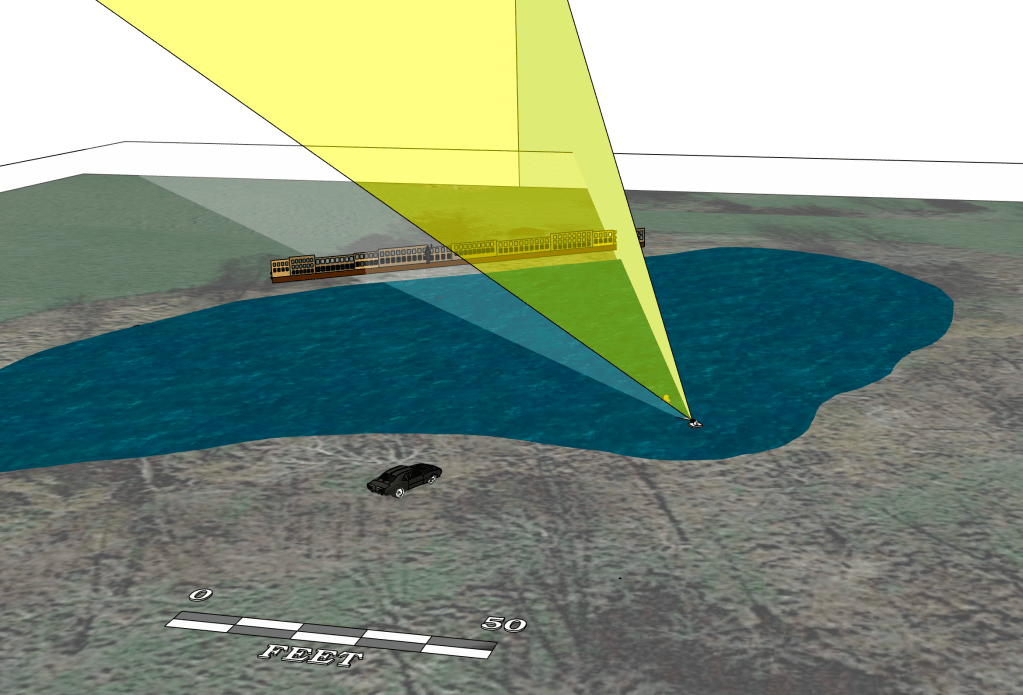
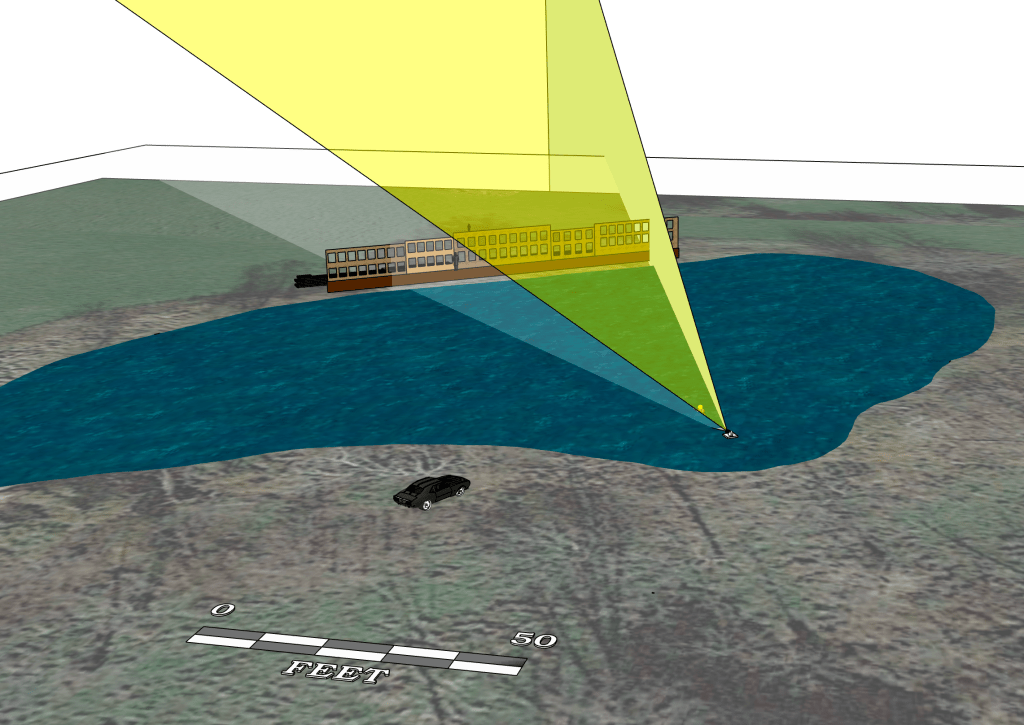
Miniatures of static or physical objects is one thing, but shooting miniatures with natural elements is another thing altogether. Replicating rain, bodies of water, smoke, and fire are tricky.
It’s the reason most model ships for films are built at a large scale. The model for James Cameron’s Titanic is over 25 feet long. It was a true milestone when VFX artists were able to create believable water effects.
Making a fire look like a really big fire or making water behave naturally in a smaller scale usually requires over-cranking, shooting at a faster frame rate so when you slow it back down to 24 frames a second, it smooths out the movements to a speed that looks more believable to the eye.
Unfortunately combining over-cranked footage with in-frame live actors was beyond my capabilities. Today this whole problem could have been solved by a high school student with a green screen and Premier Pro editing software. Not a big deal. I was stuck with in-camera effects.
So, the fire effects weren’t quite up to my expectations but the fact I had gone for a bigger size (as in extensive) backing helped minimize the effect. The focal length of the lens helped too, along with the shallow depth of field.
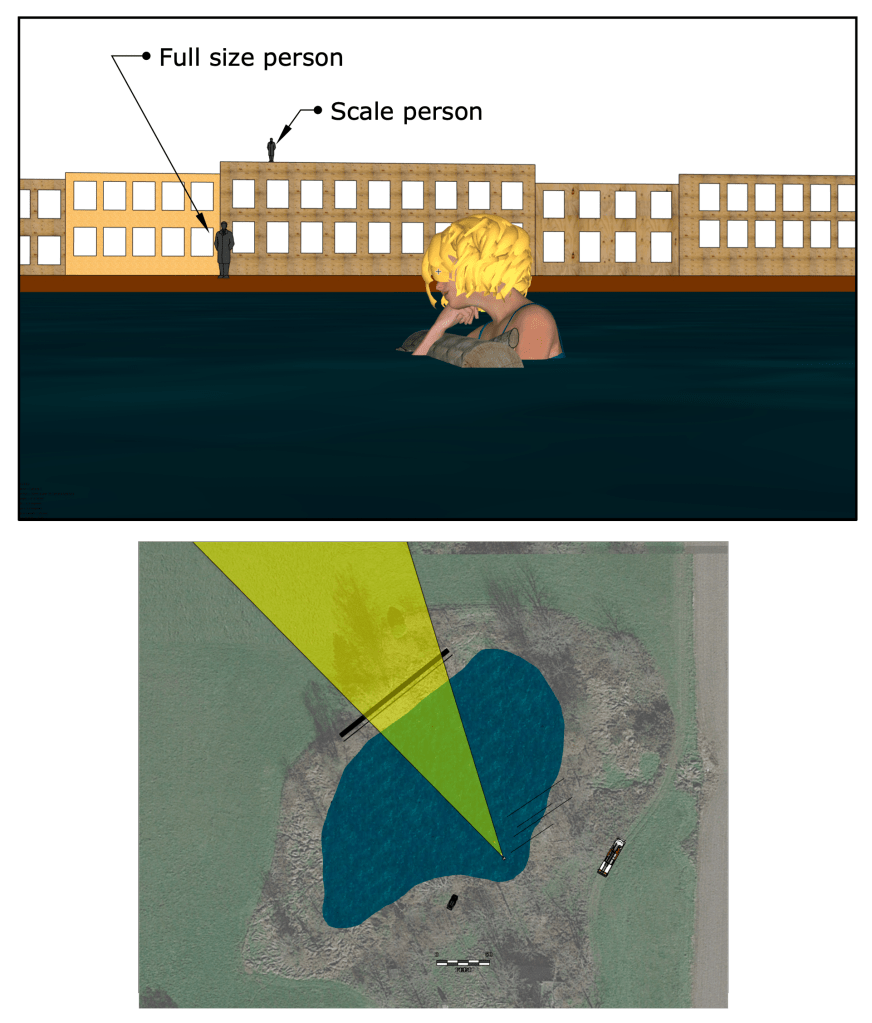
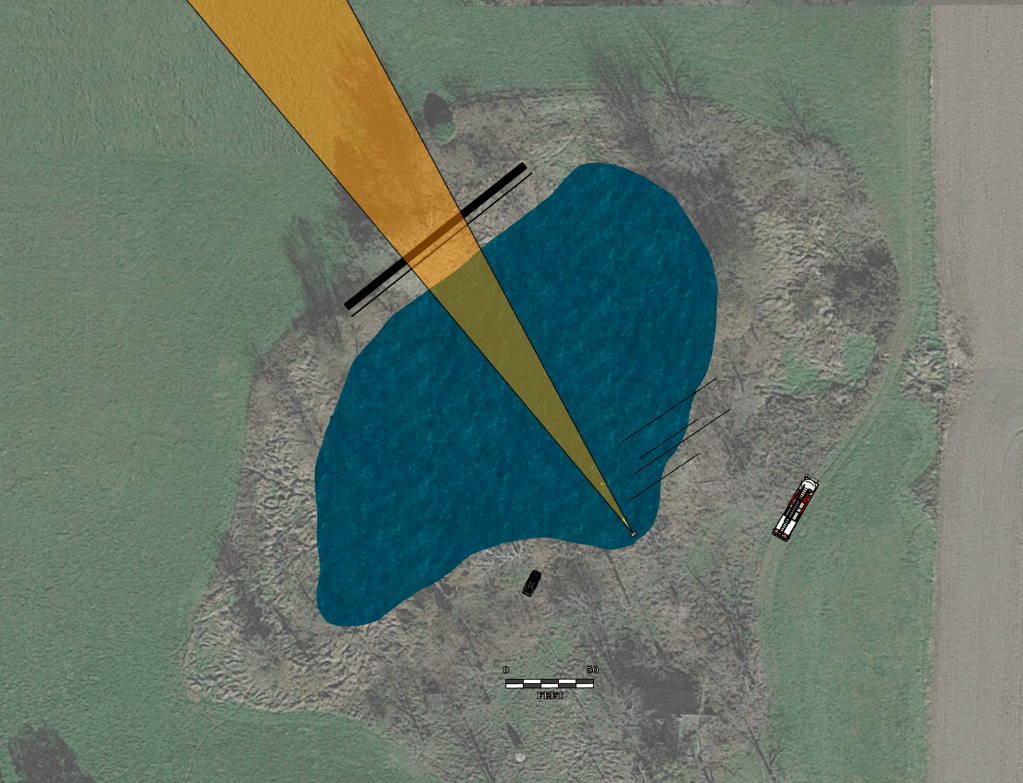
Analyzing Different Set-ups
Diagram of camera set-up
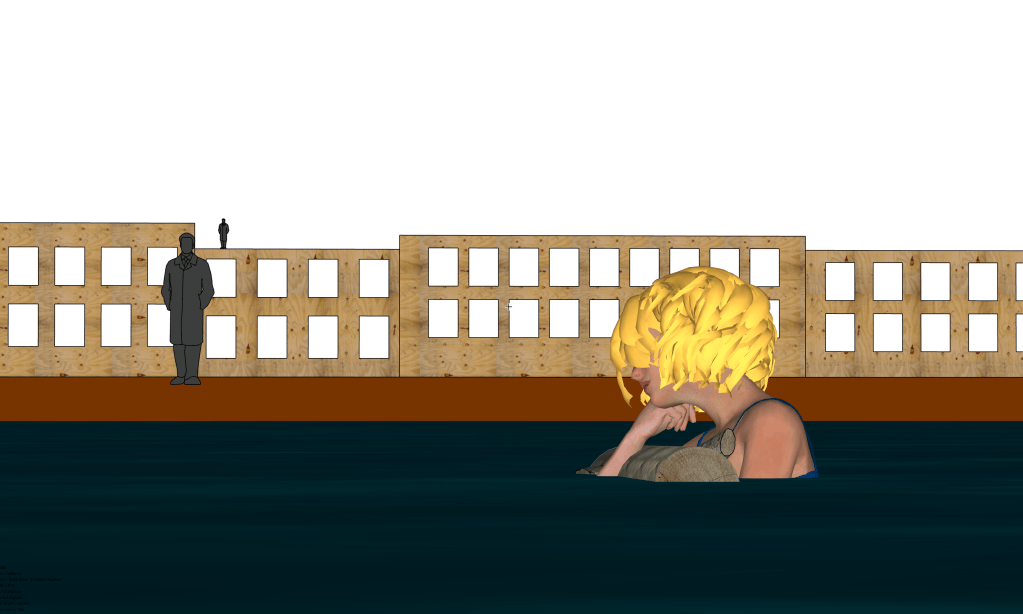
How could I have improved the flame effect? Well, I could have built the facade at a larger scale. Below is a diagram showing the scale of the backing compared to a full size person.
On top of the backing is an icon of a person at the scale of the facade.
Below is an image of what the facade would have looked like at twice the scale size.
Angle of view on a 25mm lensAngle of view on a 75mm lens
Yes, the flame effects would have been even more frightened real. The fire would have also been at the scale of an actual small house fire and without a lot of fire suppression in place, it would have been incredibly unsafe. The detail of the backing would have also needed to be much more realistic. I also was trying to capture a feeling of isolation, and the scale I used allowed me to portray the actress as being farther away from the fire than I would have been able to achieve given the size of the pond.
The fire burned itself out quickly. We went in and put out any remaining embers with a fire extinguisher and Hudson sprayers. I’m sure the firemen were even happier than I was that they got a good show and hadn’t had to drag their firehose through the mud, which would mean spending the rest of the evening cleaning firehose. And that, I can tell you, is really not a fun job.
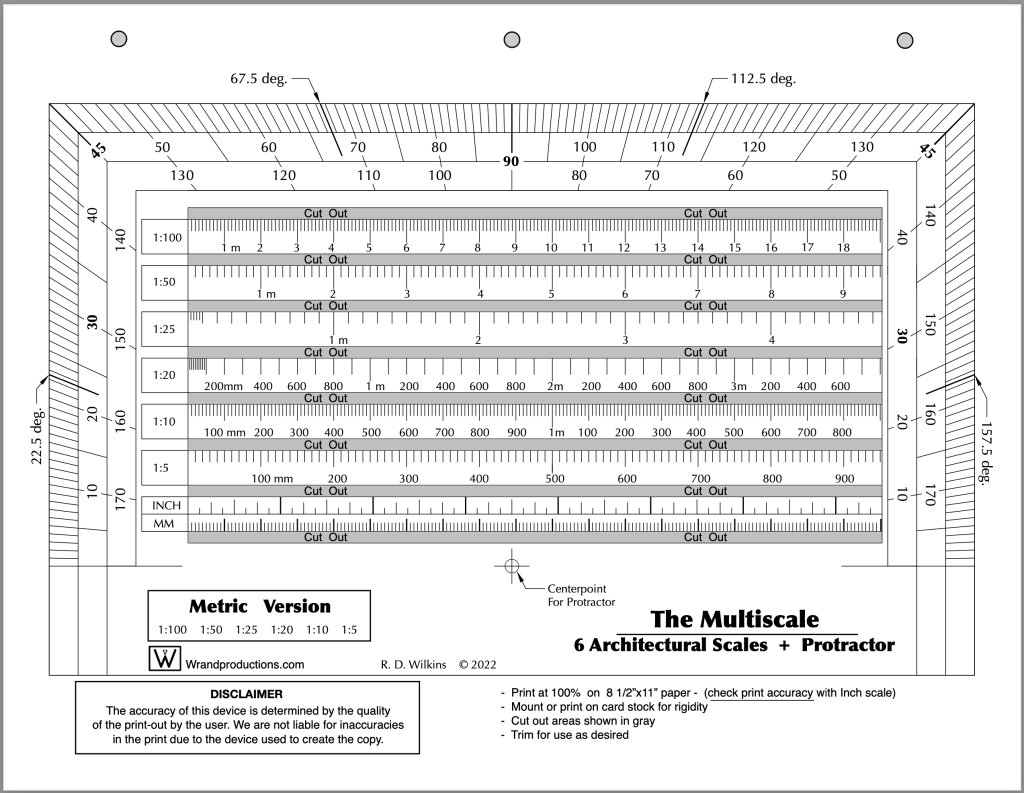
Last week I posted the Imperial version of a new tool I’ve updated recently. I promised I’d post the Metric version of the tool this week so here it is. You’ll find the Imperial version here if you missed the post.
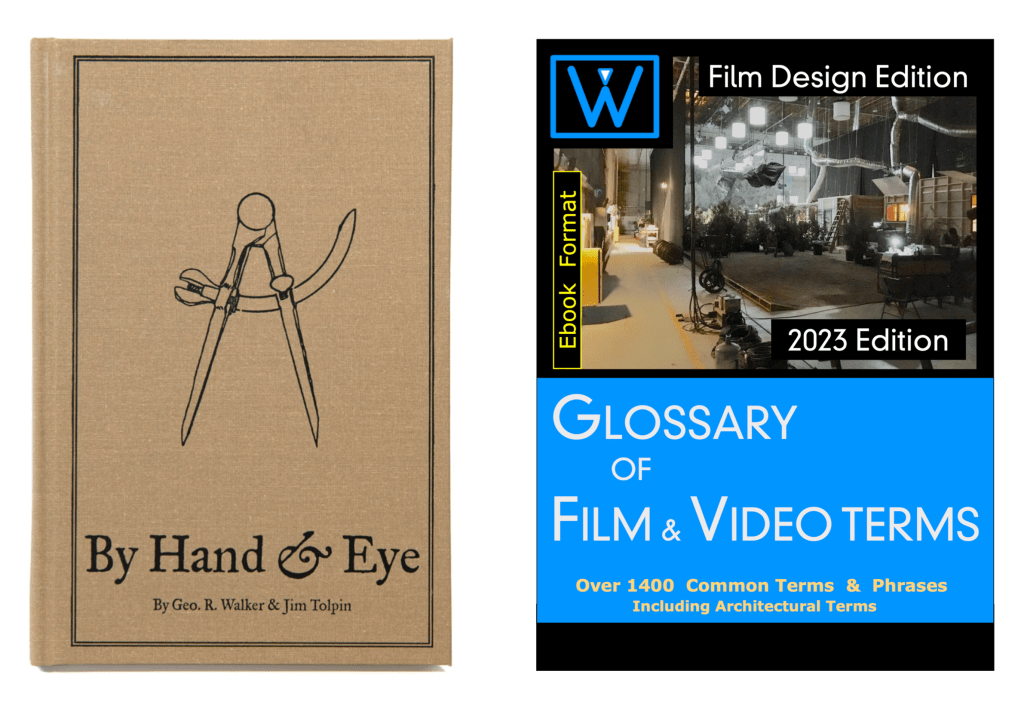
This is one of the design books on my Top Ten list. Authors Jim Tolpin and George R. Walker examine the role of proportion in design from ancient times to the present. While the emphasis is on furniture design, they show how much of the world is governed by simple proportions, noting how ratios such as 1:2; 3:5 and 4:5 were ubiquitous in the designs of pre-industrial artisans.
This is not a recipe book but a guide to a new way of looking at design through the eyes of centuries of artists.
Published by Lost Arts Press, this is just one of a whole line of fantastic books on design and hand woodworking that they offer.
You’ll receive a link after you purchase the course to download the PDF.
This new first edition is the only one of it’s kind; a film glossary created for film designers. Whether you are a novice or an industry professional, you’ll find useful information in this book that doesn’t exist in any other film glossary,. As well as nearly 1500 up-to-date terms on production, cameras, crew positions, post-production, legal aspects, stage equipment, and industry slang, there are hundreds of entries on architecture, hardware, set construction, and more.
The 2023 Ebook is due to be available in mid-December. Series purchasers will be the first to get the book when in becomes available and will receive a download link.
The 10-Week Course Description
This is the only time the series will be offered at this price and it will return to the normal price when the series begins on October 31.
This self-paced online series covers the fundamental skills that a Set Designer in the feature film and television industry here in Los Angeles are expected to have.
This is similar in difficulty to a one-semester graduate-level program at a university, but much of the material presented here is not covered at most colleges and is normally only available at the professional level. I’ve been developing this series for several years, basing it on classes I teach at the Art Directors Guild in Los Angeles.
Here is an outline of the material that will be covered in the series:
Week 1 – The Basics
Standard drafting conventions and symbols for set construction drawings. Set construction: typical flat construction techniques and variations.
Week 2 – Cameras & Optics
Understanding basic camera and lens terms: aspect ratios, focal length, depth of field, sensor sizes, exposure, stage lighting, using camera angle templates.
Scaling from photographs and artwork: calculating dimensions, understanding picture perspective and allowing for lens distortion.
Week 3 – Analyzing the Script / Reference Materials
How to break down a script for set design; using storyboards; techniques for estimating drawing time schedules.
References: using online, printed, and survey photo references; building a reference library on a budget.
Week 4 – Working Drawings
Step-by-step directions on creating proper construction drawings: plans and elevations; details, full-size details, and digital cut files; reflected ceilings and furniture plans; stage spotting plans, and director’s plans.
Week 5 – Door & Window Details
Diagrams and explanations of door and window construction and various adaptations for stage sets; creating accurate-looking period reconstructions; understanding, using, and sourcing hardware.
Week 6 – Stairways
The fundamentals of stair design: types of stairs, stair construction, how the choice of stair type affects design, and designing elliptical stairs.
Week 7 – Mouldings & Staff Elements
Understanding and using the Classical Orders of architecture; the proportions of mouldings based on style type; using a moulding catalog and creating built-up moulds.
Using plaster staff and compo elements in a set; designing with brick skins and textured surfaces.
Week 8 – Backings, Special Effects, & Visual Effects
Using painted and photo backings: The advantages and drawbacks of various types; creating custom backings; how to calculate correct placement distance from the set.
Special effects considerations: replicating fire, water, and wind effects; understanding legal requirements for special effects work on a sound stage; dealing with practical fireplaces.
Visual effects work: shooting with green or blue screens; using LED walls or volumes.
Week 9 – Backlots & Location Surveys
Shooting on studio backlots; shooting on location; proper surveying techniques; assembling a personal survey tool kit.
Week 10 – Physical Models
The advantages of physical study models; determining model scales; various model types and construction techniques.
Class Materials & Videos
Each week there will be tools, charts, and reference material to download as well as video instruction to help you do the exercises and create your portfolio drawings.
Along with the classes, you’ll have access to a private chat area that is only available to students of the series and alumnae who have taken courses previously. Here you’ll be able to meet other designers, discuss class material, get advice on your career, and exchange ideas and experiences from both the classes and real-world entertainment jobs.
Prerequisites:
– You must know how to draft. Drafting ability is essential to effectively completing the course and ending up with a set of professional quality working drawings. I’ll be offering a course on drafting later in 2022 to fulfill this prerequisite.
– Be familiar with CAD software – You are free to use any CAD software you are familiar with. Using software that you are still learning may make the lessons more challenging than you can handle. There is no standard drawing software in the entertainment industry as far as the Art Department is concerned. There are preferences among certain designers but one aspect of the job is a need to create files that can be used by many different other programs. 3D modeling won’t be required for any of the class projects but feel free to work that way if that is part of your usual design process.
There is a 14-day money-back guarantee from the time you begin the series if you change your mind. If you’re unsure about whether the series is right for you, you can schedule a free 15-minute discovery call to talk with me and I’ll be happy to answer any questions you might have.
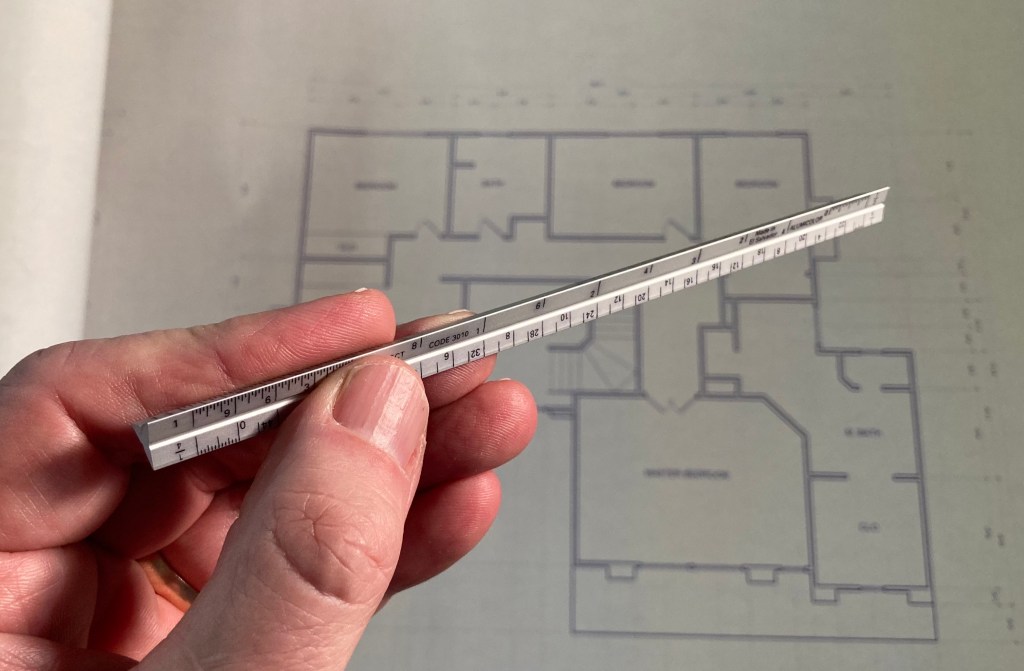
A full-size triangular architects scale isn’t the handiest thing to carry around with you.
I have those miniature versions, the cute ones that are about 6″ long and require a magnifying glass to be sure you’re reading them correctly.
It hurts my eyes to try to read the numbers on these things
After I nearly poked a hole in my chest from having one of these in my pocket, I looked for an alternative that might lessen the chances of a trip to the emergency room after falling on one of these.
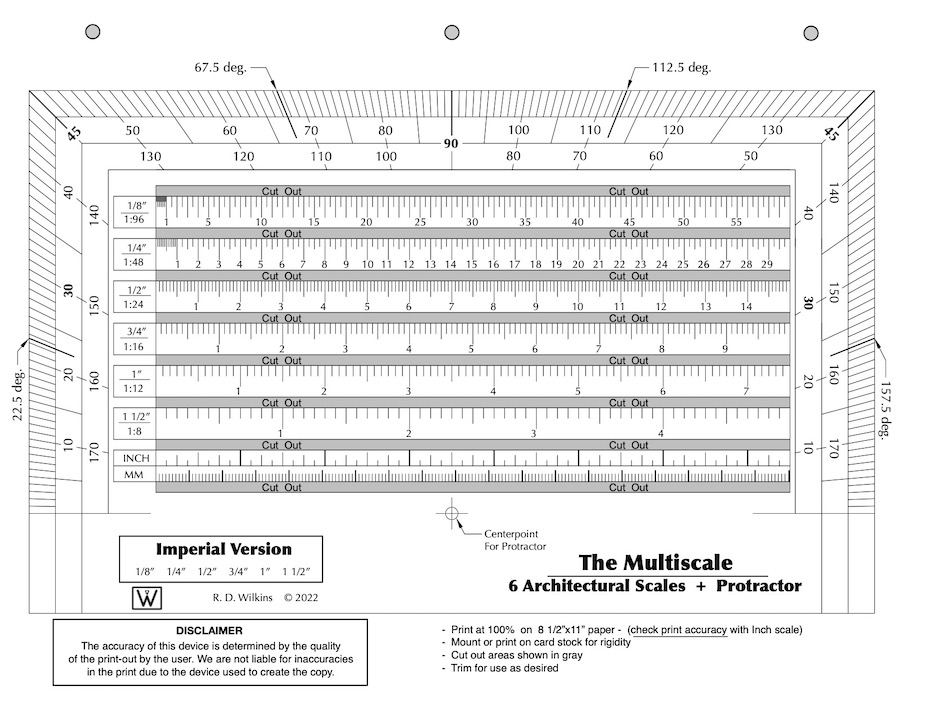
I found an 18th century drafting tool that was a combination scale and liked the concept. So, I updated and revised it to what you see here. It’s a combination of the six standard scales we use for set design and throws in a protractor as well.
A good thing about it is that it’s not engraved on brass or ivory and it fits in a binder or a book, or you can fold it up and put it in your pocket. But, it doesn’t work very well with a lot of folds in it. Best to leave it as flat as possible. Just be sure you print it out at 100%. Check it with the inch scale at the bottom against a known accurate ruler.
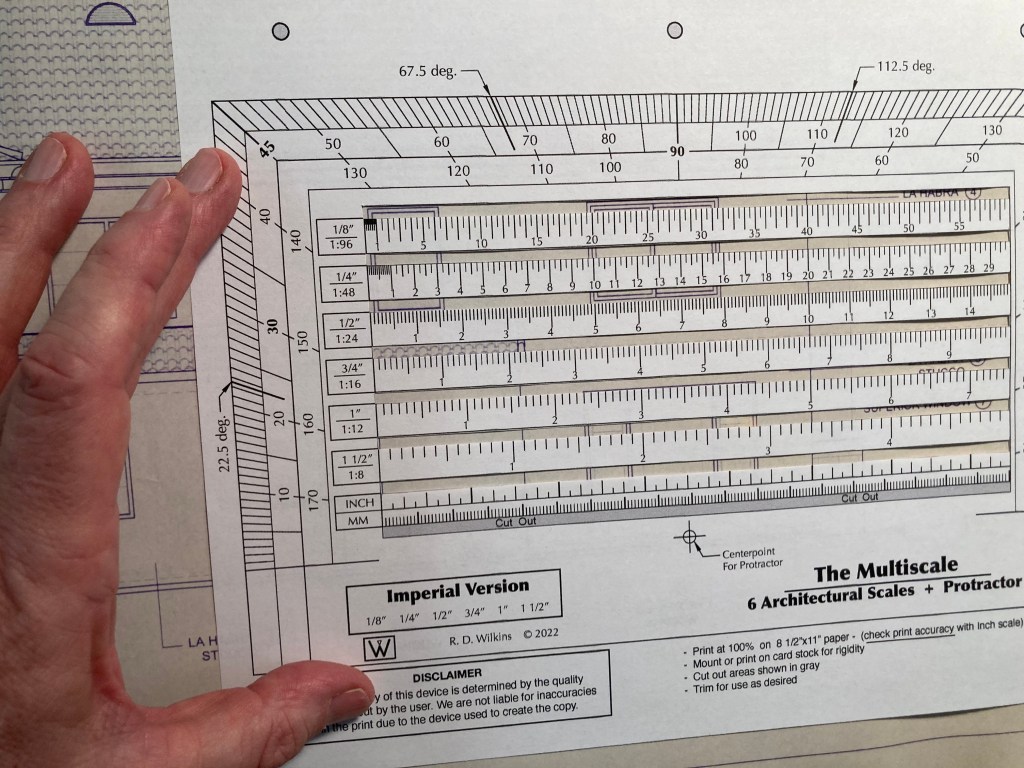
It’s better if you mound it to some thin card stock or manila folder material. Then cut out the little windows between the scales and you’re good to go. Heck, you can even have it printed on a transparency if you want.
Cut out the slots between the scales for use on drawings
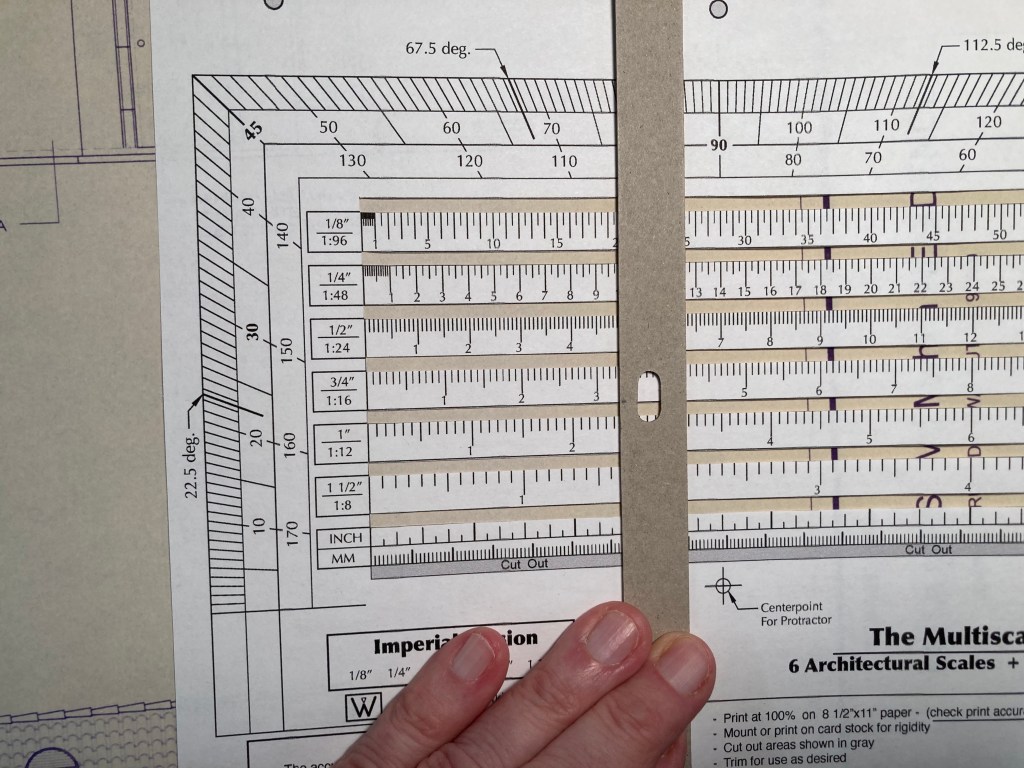
Lay a ruler or straight edge vertically on the scales and you have a direct-reading scale conversion calculator. Next week I’ll be posting the Metric version of this tool.
A straight edge aligned vertically will allow you to do quick scale conversions.
Wrand Productions announces it’s 10-Week Set Design Fundamentals Course at a Pre-Sale price of 50% off the regular price. This is the only time the series will be offered at this price and it will return to the normal price when the series begins on October 31.
This self-paced online series covers the fundamental skills that a Set Designer in the feature film and television industry here in Los Angeles are expected to have.
This is similar in difficulty to a one-semester graduate-level program at a university, but much of the material presented here is not covered at most colleges and is normally only available at the professional level. I’ve been developing this series for several years, basing it on classes I teach at the Art Directors Guild in Los Angeles.
Here is an outline of the material that will be covered in the series:
Week 1 – The Basics
Standard drafting conventions and symbols for set construction drawings. Set construction: typical flat construction techniques and variations.
Week 2 – Cameras & Optics
Understanding basic camera and lens terms: aspect ratios, focal length, depth of field, sensor sizes, exposure, stage lighting, using camera angle templates.
Scaling from photographs and artwork: calculating dimensions, understanding picture perspective and allowing for lens distortion.
Week 3 – Analyzing the Script / Reference Materials
How to break down a script for set design; using storyboards; techniques for estimating drawing time schedules.
References: using online, printed, and survey photo references; building a reference library on a budget.
Week 4 – Working Drawings
Step-by-step directions on creating proper construction drawings: plans and elevations; details, full-size details, and digital cut files; reflected ceilings and furniture plans; stage spotting plans, and director’s plans.
Week 5 – Door & Window Details
Diagrams and explanations of door and window construction and various adaptations for stage sets; creating accurate-looking period reconstructions; understanding, using, and sourcing hardware.
Week 6 – Stairways
The fundamentals of stair design: types of stairs, stair construction, how the choice of stair type affects design, and designing elliptical stairs.
Week 7 – Mouldings & Staff Elements
Understanding and using the Classical Orders of architecture; the proportions of mouldings based on style type; using a moulding catalog and creating built-up moulds.
Using plaster staff and compo elements in a set; designing with brick skins and textured surfaces.
Week 8 – Backings, Special Effects, & Visual Effects
Using painted and photo backings: The advantages and drawbacks of various types; creating custom backings; how to calculate correct placement distance from the set.
Special effects considerations: replicating fire, water, and wind effects; understanding legal requirements for special effects work on a sound stage; dealing with practical fireplaces.
Visual effects work: shooting with green or blue screens; using LED walls or volumes.
Week 9 – Backlots & Location Surveys
Shooting on studio backlots; shooting on location; proper surveying techniques; assembling a personal survey tool kit.
Week 10 – Physical Models
The advantages of physical study models; determining model scales; various model types and construction techniques.
Class Materials & Videos
Each week there will be tools, charts, and reference material to download as well as video instruction to help you do the exercises and create your portfolio drawings.
Along with the classes, you’ll have access to a private chat area that is only available to students of the series and alumnae who have taken courses previously. Here you’ll be able to meet other designers, discuss class material, get advice on your career, and exchange ideas and experiences from both the classes and real-world entertainment jobs.
Prerequisites:
– You must know how to draft. Drafting ability is essential to effectively completing the course and ending up with a set of professional quality working drawings. I’ll be offering a course on drafting later in 2022 to fulfill this prerequisite.
– Be familiar with CAD software – You are free to use any CAD software you are familiar with. Using software that you are still learning may make the lessons more challenging than you can handle. There is no standard drawing software in the entertainment industry as far as the Art Department is concerned. There are preferences among certain designers but one aspect of the job is a need to create files that can be used by many different other programs. 3D modeling won’t be required for any of the class projects but feel free to work that way if that is part of your usual design process.
There is a 14-day money-back guarantee from the time you begin the series if you change your mind. If you’re unsure about whether the series is right for you, you can schedule a free 15-minute discovery call to talk with me and I’ll be happy to answer any questions you might have.
Sometimes we assume that the way we do things in film art departments here in the United States must be completely different than in other countries, but often when we talk with our compatriots in other countries we find out that there are more similarities than differences.
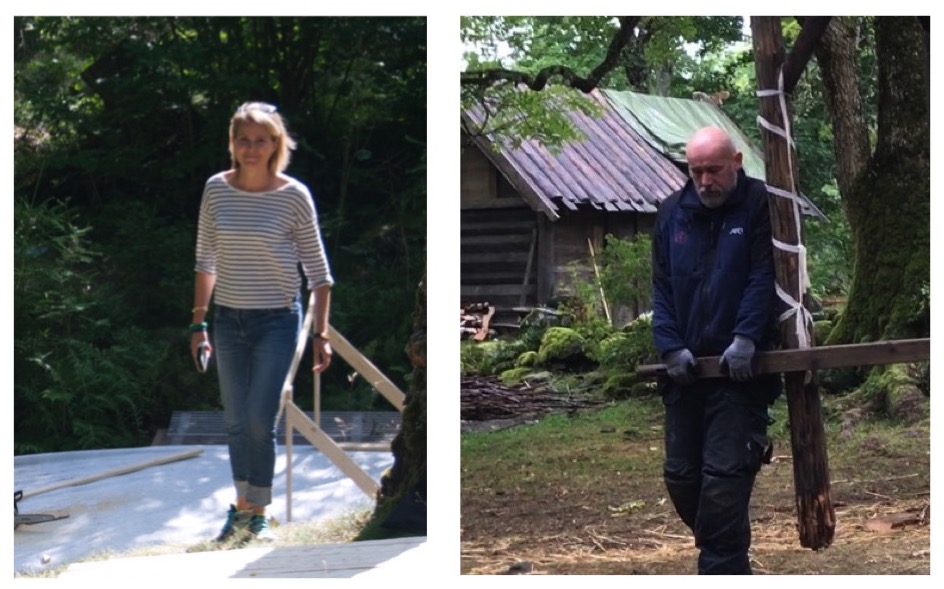
I spoke recently with Swedish Production Designer Pernilla Olsson and Construction Manager Johan Sjölin who work in the film and TV industry in Stockholm about their work process. I quickly learned that they deal with many of the same problems that we encounter here in the U.S.
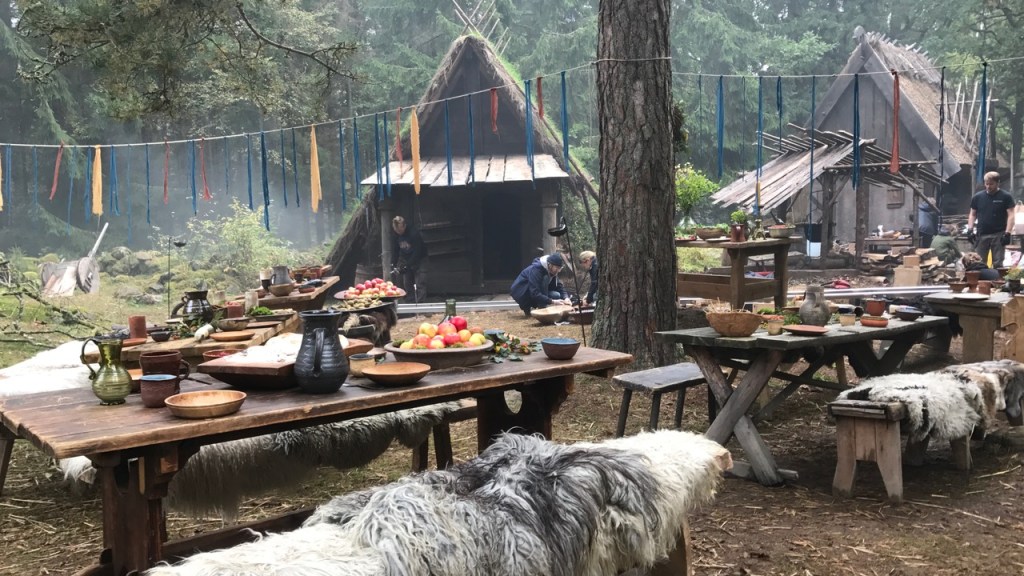
Pernilla Olsson and Johan Sjölin on the location build for the feature film Halvdan Viking (2017)
Pernilla related to me that as we often encounter here, budgets in Sweden are often stretched beyond what the production demands and the brunt of those money shortages seem to often fall hard on the Art Department. Tighter budgets not only affect the construction and set decoration budgets but limit the size of the art departments as well.
“We have a much more flexible structure compared to yours and I think this is because a larger art department in Sweden would be; the production designer, one art director, not in all productions but maybe an art director, and then two or three prop buyers who are also set decorators, store managers, and set strikers. We don’t have a standby art director so the standby props person(s) has to have the confidence to arrange things on the set as they see fit. Then we may have an intern or two, and that’s it.” Olsson said.
“The production designer or art director has to do all the drawings, all the budgeting, direct the prop buyers, do mood boards, and coordinate with the construction coordinator and the foremen. So therefore there is usually no time to do detail drawings. We usually only have time to do conceptual drawings. I will give them a drawing with overall dimensions and we will discuss any area that requires more specific dimensions but we couldn’t go into more detail in the drawings. So it’s a continuous dialogue to do the set practically but economically. The graphics are sometimes taken care of within this group or by a consultant.”
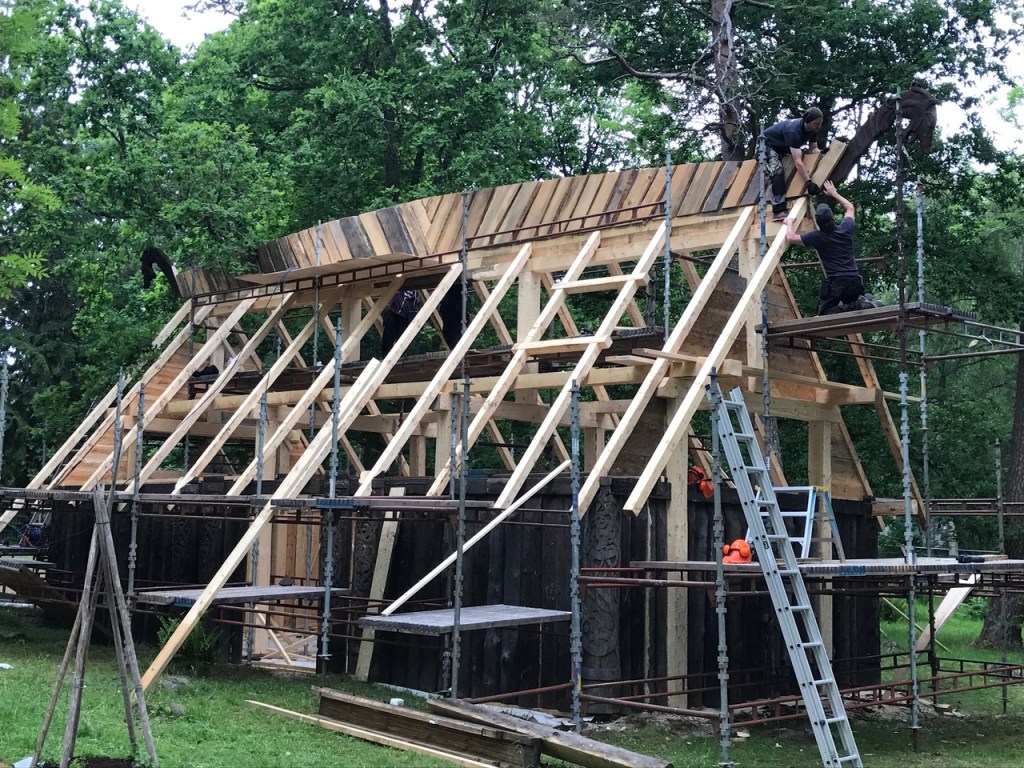
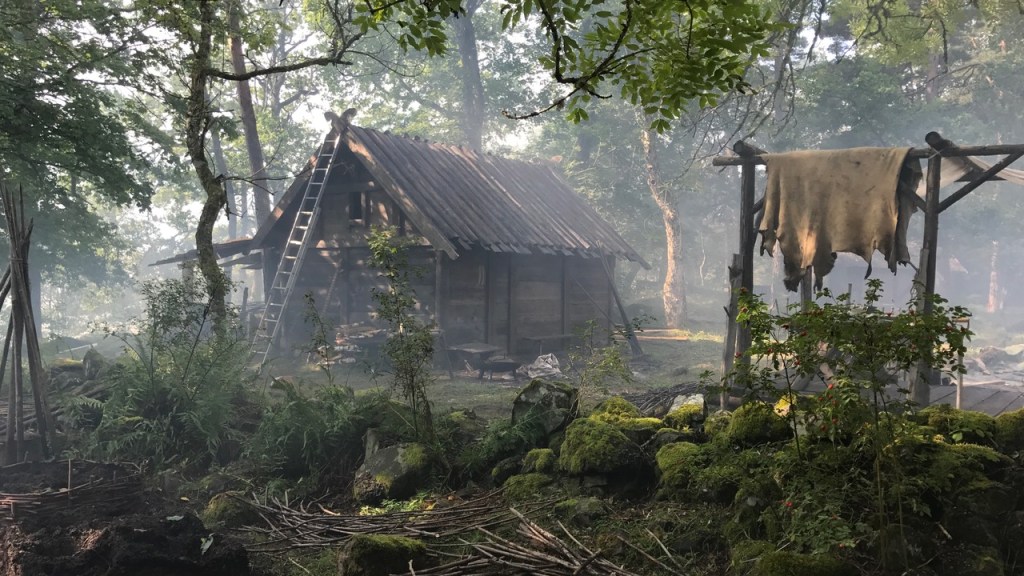
A set for Halvdan Viking (2017) under construction.Photos – P. Olsson
Olsson said she was usually frustrated to not be able to do more detailed drawings but was happy to be able to deliver what drawings she could since the art department is often trying to just keep up with the construction department, a scenario we are all too familiar with here in Los Angeles.
Johan nodded in agreement, echoing the frustration of having to start a show so soon after the designer had begun their design process. “We normally don’t get very detailed drawings from the set designers or art directors but we have a dialogue going all the time and they know what we can do and what we need and we try to find existing windows or elements that will work. No one is going to miss 10 centimeters of width if the look is the same”, he said.
“I appreciate the moments when we get the materials at the location and we can see it on the spot and we just create detail drawings on paper there in the set and it is often the most creative kind of working situation”, Sjölin continued. “The way we work is, I or my guys can always go and ask Pernilla questions. The questions don’t have to go through me or through a layer of other people. The person who needs the information can get it from her and she can talk directly to them, as long as I have a clue as to what is going on.”
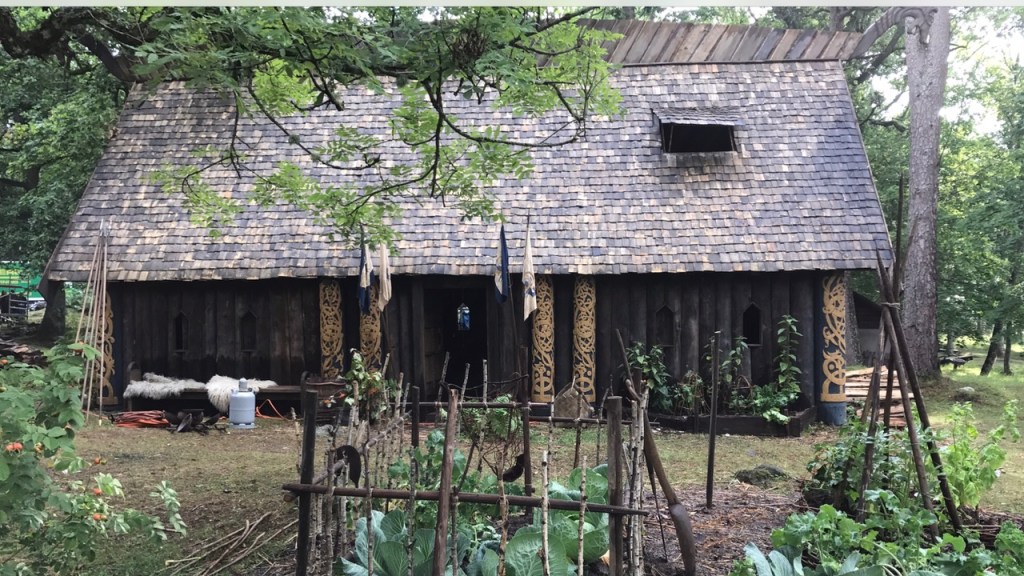
Photo – P. Olsson
Sjölin said that in some situations he may have to draw the elevations of the set if the designer doesn’t have time to do them. He said, “sometimes a production designer will hand me a rough sketch on a napkin. Build this, they’ll say, it’s 300 square meters.”
Both of them commented on the advantages and disadvantages of digital media aids, noting that the system is far from streamlined. Many art departments rely on Dropbox as an all-purpose file transfer system and people quickly become inundated with material, often making it hard to find the information that they need at that moment. This is often combined with the problem that there is often a need to look at a drawing or reference on a tiny phone screen. Sometimes, they said, the general access to the data server is often used as an excuse to not distribute print drawings at all.
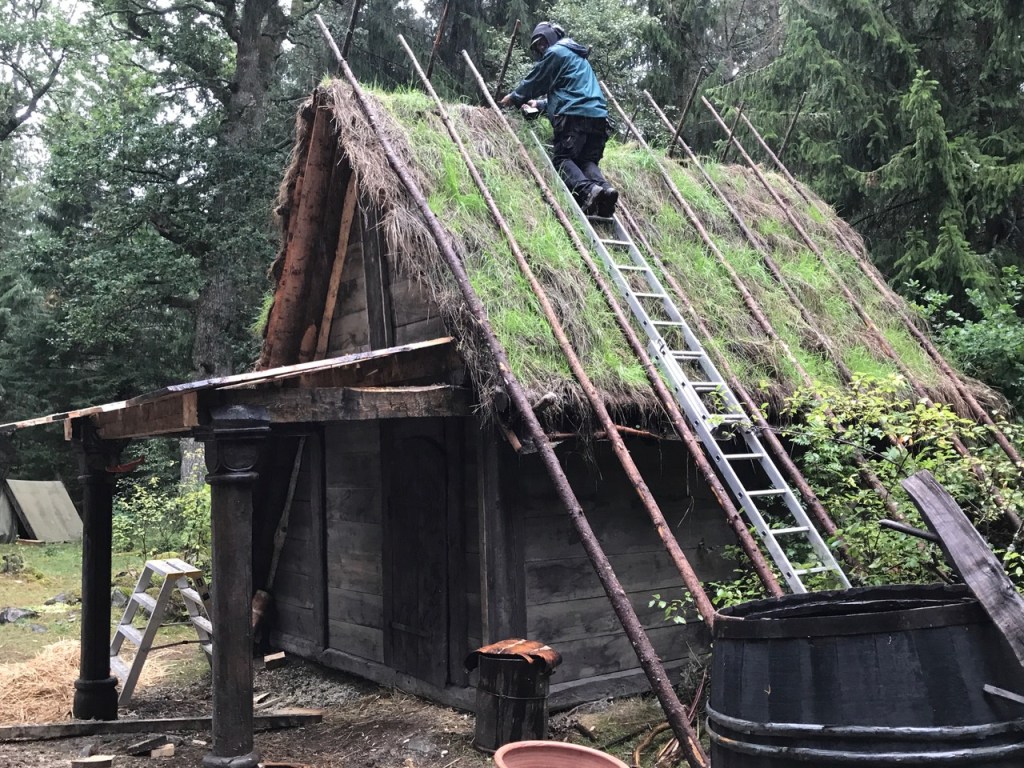
Photos- P. Olsson
“There is a sometimes a disconnect between the people sitting in front of computers and the people on the stage or on location”, Olsson said. “People often think that as soon as a document is released that the other person will have read it not realizing that the person may not have computer access or they are in a place there they don’t have wifi.”
Olsson, who studied scenography at university in Milan, said that the film industry had recently lost work to other countries because of a lack of tax incentives, notably, The Game Of Thrones. “There are not as many stage shoots as in past years or as much stage construction. Now new people don’t have a way of getting the experience to learn about stage work because there is so much less sound stage work in Sweden.”
Sjölin agreed with her. “There are not that many new people coming into the business these days as craftsmen, who are willing to stay and spend the time to learn the trade. That goes through the whole construction department, from welders, set and standby carpenters, set and standby painters who can do the aging and all the things a shooting company needs during a shoot. All the old knowledge is soon gone with them. That is the same with all the old carpentry tricks. We are losing that”.
Flat Construction
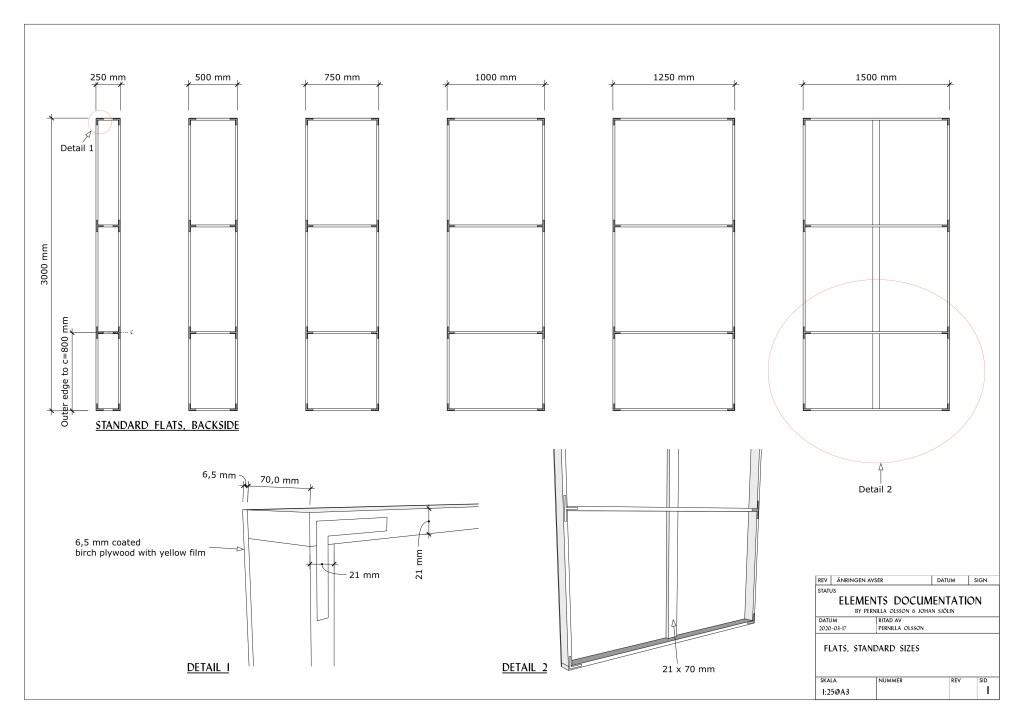
15 years ago, the Swedish film industry used stock flat sizes similar to a system we had here in Los Angeles. Sets were constructed of these stock units and when the set was struck, they were cleaned and returned to a stock shed for storage. The framing was done with the highest quality 21mm x 69mm fir and framed with Finnish birch plywood. Angle irons and T- plates were used at the corners and toggle joints for strength.
Stock Swedish flat sizes – drawing by Pernilla Olsson & Johan Sjölin
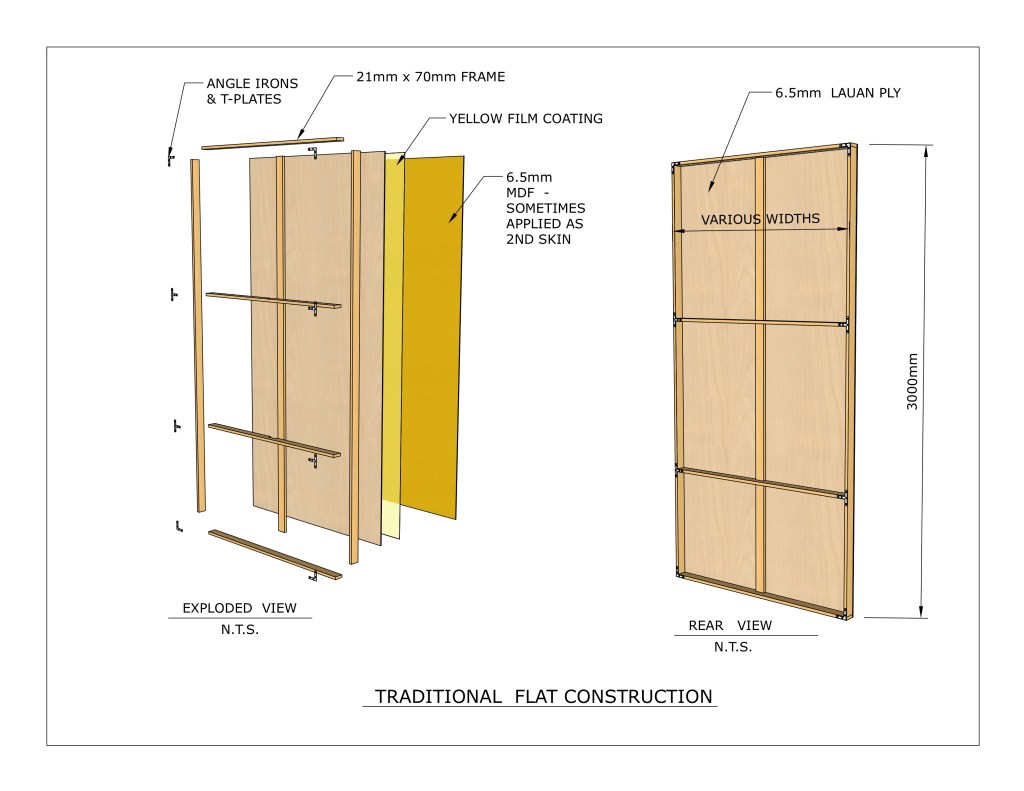
The Finnish birch ply are delivered with a yellow film applied to it, normally used for interiors in vehicles or for concrete casting. The surface is very smooth and slightly waxed. Afterwards, water was applied to soften the wallpaper or paint for removal. Sjölin said that sometimes a second skin 6.5mm MDF was stapled to the ply for painting or papering and then it was easily removed for a quick strike.
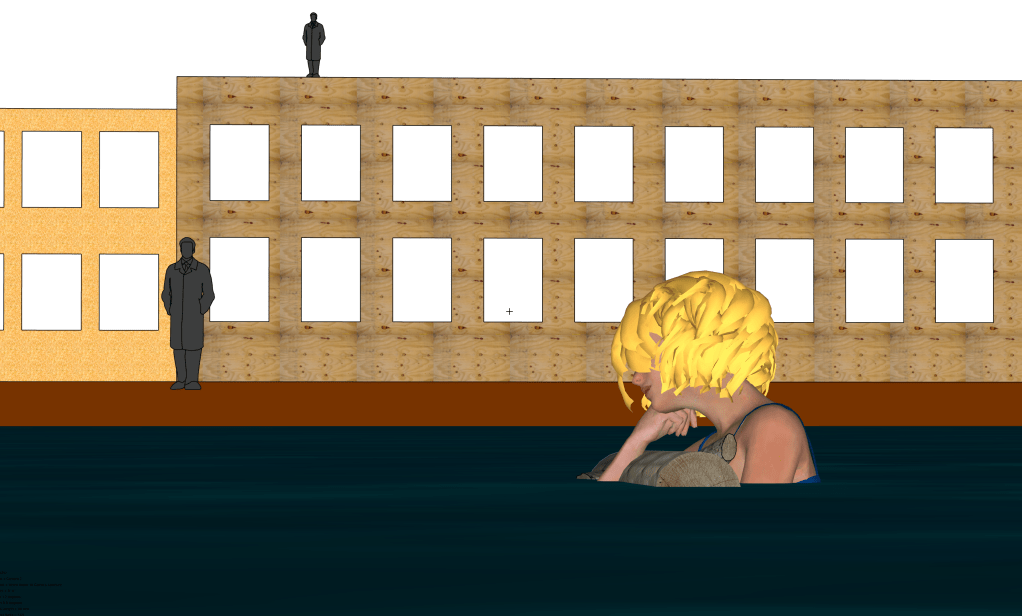
Illustration- R.D. Wilkins
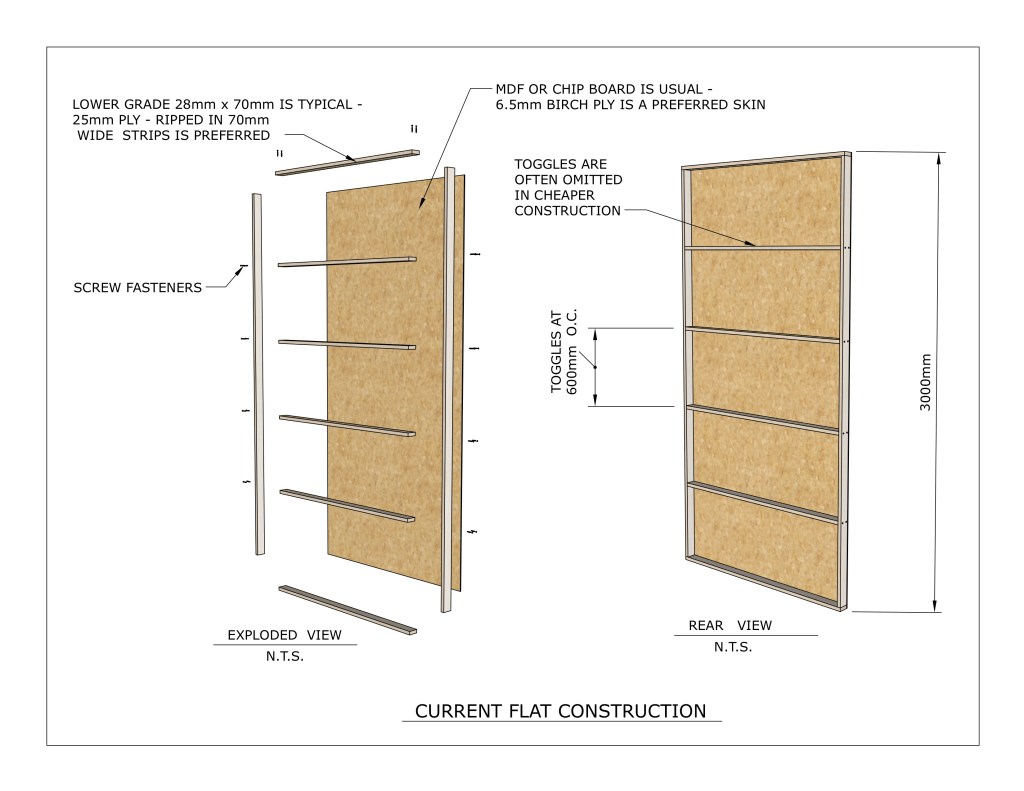
Johan said that the most noticeable differences between the traditional flats and current types are that they no longer use Lauan because of the cost and because it is made of rainforest-harvested mahogany. Currently they use 28mm x 70mm timber for the frames and chipboard or MDF for the skin. They tend to not glue the skin to the frames as they have trouble getting the flats to be straight and often omit using toggles to safe time and cost.
He prefers to use 25mm Finnish birch ply ripped to 70mm wide instead of the cheaper fir timber for the framing and prefers to use to use 6.5mm Finnish birch ply for the skins as it holds up better for TV programs that may have to last a number of seasons.
Illustration- R.D. Wilkins
Toggles are spaced at 600mm on center and the frames are constructed with screws rather than staples. “I love to use nails like the old way, but no one else does”, he said with a grin.